 |
|
 10-07-2017, 08:35 AM
|
#85
|
|
Senior Member
American Coach Owners Club
Join Date: Apr 2016
Location: North Florida
Posts: 2,474
|
I agree, I re-read a lot of it when it's added to....
__________________
1999 American Eagle
ASE med/heavy certified technician
ASE advanced diesel certified
|

|

|
 |
Join the #1 RV Forum Today - It's Totally Free!
iRV2.com RV Community - Are you about to start a new improvement on your RV or need some help with some maintenance? Do you need advice on what products to buy? Or maybe you can give others some advice? No matter where you fit in you'll find that iRV2 is a great community to join. Best of all it's totally FREE!
You are currently viewing our boards as a guest so you have limited access to our community. Please take the time to register and you will gain a lot of great new features including; the ability to participate in discussions, network with other RV owners, see fewer ads, upload photographs, create an RV blog, send private messages and so much, much more!
|
|
10-07-2017, 09:14 AM
|
#86
|
|
New to the RV World
Vintage RV Owners Club American Coach Owners Club
Join Date: Aug 2013
Location: Rochester, NY
Posts: 3,092
|
Quote:
Originally Posted by mackwrench

I agree, I re-read a lot of it when it's added to....
|
I have sent a message to JohnRR to se what we can do.
|
|
|
|
|
10-07-2017, 09:47 AM
|
#87
|
|
Senior Member
Commercial Member
Join Date: Jun 2005
Location: behind the steering wheel
Posts: 2,576
|
M &M RV ELECTRONICS repairs circuit board for rvs.
their number is 1-429-965-3014 or 1-429-965-2662
at least that is what they advertise. i have had a couple of generator control boards and a couple of norcold boards repaired there. reasonable pricing.
|
|
|
|
|
10-07-2017, 10:19 AM
|
#88
|
|
Senior Member
American Coach Owners Club
Join Date: Apr 2016
Location: North Florida
Posts: 2,474
|
Quote:
Originally Posted by azpete
M &M RV ELECTRONICS repairs circuit board for rvs.
their number is 1-429-965-3014 or 1-429-965-2662
at least that is what they advertise. i have had a couple of generator control boards and a couple of norcold boards repaired there. reasonable pricing.
|
Thanks for the info, I'm going to give them a call...there in DeLand, Florida for the winter and not too awful far from me.
I hopeful they can be repaired.
I had sent my controller and touch pad to a company called Global Electronics in Atlanta, after sending them back and forth 3 times, and $700 they admitted they couldn't repair them...then took me 6 months to get my money back and then only after I got my CC company involved. Bad experience all the way around...
__________________
1999 American Eagle
ASE med/heavy certified technician
ASE advanced diesel certified
|
|
|
|
|
10-08-2017, 02:33 PM
|
#89
|
|
New to the RV World
Vintage RV Owners Club American Coach Owners Club
Join Date: Aug 2013
Location: Rochester, NY
Posts: 3,092
|
|
|
|
|
|
10-19-2017, 08:04 AM
|
#90
|
|
Senior Member
American Coach Owners Club
Join Date: Jan 2014
Location: Palm Beach Gardens FL
Posts: 601
|
This is a followup to post number #80.
In that post I removed the complete leveler hydraulics and found the pump locked up -- with a broken gear inside. I ordered a new pump from Lippert (about $400) I believe they call it a pump rebuild kit, but it is a complete new pump.
The new pump is similar but slightly different. The old pump was both held together and clamped to what I will call the Hydraulic Distribution Plate
(power Gear does not show a separate part/name for this -- just Motor/Pump Assembly.) by about five long bolts. The new pump is held together by four shorter bolts and then two longer bolts that hold the pump itself to the Plate. I assume this keeps the pump together better and may minimize the potential for a broken pump gear (the issue mine had, and others have had)
Once assembled I tried to put the entire assembly (500453) up into the RV and attach it to the bracket there. Unfortunately this is very heavy and was difficult to hold and get a bolt started at the same time. I removed the heavy but small motor, and was then able to get the assembly into place. Then installed the motor. Hooking up the five electrical connections was easy, but the three hydraulic hoses (three levelers system) were a nuisance to get reconnected and not cross threaded.
Once connected I refilled the TWO gallon tank with ATF. I then tested the unit. Fortunately I had all connections correct and each worked with the proper button on the control pad (mine is one of the older 500105 pads)
On this system there is no need to bleed the hydraulics. Any air in the lines is pumped into the legs. Then the air rises to the top. When the legs are retracted into the up position the air is then pushed back into the tank. The next time used just hydraulic fluid is pumped into the leg. Just remember to refill the tank to the proper level again.
I have now tested mine at least a half dozen times including going to maximum extension. Next week we travel to TN to meet a group of RV'ers -- that will be the real test as where we are staying does not have level sites.
thx -- Dale
|
|
|
|
|
12-01-2017, 07:43 PM
|
#91
|
|
Member
Join Date: Nov 2017
Location: Buckeye, AZ
Posts: 59
|
powergear
Hello, I too am having trouble getting the levelers to work. It looks like someone did a chop on the wiring under the circuit board. Then added a rocker switch to the unit to engage the pump motor. The rocker switch does get the pump motor to work but it sounds like it is free wheeling?? Not seeming to build any pressure. Meanwhile. the arrows do nothing, no legs go down at all.
I was thinking of putting power to the circuit board where it was chopped to see if that might activate the down buttons on the board. But whoever did this might of did this chop for a reason?? I don't want to make it worse . Any light on this will help.
1998 National tradewinds, 300 cat 6 speed Alison, 36 ft.
In all the info above, no one has explained what and how these system works., like i turn the key to on, then hit the on button, then do I press or press an hold the down button. What is the button activating? A solenoid,
Am I giving the solenoid a connection to open a valve to let the fluid go to the leg? Or is the solenoid pushing a valve to let the fluid go to the leg.
I have a 4 leg leveler, but the front two work together. Then the two in the back are suppose to go down together too. Then I am able to level left to right wit just the back two legs
All help will be gladly taken Thanks Rudy
|
|
|
|
|
12-01-2017, 11:39 PM
|
#92
|
|
Senior Member
Join Date: Jan 2015
Location: Montreal
Posts: 1,079
|
I did not follow this thread, but in case you don't know, the parking brake must be depress for the levelling system to get power.
Also, the 4 solenoid valves work on 12v. They all have a two wires connector. If you put 12v on the connector it will open the valve. The wires have no preference for + or -. If the pump work with a switch then one could add a switch on each solenoid valve to operate the system without a control panel. I am no expert. One of the four solenoid valve is to release all legs. One is to raise the two front legs that work like twins. The two others are to raise the rear legs. The solenoid valve is simply a plastic coil that is inserted over the body of the valve. Each coil has a two-wires about 3inches long and then there is the connector. Unplug it to test each valve. The four solenoid valves are on top of the system.
I suppose we could get rid of the control board-panel with the use of 5 switchs. One switch for the pump and four for the solenoid valves. It would also be possible to replace the control board-panel with four switch since each switch could activate the pump and one valve at the same time.
Here is a solenoid valve:
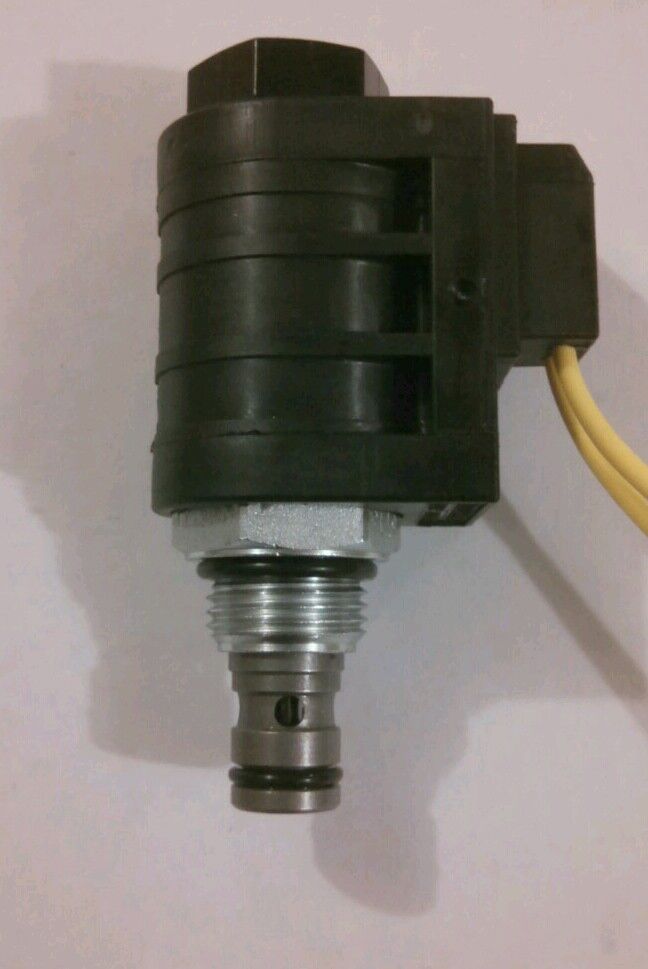
There is only one big nut at the end of the valve to remove to be able to remove the coil from the valve.
__________________
Carl
Berkshire Forest River 390BH 2011, Cummins 6.7 ISB 340, Freightliner XC Lowered Rail
|
|
|
|
|
12-05-2017, 12:39 PM
|
#93
|
|
Member
Join Date: Nov 2017
Location: Buckeye, AZ
Posts: 59
|
Rudy
Hi there cbilodeau, thank you for your input. I see what you are saying, I was thinking the same thing. But, if I activate the solenoid, that will raise the 2 front ones fine, then the 2 back ones are separate, left & right. Now how would retract each of them individually? Same with the 2 front ones together? I will try to post a pic of my pump & solenoids.
How do I post a pic like you did on that solenoid?
|
|
|
|
|
12-05-2017, 12:42 PM
|
#94
|
|
Member
Join Date: Nov 2017
Location: Buckeye, AZ
Posts: 59
|
Rudy
Wow, I did it but don't know how I did it.
Anyway, You can see the 3 solenoids and one underneath the 3?
|
|
|
|
|
12-05-2017, 12:50 PM
|
#95
|
|
Registered User
Ford Super Duty Owner
Join Date: Nov 2014
Location: NW Ohio
Posts: 7,114
|
cbilodeau nailed it.
If you wanted to make this a strictly manual system, you need 5 switches.
* pump ON/OFF
* Front leg solenoid
* rear left leg solenoid
* rear right leg solenoid
* retract vent solenoid
To extend, you turn the pump on and then hold any of the three leg buttons.
To retract, you will hold the retract button and any of the three leg buttons. (pump off)
In your photo, the solenoids on the top are the leg solenoids. The one on the bottom is the retract vent solenoid.
|
|
|
|
|
12-05-2017, 07:14 PM
|
#96
|
|
Senior Member
Join Date: Jan 2015
Location: Montreal
Posts: 1,079
|
Quote:
Originally Posted by rudedawg1951
Hi there cbilodeau, thank you for your input. I see what you are saying, I was thinking the same thing. But, if I activate the solenoid, that will raise the 2 front ones fine, then the 2 back ones are separate, left & right. Now how would retract each of them individually? Same with the 2 front ones together? I will try to post a pic of my pump & solenoids.
How do I post a pic like you did on that solenoid?
|
I suppose that when you activate the fourth solenoid, all the legs will retract all together. There is no need to activate the pump since the gravity will do the work.
__________________
Carl
Berkshire Forest River 390BH 2011, Cummins 6.7 ISB 340, Freightliner XC Lowered Rail
|
|
|
|
|
12-05-2017, 07:16 PM
|
#97
|
|
Senior Member
Join Date: Jan 2015
Location: Montreal
Posts: 1,079
|
Quote:
Originally Posted by Waiter21
cbilodeau nailed it.
If you wanted to make this a strictly manual system, you need 5 switches.
* pump ON/OFF
* Front leg solenoid
* rear left leg solenoid
* rear right leg solenoid
* retract vent solenoid
To extend, you turn the pump on and then hold any of the three leg buttons.
To retract, you will hold the retract button and any of the three leg buttons. (pump off)
In your photo, the solenoids on the top are the leg solenoids. The one on the bottom is the retract vent solenoid.
|
In fact with only four switch you should be ok since for the Front, left and right the switch can activate the solenoid and the pump at the same time.
I don't think you need to activate the pump when your retract the legs.
__________________
Carl
Berkshire Forest River 390BH 2011, Cummins 6.7 ISB 340, Freightliner XC Lowered Rail
|
|
|
|
|
12-06-2017, 06:19 AM
|
#98
|
|
Registered User
Ford Super Duty Owner
Join Date: Nov 2014
Location: NW Ohio
Posts: 7,114
|
Quote:
|
I don't think you need to activate the pump when your retract the legs.
|
Correct. The springs in the legs will pull them up. HOWEVER, I don't think you want the leg switches also activating the pump, because you'll need to energize the leg solenoid to get it to retract. I need to verify this. I can pull the fuse to one of the legs and tell the system to RETRACT ALL.
To extend, you energize the leg(s) and the pump.
To retract, you energize the leg(s) and the retract solenoids. When the system does a retract, it energizes the three leg solenoids and the retract solenoid.
NOTE - I can see where you could wire the "retract" switch so that if its not pressed, the pump would run when a leg switch is pressed. if the "retract" switch is pressed, it would energize the retract solenoid and the pump wouldn't run when a leg is pressed.
Let me put a schematic together. ( I'd probably do this if my control panel or controller failed) NOTE - A simple switch system would not incorporate the safety features that are found in the existing system.
A small PLC (Programmable Logic Controller) could be easily programmed to do all these features. I did this for an airplane landing gear system many years ago..
|
|
|
|
|
|
|
Currently Active Users Viewing This Thread: 1 (0 members and 1 guests)
|
|
|
 Posting Rules
|
You may not post new threads
You may not post replies
You may not post attachments
You may not edit your posts
HTML code is Off
|
|
|
|
 » Recent Discussions
 |
|
|
|
|
|
|
|
|
|
|
|
|
|
|
|
|
|
|
|
|
|
|
|
|
|


 Linear Mode

