 |
|
 11-23-2016, 07:37 AM
|
#15
|
|
Member
Join Date: Aug 2011
Location: SJV California
Posts: 34
|
Foot switch
Ok Guys, with all this talk about the pacbrakes it's got me wanting to make some changes. I have been wanting to replace the foot switch on my 99 Windsor with a rocker switch. Where can I find information on how to do this.
__________________
Kent McNiece
1999 Windsor 40SO
2 kids and wife.
|

|

|
 |
Join the #1 RV Forum Today - It's Totally Free!
iRV2.com RV Community - Are you about to start a new improvement on your RV or need some help with some maintenance? Do you need advice on what products to buy? Or maybe you can give others some advice? No matter where you fit in you'll find that iRV2 is a great community to join. Best of all it's totally FREE!
You are currently viewing our boards as a guest so you have limited access to our community. Please take the time to register and you will gain a lot of great new features including; the ability to participate in discussions, network with other RV owners, see fewer ads, upload photographs, create an RV blog, send private messages and so much, much more!
|
|
11-23-2016, 07:47 AM
|
#16
|
|
Registered User
Monaco Owners Club
Join Date: Oct 2009
Location: Varies Depending on The Weather
Posts: 8,517
|
Myron,
Thanks for sharing your experience!
One other thing to make sure is that the zerks on your auto slack adjusters get lubricated so they will adjust properly when using the service brakes normally. Also, any of the auto slack adjusters can be adjusted manually so it pays to inspect them periodically.
I've been using Speedco for the past 6 years and some of their locations are great but some are not so great when it comes to performing the zerk lube correctly.
I always have to review the process at each location to ensure that they are doing it correctly.
Dr4Film ----- Richard
|
|
|
|
|
11-23-2016, 08:06 AM
|
#17
|
|
Registered User
Join Date: Nov 2016
Posts: 520
|
Quote:
Originally Posted by RustyTools

I had installed one of the evidently now-defunct (sadly, I couldn't find any current contact info for him), 'Homer Hawks BrakeSwitch' devices on my '06 Endeavor.
It removed the requirement to 'feather' the go-pedal when wanting to coast without using the exhaust-brake - take your foot off the go-pedal and you coast. It will also engage and latch the exhaust-brake when tapping the brake pedal, unless you depress the go-pedal again and it releases the exhaust brake.
As I said, unfortunately he doesn't seem to offer the product any more. It worked great and was quite simple.
|
Quote:
Originally Posted by Dr4Film
Homer retired and closed down his Brake Switch business some time ago.
However, someone on this forum had talked to Homer before retiring and basically got enough information from Homer to draw out his own wiring diagram of the same exact device.
It was in PDF file format and I believe that I downloaded it at the time for later review but never got back to it. I have to look around my Laptop to see if I still have it. If I do I will post it on this thread.
Dr4Film ----- Richard
|
RustyTools & Dr4Film
Sad that the "Brakswitch" by Homer Hawks is no longer available.
However on most Cat powered coaches, with a Pacbrake and MD3060 Allison transmission, the "Exhaust Brake Mode" of the "Cruise Control Parameters", (in the ECU), can be electronically programed at any Cat service shop into "COAST MODE"..(which results in the same improvement RustyTools described).
Not sure whether that can be done on Cummins powered coaches.
|
|
|
|
|
11-23-2016, 08:47 AM
|
#18
|
|
Registered User
Monaco Owners Club
Join Date: Oct 2009
Location: Varies Depending on The Weather
Posts: 8,517
|
Quote:
Originally Posted by RustyTools
I had to do a search on here to remember Homer's name, it's been so long. Good guy! He was very helpful.
Richard - Would be greatly appreciated if you could dig up his files, and post it. I too like to keep a library of things on the coach (and things that break... or brake as it were  ).
Many thanks |
I was able to locate the document written by Jerry Donofrio who is a member here on iRV2.com.
Dr4Film ----- Richard
|
|
|
|
|
11-23-2016, 10:29 AM
|
#19
|
|
Senior Member
Join Date: Aug 2014
Location: Pittsburgh, PA
Posts: 286
|
Ray, it occurs to me that even if the other plug isn't there you would just need to cut the two wires going to the cruise control. They were labeled on mine and the only difference in wiring was the plug I swapped didn't have those two wires in it. They are on the end of the plug if that helps.
__________________
Larry & Jean
2021 Jayco Melbourne Prestige 24RP

|
|
|
|
|
11-23-2016, 01:35 PM
|
#20
|
|
Senior Member
Monaco Owners Club
Join Date: Feb 2008
Posts: 2,179
|
 Thank you, Richard!! 
Looking over the diagram again, I am reminded at how simple of a concept Homer used to create something that is so useful. I've even forgotten that I have one til you mentioned it. It's one of those things that is pretty-much taken for granted, because it works and because it works as it should. I realize it's a matter of personal choice as to what one prefers - to me this just seemed 'right' in its operation.
It also brings up something else... when I first ran across the BrakeSwitch, I realized it was so simple in execution that I could easily build one out of stuff in my spare-parts box. I also realized that Homer most likely put a lot of effort into the initial build-up, and therefore should be entitled to his 'fair-share'. Seemed like the Switch was selling for something like $50-$75 (I forgot the exact selling price) versus maybe $10 in parts, but it was an easy no-brainer to pony-up and buy one from him and fairly compensate him for all his work.
...Sorry, way off-topic. My apologies. 
|
|
|
|
|
11-23-2016, 03:38 PM
|
#21
|
|
Senior Member


Join Date: Jun 2011
Location: FL
Posts: 11,452
|
Richard, I have done all but one grease job on my chassis and I am very maticulous. The last one was with a small wand connected to my electric pressure washer. Cleaned before and after with the little handle versus trying to use a long wand. I am type A when it comes to inspecting the rv top to bottom and inside and out.
I believe the front slack adjuster had not tightened up properly. I'm just guessing because they should have smelled from years of previous experiences.
I just ordered a torque multiplier so I can remove the wheels myself and get in there for a real inspection.
Have a great Thanksgiving.
__________________
Certified Senior Electronic Technician, Telecommunications Engineer, Telecommunications repair Service Center Owner, Original owner HR 2008
.
|
|
|
|
|
11-23-2016, 03:41 PM
|
#22
|
|
Registered User
Monaco Owners Club
Join Date: Oct 2009
Location: Varies Depending on The Weather
Posts: 8,517
|
Quote:
Originally Posted by RustyTools
Thank you, Richard!!
Looking over the diagram again, I am reminded at how simple of a concept Homer used to create something that is so useful. I've even forgotten that I have one til you mentioned it. It's one of those things that is pretty-much taken for granted, because it works and because it works as it should. I realize it's a matter of personal choice as to what one prefers - to me this just seemed 'right' in its operation.
It also brings up something else... when I first ran across the BrakeSwitch, I realized it was so simple in execution that I could easily build one out of stuff in my spare-parts box. I also realized that Homer most likely put a lot of effort into the initial build-up, and therefore should be entitled to his 'fair-share'. Seemed like the Switch was selling for something like $50-$75 (I forgot the exact selling price) versus maybe $10 in parts, but it was an easy no-brainer to pony-up and buy one from him and fairly compensate him for all his work.
...Sorry, way off-topic. My apologies.
|
No worry about being off-topic. Plus I totally agree in that Homer did a great job in putting the unit together. Hopefully he is enjoying his retirement.
Although, I remember reading one thread about a VERY irate customer who claimed that he followed Homer's instructions exactly and as a result he had a catastrophic failure of his engine ECM which burned out and that device is very expensive to replace. Thread is below.
Brake Switch - Beware!
Dr4Film ----- Richard
|
|
|
|
|
11-23-2016, 04:33 PM
|
#23
|
|
Senior Member
Monaco Owners Club
Join Date: Feb 2008
Posts: 2,179
|
Awww, jeez! Now I remember about all nastiness, and I am soooo sorry that I brought up the entire episode again  . Please, let's move on.

I'll try to keep my mouth shut in the future.
|
|
|
|
|
11-24-2016, 09:39 AM
|
#24
|
|
Senior Member/RVM #90
Monaco Owners Club
Join Date: Nov 2002
Location: Columbus, MS
Posts: 54,785
|
Quote:
Originally Posted by tankcj
When I'm on flat ground at highway speed I turn my exhaust brake off. I really don't want the exhaust brake to activate every time I have to ease up on the throttle.
|
That's the reason I installed Homer's BrakeSwitch! The exhaust brake only activates when I press the brake pedal! 
__________________
Joe & Annette
Sometimes I sits and thinks, sometimes I just sits.....
2002 Monaco Windsor 40PBT, 2013 Honda CRV AWD

|
|
|
|
|
11-24-2016, 09:42 AM
|
#25
|
|
Senior Member/RVM #90
Monaco Owners Club
Join Date: Nov 2002
Location: Columbus, MS
Posts: 54,785
|
Quote:
Originally Posted by Dr4Film
Myron,
Thanks for sharing your experience!
One other thing to make sure is that the zerks on your auto slack adjusters get lubricated so they will adjust properly when using the service brakes normally. Also, any of the auto slack adjusters can be adjusted manually so it pays to inspect them periodically.
I've been using Speedco for the past 6 years and some of their locations are great but some are not so great when it comes to performing the zerk lube correctly.
I always have to review the process at each location to ensure that they are doing it correctly.
Dr4Film ----- Richard
|
Richard, I didn't know about the zerks. Can you tell me where they are so I can tell Speedco? Thanks!
Joe
__________________
Joe & Annette
Sometimes I sits and thinks, sometimes I just sits.....
2002 Monaco Windsor 40PBT, 2013 Honda CRV AWD
|
|
|
|
|
11-24-2016, 09:46 AM
|
#26
|
|
Senior Member
Newmar Owners Club
Join Date: Oct 2009
Posts: 10,310
|
Quote:
Originally Posted by MSHappyCampers
Richard, I didn't know about the zerks. Can you tell me where they are so I can tell Speedco? Thanks!
Joe
|
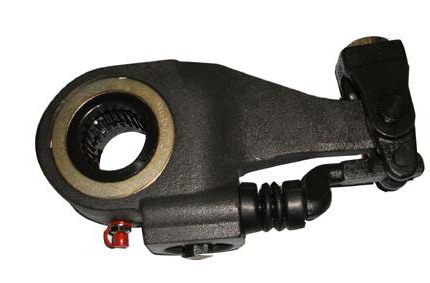
The Grease fitting(Zerk) is right on the front of the slack adjusters Joe...........the grease fitting in this picture had a red cap on the fitting.
__________________
2012 Essex 4544 2011 Jeep JK, M&G Braking, 2014 MTI 27' Hog Hauler, Wireless brake control, 2006 Ultra & 1989 Springer, 2003 Harley-Davidson
FLHR Road King Anniversary
|
|
|
|
|
11-24-2016, 09:51 AM
|
#27
|
|
Senior Member/RVM #90
Monaco Owners Club
Join Date: Nov 2002
Location: Columbus, MS
Posts: 54,785
|
Quote:
Originally Posted by palehorse89
The Grease fitting(Zerk) is right on the front of the slack adjusters Joe...........the grease fitting in this picture had a red cap on the fitting.
|
Are these slack adjusters easily seen at each wheel?
__________________
Joe & Annette
Sometimes I sits and thinks, sometimes I just sits.....
2002 Monaco Windsor 40PBT, 2013 Honda CRV AWD
|
|
|
|
|
11-24-2016, 09:57 AM
|
#28
|
|
Senior Member
Newmar Owners Club
Join Date: Oct 2009
Posts: 10,310
|
Quote:
Originally Posted by MSHappyCampers
Are these slack adjusters easily seen at each wheel?
|
Yes, they are Joe, right on the inside of each wheel and they are linked to the brake chamber........you will see the air hose going to the brake chamber. Here is a photo of one........kinda dirty, and you can see the grease fitting on the front of the slack adjuster.......right below the 9/16" bolt head for "Manual adjusting".

__________________
2012 Essex 4544 2011 Jeep JK, M&G Braking, 2014 MTI 27' Hog Hauler, Wireless brake control, 2006 Ultra & 1989 Springer, 2003 Harley-Davidson
FLHR Road King Anniversary
|
|
|
|
|
|
|
Currently Active Users Viewing This Thread: 1 (0 members and 1 guests)
|
|
|
 Posting Rules
|
You may not post new threads
You may not post replies
You may not post attachments
You may not edit your posts
HTML code is Off
|
|
|
|
 » Recent Discussions
 |
|
|
|
|
|
|
|
|
|
|
|
|
|
|
|
|
|
|
|
|
|
|
|
|
|


 Linear Mode

