 |
|
 03-12-2010, 12:30 PM
|
#253
|
|
Senior Member
Monaco Owners Club
Join Date: May 2009
Posts: 331
|
Quick Tips & Easy Mods
Hello All, I been contemplating this post for a couple of months now. I wanted to make sure I completed everything I was considering before posting my additions and modifications. Well I finally finished everything this pass week and I'm eager to share this information with my fellow RVers. I have several pictures I want to share with you and I have added them into their respective area.
Added a front curbside awning. As many of you know the big awning is for a little shade at best, so I thought I would add the window awning. I can leave the windows open without rain pouring in the coach.

Added a Wilson Truckers antenna to the roof to increase the range of my Sprint Air card, which is hooked to my Cradle point router, which gives my wife and I wireless Internet and printing capabilities.
Custom Wheel Covers. Everyone knows how much MCD charges for custom-made wheel covers plus installation 4-wheels $400 plus $125 for installation. I made my own using a plastic awning rail, which is riveted into the inner wheel well, and rubber welting, which is, sewed into Sumbrella, a boat cover fabric that has been in existence for 30 years. It resists mildew, mold and shrinkage. You can buy this in many colors and sizes. The covers just slide into the plastic awning rail. The total project was less than $150 dollars. I do own a portable Consew heavy-duty sewing machine.


Custom Steering Wheel Computer Table is made out of wood and stained. I've attached an L-bracket made of wood, which allows the table to slide on the steering wheel

Sanicon Remote with on/off switch in wet bay I wanted to add a remote inside the coach for periods when the drain is 6-8 inches off the ground. In this instance, the gray water drains extremely slow. I also added an on/off switch in the outside wet bay,so when the grandkids are in the coach they do not accidentally activate the switch.


Water Pump Switch in Toilet Area I just tapped into the switch on the main panel in the hallway. I also found many wood screws inside the main panel that were not properly covered. I cut small pieces of rubber tubing and applied to each of the ends. You just don't know when something will touch and a short occurs in the coach.

Remote 12V Fan in Outside Refrigerator Exhaust Compartment Added this for very hot summer days when the refrigerator is working at maximum power whether on propane or electric. Look near the top middle right you will see two screws attaching the fan. I also added a lighted switch, red, center left bottom, so I know when the fan is in operation. I will add a remote temperature snap disc later.

EC30W Auto Generator Start Purchased from Onan. We have two cats that we leave for several hours when we golf and hike and wanted to make sure they were safe when we are out having a good time. Installs in less than 30 minutes. Make sure its plugged into a non-inverter outlet.

I have also done the following improvements to my 2007 Monaco Knight:
Had modified sine water inverter replaced with a Magnum pure sine inverter.
Added Tire-Safeguard Tire Monitoring System.
Built custom DVR shelf for my Direct TV receiver
Added dual charging isolator in roadside distribution panel which charges chassis batteries while plugged into shore power.
Installed 26" flat screen in bedroom area.
Had installed Progressive 50 AMP Surge Protector
Had installed Horton V-Master Fan for Engine
Installed Kwikee slide in second pass through bay
Developed extensive Microsoft Excel Spreadsheet for RV maintenance tasks to include frequency description, last completed, next due and reference for each task as listed in appropriate manul. My wife gets the credit for this work. She read every manual, document and complied a weekly, monthly, annual, and semi-annual task list for each item.
Well that’s most of it. If I can be of assistance, please let me know.
__________________
Dave & Kathy Cramer, Ret. Air Force CMSgts
2007 Monaco Knight 40PDQ, Air Force One Braking Sys
2018 Ford F-150, Towing 2017 HD Tri Glide
|

|

|
 |
Join the #1 RV Forum Today - It's Totally Free!
iRV2.com RV Community - Are you about to start a new improvement on your RV or need some help with some maintenance? Do you need advice on what products to buy? Or maybe you can give others some advice? No matter where you fit in you'll find that iRV2 is a great community to join. Best of all it's totally FREE!
You are currently viewing our boards as a guest so you have limited access to our community. Please take the time to register and you will gain a lot of great new features including; the ability to participate in discussions, network with other RV owners, see fewer ads, upload photographs, create an RV blog, send private messages and so much, much more!
|
|
03-12-2010, 01:00 PM
|
#254
|
|
Senior Member
Tiffin Owners Club Winnebago Owners Club Freightliner Owners Club
Join Date: Sep 2007
Location: Somewhere Warm
Posts: 849
|
where did you mount your Truckers antenna, i have my on the rear ladder and want to move it forward. last summer i saw someone have it mounted on the TV antenna, so when he cranked it up, it was even higher up, but down for traveling. could not tell how he had it mounted.
__________________
Retired Army--Bob--2018 Allegro Bus 45OPP
2018 GMC Canyon SLT Crew Cab 4WD
|
|
|
|
|
03-12-2010, 02:41 PM
|
#255
|
|
Senior Member


Monaco Owners Club Texas Boomers Club
Join Date: Feb 2008
Location: Denmark and Spain
Posts: 2,030
|
Quote:
Originally Posted by majfrizz

where did you mount your Truckers antenna, i have my on the rear ladder and want to move it forward. last summer i saw someone have it mounted on the TV antenna, so when he cranked it up, it was even higher up, but down for traveling. could not tell how he had it mounted.
|
Sacs and Monaco Mama did this. Here is the link.
__________________
The Great Dane
|
|
|
|
|
03-12-2010, 06:33 PM
|
#256
|
|
Senior Member
Monaco Owners Club
Join Date: May 2009
Posts: 331
|
Maj Frizz, I just mounted the antenna coming from the roof down inside the overhead cabinet to the upper left of the driver. I did not add an amplifier, as the antenna seemed to receive just fine. In talking with others that have an amp, they said it added about 10% increase in range.
__________________
Dave & Kathy Cramer, Ret. Air Force CMSgts
2007 Monaco Knight 40PDQ, Air Force One Braking Sys
2018 Ford F-150, Towing 2017 HD Tri Glide
|
|
|
|
|
03-12-2010, 07:21 PM
|
#257
|
|
Senior Member
Join Date: Dec 2008
Location: Fulltime
Posts: 110
|
chiefdave
The curbside awning is a great idea. Am kicking myself for not having thought of it before as the little woman has complained many times of the sun and or rain coming in that window. 
Any particulars on what kind it is, where you got it, how it was installed, etc., etc., would help get me again into her good graces (as if I was ever there in the first place.) 
__________________
BOB 2006 HR Endeavor PST 38' / 2015 Cherokee Trailhawk
FT since Jan '06; Our Website: Because We Can
|
|
|
|
|
03-13-2010, 05:06 AM
|
#258
|
|
Senior Member
Monaco Owners Club
Join Date: May 2009
Posts: 331
|
Bob, Just used a Carefree distributor in Florida. It was very easy to install. Call Monaco and get your awning model number and color information before ordering. Make sure you add six inches on each side of your window measurements. This will make sure you do not get any rain inside the coach during heavy, windy conditions. Monaco did not when they installed the other window awnings. Saved them money I guess. Need anything more just let me know.
__________________
Dave & Kathy Cramer, Ret. Air Force CMSgts
2007 Monaco Knight 40PDQ, Air Force One Braking Sys
2018 Ford F-150, Towing 2017 HD Tri Glide
|
|
|
|
|
03-15-2010, 11:56 AM
|
#259
|
|
Senior Member
Monaco Owners Club
Join Date: Aug 2007
Location: Gardnerville, Nevada
Posts: 1,336
|
I got tired of the mess the Air Dryer made (dirt from moisture left after pressure release) and plumbed a piece of 3/4" PVC coupled at the dryer with a small piece of 1 1/8" hose. Now when it releases it dumps it below the coach.
I also moved the chassis batteries to the engine compartment which enabled me to add 4 additional batteries for the coach.
Pictures below if I've done this right.[IMG]file:///F:/DCIM/101MSDCF/DSC00988.JPG[/IMG][IMG]file:///F:/DCIM/101MSDCF/DSC00986.JPG[/IMG]
__________________
Ken, Chris and Maverick (Golden Retriever)
2009 Beaver Contessa
1984 LS1 CJ7 & 2017 Yamaha YXZ SS SE 
|
|
|
|
|
03-26-2010, 12:10 AM
|
#260
|
|
Senior Member
Monaco Owners Club
Join Date: Apr 2007
Location: AZ & MT snowbirds
Posts: 731
|
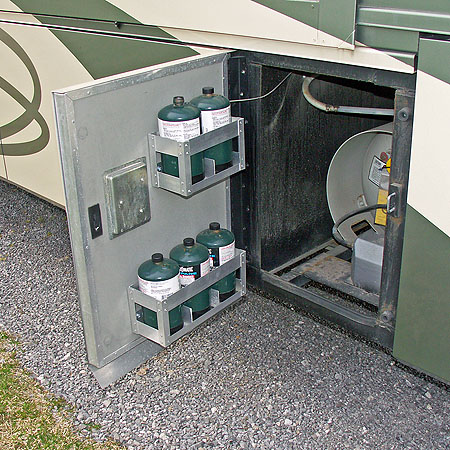
shelving storage inside bay doors
Got the idea from Drifter while in Quartzsite. He's quite the inspiration!


I think we have shelving inside most of the storage bay doors. And we are careful not to overload them with too much weight.
There are more photos in our Photo Gallery.
|
|
|
|
|
03-26-2010, 09:04 AM
|
#261
|
|
Senior Member
Monaco Owners Club Holiday Rambler Owners Club
Join Date: Feb 2010
Location: Buffalo, NY
Posts: 1,632
|
Quote:
Originally Posted by GoneFishin
Got the idea from Drifter while in Quartzsite. He's quite the inspiration!
|
That's a great idea! I've been trying to figure out where to mount a paper towel holder in my water bay, but there's not enough panel space to mount one where it would stay dry, as there are always some drips from filling up, flushing tanks, using the outside shower, etc. After all, what good is a roll of paper towels that are soaked?
The door is a perfect solution! I don't know why I couldn't think of mounting it on the door myself, especially when I already came up with door mounted storage right in the next compartment: 
Quote:
Originally Posted by ShapeShifter
|
I guess I have another mod to do... 
__________________
Adam and Sue, and a pack of little furballs
2007 Holiday Rambler Endeavor 40PDQ Limited Edition - Cummins ISL 400
2013 Ford F-150 FX4 toad - USGear Unified Tow Brake, Roadmaster Blackhawk II Tow bar, Blue Ox baseplate
Home base near Buffalo NY, often on the road to a dog show
|
|
|
|
|
03-26-2010, 01:00 PM
|
#262
|
|
Senior Member
Monaco Owners Club
Join Date: Jan 2007
Location: Off the road after 14 years full timing
Posts: 1,101
|
Added dash switches
I added three switches to my dash panel. They turn on/off my Pressure Pro tire monitor, my GPS, and the radio (lets me run the radio with the ignition off). I found these switches at Autozone, since they have a round mounting they were easy to install. And built in LED lights lets me know when they are on.
Just found an always-on hot line to wire the whole thing up, easy job. After this picture was taken, I added a 250K 1/2W resistor to the LED line to dim the LEDs to a more pleasant level.
|
|
|
|
|
05-09-2010, 03:21 PM
|
#263
|
|
Senior Member
Monaco Owners Club Holiday Rambler Owners Club
Join Date: Feb 2010
Location: Buffalo, NY
Posts: 1,632
|
Quote:
Originally Posted by Robin_M
Ron,
Finally got my coach back from 4 weeks in the shop. I followed your lead and turned the power cord reel around today. Turned out fairly nice. Didn't need any extra pigtail, as I didn't cut it when I added the Progressive Industries EMS. Power cord now slides in and out without binding.
 Click here for more details
. |
I just got done doing this same mod this afternoon. It looks like it will definitely make dealing with the shore cord simpler -- there's more room to pull it off of the reel, and it lines up better with the port so that it will hopefully wind up better. (Like most owners, I'm sure, I had to keep pushing the cord to the back of the reel as it was winding, to prevent it from filling up just the front portion and binding.)
I didn't need any additional pigtail, either. I do have the same Progressive Industries EMS as you, but I installed mine inside behind the breaker panel so that it protects while under generator power as well (there was no room to tie into the post-transfer switch line in that bay.) But even using the stock wiring, both from the reel to the transfer switch, and from the rewind switch to the reel, it all fit. I had to remove the screws from two of the cable clamps for the shore cord pigtail, and the two cable clamps for the 12 volt lead, but I was able to spin it around without disconnecting anything.
The cord reel is now in the same position as it was, but the mounting holes are a half inch closer to the door, because of the extra space taken up by the motor cover. The 12 volt lead now runs straight down from the switch and along the side wall to the back of the reel, instead of looping up and over the switch bracket and down the front edge of the compartment. This required re-positioning the two cable clamps.
The main power umbilical now comes down from the transfer switch, and instead of running along the back wall of the compartment, it now runs diagonally across the compartment floor, and around the right side of the reel's base (instead of around the back and approaching from the left, as in your picture.) I repositioned the cable clamps, and now everything is secure. The floor isn't quite as uncluttered as yours, but the cable is not really in the way. If it came from the factory this way, I probably wouldn't have given it a second glance. (I don't have any pictures since my compartment is not nearly as clean and shiny as yours! Besides, it's not that much different, so it's not really worth the effort of cleaning it just to take a picture. ") )
So, the moral is: if you have the same bay layout, and the cord reel with the cord coming from the bottom, it's not difficult to spin it around. It just takes a few minutes to remove some screws, relocate things, and fasten them back down. There is no need to make any wiring changes or lengthen any pigtails.
__________________
Adam and Sue, and a pack of little furballs
2007 Holiday Rambler Endeavor 40PDQ Limited Edition - Cummins ISL 400
2013 Ford F-150 FX4 toad - USGear Unified Tow Brake, Roadmaster Blackhawk II Tow bar, Blue Ox baseplate
Home base near Buffalo NY, often on the road to a dog show
|
|
|
|
|
05-09-2010, 08:25 PM
|
#264
|
|
Senior Member
Monaco Owners Club Tiffin Owners Club
Join Date: May 2007
Location: SE Pennsylvania
Posts: 1,850
|
Quote:
Originally Posted by ShapeShifter
I don't have any pictures since my compartment is not nearly as clean and shiny as yours!
|
But you should see it now. 
Quote:
|
So, the moral is: if you have the same bay layout, and the cord reel with the cord coming from the bottom, it's not difficult to spin it around. It just takes a few minutes to remove some screws, relocate things, and fasten them back down. There is no need to make any wiring changes or lengthen any pigtails.
|
Good point, worth making. I didn't give that much thought since I installed the EMS at the same time. Turning the reel around the right way sure does make it easier to deal with that heavy cord.
|
|
|
|
|
05-10-2010, 09:53 AM
|
#265
|
|
Senior Member
Monaco Owners Club Holiday Rambler Owners Club
Join Date: Feb 2010
Location: Buffalo, NY
Posts: 1,632
|
Quote:
Originally Posted by Robin_M
Good point, worth making. I didn't give that much thought since I installed the EMS at the same time. Turning the reel around the right way sure does make it easier to deal with that heavy cord. |
Yes, I had wanted to do this mod for a while, but didn't because I figured the wires would have to be lengthened, and that was too much work. But, I had some time yesterday, and looking at it, the wires seemed like they might be long enough as is, so I gave it a try.
This is a simple job, needing a minimum of tools (a screwdriver and a 3/8 inch wrench) and a minimum of time (half an hour if you work slowly?) A power drill with a 3/8 hex socket does make it go much faster, since the self-tapping bolts that hold the reel down don't just go through the plastic compartment floor, but also drill into a metal support brace under the compartment. While the rest can be done with a screwdriver or ratchet wrench, having the drill for those bolts makes it go MUCH faster! 
It's an easy job, and well worth the effort. My thanks to all who went ahead of me and showed me how it's done!
But back to Robin: I like where you mounted the EMS display. Mine is mounted under the transfer switch where you have your main EMS box, and while it works OK there, I think on the reel might be a better place. How did you mount it, double stick foam tape?
I originally had it mounted on the right side compartment wall, where you have the metal junction box. While that's a good place for the inside/outside display selector switch, putting the display there makes it too hard to read. BTW, what is that upper junction box, I don't have that in my compartment?
__________________
Adam and Sue, and a pack of little furballs
2007 Holiday Rambler Endeavor 40PDQ Limited Edition - Cummins ISL 400
2013 Ford F-150 FX4 toad - USGear Unified Tow Brake, Roadmaster Blackhawk II Tow bar, Blue Ox baseplate
Home base near Buffalo NY, often on the road to a dog show
|
|
|
|
|
05-14-2010, 09:03 AM
|
#266
|
|
Senior Member
Monaco Owners Club
Join Date: Feb 2009
Posts: 1,496
|
DW always complains about me not closing the small slide on the screen door because it lets bugs in. Well today I have been in and out of the MH loading it for our upcomming trip and once again I was reminded that I should close the slide door. I now understand why I dont, because it is a PITA to try to close it because there is nothing to grip just the small groove. I fixed it today with a 5 minute mod that works great. Im probley the last person to do this.
__________________
Del & Lori 2007 Diplomat 40PDQ - 2020 Grand Cherokee TrailHawk Hemi Toad, M&G Brake System, Blue Ox.
|
|
|
|
|
|
|
Currently Active Users Viewing This Thread: 1 (0 members and 1 guests)
|
|
|
 Posting Rules
|
You may not post new threads
You may not post replies
You may not post attachments
You may not edit your posts
HTML code is Off
|
|
|
|
 » Recent Discussions
 |
|
|
|
|
|
|
|
|
|
|
|
|
|
|
|
|
|
|
|
|
|
|
|
|
|


 Linear Mode

