 |
|
 06-21-2015, 07:21 PM
|
#631
|
|
Senior Member
Monaco Owners Club
Join Date: Sep 2007
Location: Lancaster, CA
Posts: 606
|
Thanks for the advice on the step drill Craig,
I got a factory style momentary switch installed for the Safe-T-Plus Trim Unit.
I measured it from the other switches and after drilling i saw the factory knockout from the back with a mirror. Drilled the four corners and sawed it out using a very find blade by hand. You can see it in the attached photo next to the mirror adjustment. The switch with no label.
__________________
Mike and Wanda
2008 Safari Cheetah 38PDQ, 350 C7, TRW, F/R X-Bars, F/R Watts, FSD, STP, TST, RF18, SeaLevel II, 800w Renogy PV, 2016 F150 4x4, Blue Ox, AFO, LSL TC, Battleborn
|

|

|
 |
Join the #1 RV Forum Today - It's Totally Free!
iRV2.com RV Community - Are you about to start a new improvement on your RV or need some help with some maintenance? Do you need advice on what products to buy? Or maybe you can give others some advice? No matter where you fit in you'll find that iRV2 is a great community to join. Best of all it's totally FREE!
You are currently viewing our boards as a guest so you have limited access to our community. Please take the time to register and you will gain a lot of great new features including; the ability to participate in discussions, network with other RV owners, see fewer ads, upload photographs, create an RV blog, send private messages and so much, much more!
|
|
06-21-2015, 10:41 PM
|
#632
|
|
Senior Member
Monaco Owners Club
Join Date: Feb 2011
Location: Signal Hill, California
Posts: 3,320
|
I have truck turning style LED signal lights that protrude from the front of the motor home that have red facing the rear and amber facing the front of the motor home. So in reinforcing the RED protruding turn signal the RED 12 LED light below it works for me. Replacing the cheap amber clearance light with a matching 12 LED amber clearance (to the two red ones) and the top clearance lights above the front windshield was a no brain er. These lights are a inexpensive safety measure that you can enjoy each trip you take with your motor home. Mike nice installation of your momentary trim unit switch. I'm using the one that came with the Henderson system at this time. You will find it is neat being able to control the Safe - T - Plus on the "fly". Sanford
__________________
Sanford, Linda & R cats: Molly, Levi, Cody
2011 Monaco by Navistar RV
Good Sam Life Member Good Sam Hams Chapter
|
|
|
|
|
07-01-2015, 11:54 AM
|
#633
|
|
Senior Member
Monaco Owners Club
Join Date: May 2015
Location: Where I happen to land
Posts: 2,529
|
Just did the turn signal side marker light update. Easy, cheap and can't wait to see if people actually let me over now. 
|
|
|
|
|
07-01-2015, 09:32 PM
|
#634
|
|
Junior Member
Join Date: Jul 2015
Posts: 6
|
t can I do to bring the colors back on the decals on my 2008 LaPalma?
|
|
|
|
|
07-07-2015, 08:53 AM
|
#635
|
|
Senior Member
Monaco Owners Club
Join Date: May 2015
Location: Where I happen to land
Posts: 2,529
|
Installed a bit of expanded steel in the propane bay. I have no place to store a sewer hose (my coach has a Sanicon); so this was wasted space anyway. Took about 1 1 /2 hours with scrap material I had on hand.
...hoping this pic works...

|
|
|
|
|
07-07-2015, 10:27 AM
|
#636
|
|
Senior Member
Monaco Owners Club Holiday Rambler Owners Club
Join Date: Feb 2010
Location: Buffalo, NY
Posts: 1,632
|
Quote:
Originally Posted by Captjake1

Installed a bit of expanded steel in the propane bay.
|
Very nice!
I used the wasted space slightly differently:
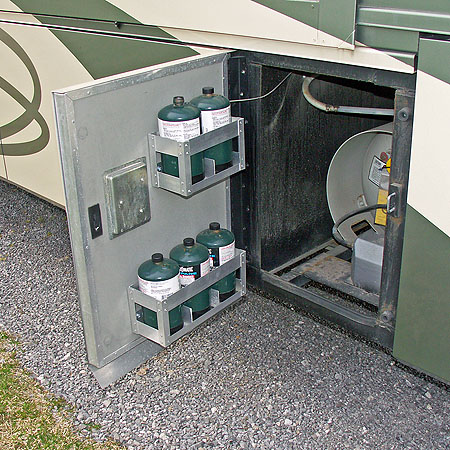 
For anyone thinking of using the storage space in that compartment, keep in mind that it cannot (and should not!) be locked. You should always have easy access to the shutoff valve. It's not a problem with Captjake1's stinky slinky (not many people would want to borrow it) and I'm not too worried about my propane tanks. But I wouldn't plan on putting anything valuable in there.
__________________
Adam and Sue, and a pack of little furballs
2007 Holiday Rambler Endeavor 40PDQ Limited Edition - Cummins ISL 400
2013 Ford F-150 FX4 toad - USGear Unified Tow Brake, Roadmaster Blackhawk II Tow bar, Blue Ox baseplate
Home base near Buffalo NY, often on the road to a dog show
|
|
|
|
|
07-07-2015, 12:39 PM
|
#637
|
|
Senior Member
Monaco Owners Club
Join Date: May 2015
Location: Where I happen to land
Posts: 2,529
|
Quote:
Originally Posted by ShapeShifter
Very nice!
I used the wasted space slightly differently:
For anyone thinking of using the storage space in that compartment, keep in mind that it cannot (and should not!) be locked. You should always have easy access to the shutoff valve. It's not a problem with Captjake1's stinky slinky (not many people would want to borrow it) and I'm not too worried about my propane tanks. But I wouldn't plan on putting anything valuable in there. |
Your door shelves are on my list yet!  I have gleaned some pretty cool ideas here! Nobody better steal my slinky! 
|
|
|
|
|
07-07-2015, 01:07 PM
|
#638
|
|
Senior Member
Monaco Owners Club Holiday Rambler Owners Club
Join Date: Feb 2010
Location: Buffalo, NY
Posts: 1,632
|
Quote:
Originally Posted by Captjake1
Your door shelves are on my list yet! |
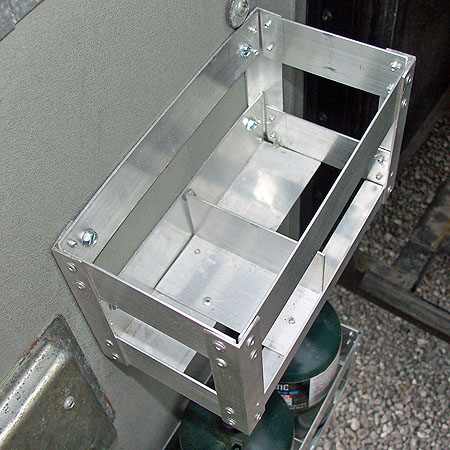
The plans, with material list, is attached. They are just some pieces of aluminum stock picked up the home center, and pop-riveted together. Nothing but straight/square cuts and drilling some holes. I didn't draw the two slot version, it's just a shorter version of the three slot shelf with one less set of dividers.
If you compare the plans to the photo, you'll see that I never ended up putting on the diagonal braces, so I never ended up using the 1/2" flat stock I bought. I was concerned about the shelf racking under the weight of the propane bottles, but they are plenty stiff enough that no bracing was needed.
Post photos on this thread if you do go ahead and do it.
Quote:
|
Nobody better steal my slinky!
|
It would have to be a pretty desperate fellow RVer. I can't imagine anyone else wanting it, especially once they figure out what it's for. 
__________________
Adam and Sue, and a pack of little furballs
2007 Holiday Rambler Endeavor 40PDQ Limited Edition - Cummins ISL 400
2013 Ford F-150 FX4 toad - USGear Unified Tow Brake, Roadmaster Blackhawk II Tow bar, Blue Ox baseplate
Home base near Buffalo NY, often on the road to a dog show
|
|
|
|
|
07-07-2015, 02:50 PM
|
#639
|
|
Senior Member
Monaco Owners Club Holiday Rambler Owners Club
Join Date: Feb 2010
Location: Buffalo, NY
Posts: 1,632
|
Another recent mod: We travel with show dogs, and our site often looks like this, with a portable fence dog run next to the coach:
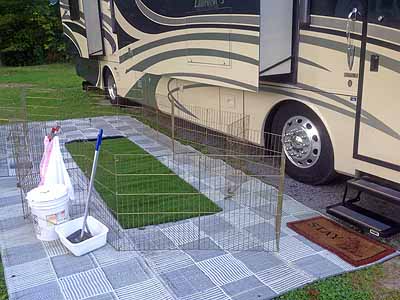
When it's dark, it's hard to keep an eye on the dogs, or clean up after them. The porch light just doesn't cut it. So I placed 2 meters worth of LED strip lighting under the slide:
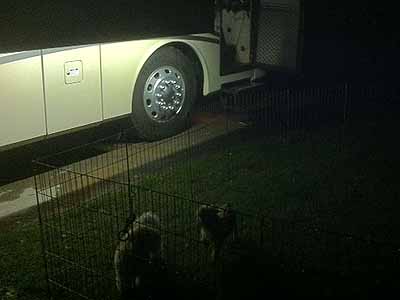
Just enough light to be able to see the dogs, and see the "stuff" that needs to be picked up, but not enough to be blinding or annoying - although we still don't leave it on all the time, and don't use it in a crowded campground.
And the best part: it was free! A friend bought a Camco light strip and expansion kit, then decided they wouldn't be able to use it on their rig like they wanted, so they gave it to us. OK, I guess it's not free, I now owe them big-time.
__________________
Adam and Sue, and a pack of little furballs
2007 Holiday Rambler Endeavor 40PDQ Limited Edition - Cummins ISL 400
2013 Ford F-150 FX4 toad - USGear Unified Tow Brake, Roadmaster Blackhawk II Tow bar, Blue Ox baseplate
Home base near Buffalo NY, often on the road to a dog show
|
|
|
|
|
07-07-2015, 02:58 PM
|
#640
|
|
Senior Member
Monaco Owners Club
Join Date: May 2015
Location: Where I happen to land
Posts: 2,529
|
Quote:
Originally Posted by ShapeShifter
Another recent mod: We travel with show dogs, and our site often looks like this, with a portable fence dog run next to the coach:
When it's dark, it's hard to keep an eye on the dogs, or clean up after them. The porch light just doesn't cut it. So I placed 2 meters worth of LED strip lighting under the slide:
Just enough light to be able to see the dogs, and see the "stuff" that needs to be picked up, but not enough to be blinding or annoying - although we still don't leave it on all the time, and don't use it in a crowded campground.
And the best part: it was free! A friend bought a Camco light strip and expansion kit, then decided they wouldn't be able to use it on their rig like they wanted, so they gave it to us. OK, I guess it's not free, I now owe them big-time. |
How did you run the wire and where did you tap power from? 
|
|
|
|
|
07-07-2015, 03:41 PM
|
#641
|
|
Senior Member
Monaco Owners Club Holiday Rambler Owners Club
Join Date: Feb 2010
Location: Buffalo, NY
Posts: 1,632
|
Quote:
Originally Posted by Captjake1
How did you run the wire and where did you tap power from? |
It took me the longest time to figure that out. You can kind of see the outline of the currently closed outside entertainment center between the window and the bottom of the slide. My thought was to drill a hole up through the floor of the slide and into the space of that compartment. But the hole was either far enough forward that it would be exposed and not behind the TV, or far enough back that it would be worn by the slide bottom wiper seal. I wanted to try and keep everything in that little space between the lip of the slide and the slide opening frame.
I finally ended up using a small cord hider strip, stuck to the side of the slide immediately under the angled black rain gutter you can see on the side of the slide. One end is right at the end of the LED strip, the other is inside just behind the inner flange of the slide. (I don't have a picture.)
The small low voltage wire runs from the LED strip and up that cord channel (fully protected) then around the front edge of the slide flange, tucked between the wood trim and the carpeting. It goes behind the jackknife sofa and over to the opening for the outside DVD player (which is visible behind the sofa.)
Then from outside, I pulled out the Magndyne DVD player (identical to the in-dash unit) and spliced into power behind it. I hid the control box behind the DVD player.
The Camco LED starter kit came with one meter of LEDs, a 120VAC to 12VDC power supply, and then a controller box that has the 12VDC input terminals on one end, and the LED output terminals on the other. I didn't use the 120VAC adapter at all, I just used the 12V from the DVD player (which we never use, so I'm not worried about overloads.) The on/off/dim control is from a small remote that is included with the kit, which we keep by the front door. By skipping the AC adapter and running directly off of 12V, we can still use it while camping off the grid (which is often.) The expansion kit just has a one meter strip of LEDs, and a connector to daisy chain off of a starter kit.
Leaving the strip turned on with the slide in hasn't been a problem yet, but I'm thinking about splicing into the LED output, and mounting an LED inside just above the jackknife sofa so we can see if the outside strip is on.
__________________
Adam and Sue, and a pack of little furballs
2007 Holiday Rambler Endeavor 40PDQ Limited Edition - Cummins ISL 400
2013 Ford F-150 FX4 toad - USGear Unified Tow Brake, Roadmaster Blackhawk II Tow bar, Blue Ox baseplate
Home base near Buffalo NY, often on the road to a dog show
|
|
|
|
|
07-13-2015, 10:19 AM
|
#642
|
|
Senior Member
Monaco Owners Club
Join Date: Sep 2012
Location: Titusville Fl
Posts: 266
|
We took a short trip down to Franklin In and a friend and I removed our propane stove and installed 2 induction burners for cooking.
My friend Jack is a cabinet guy and he came to my house and took measurements and constructed the insert,mounting framework,and face board in his shop while I did the easy job of demolition of the old stove.
Since we now have a res. refer my next project is to remove the propane tank and make more storage.
I'll try to attach photos of the installation.It took us about 4 hours to cut the countertop,install the power,mount the frame ,and put in the new mounting for the burners.
I wanted two cooktops wired from different circuit breakers so we could use both on high setting if ever needed.I had the circuits installed last winter while in Florida at Alliance [the only correct thing they did].
__________________
Dan & Kris Murphy
2022 Newmar Baystar 3226
2020 Chev Equinox 2.0
|
|
|
|
|
07-13-2015, 10:27 AM
|
#643
|
|
Senior Member
Monaco Owners Club
Join Date: May 2012
Location: DFW, Tex-US
Posts: 6,196
|
WEIGH cool Dan !!!!
Although the wife says the kitchen is just for decoration - induction cooktops are on my to do list !
__________________
'11 Monaco Diplomat 43DFT RR10R pushed by a '14 Jeep Wrangler JKU. History.. 5'ers: 13 Redwood 38gk(junk!), 11 MVP Destiny, Open Range TT, Winn LeSharo, C's, popups, vans, tents...
|
|
|
|
|
07-13-2015, 10:31 AM
|
#644
|
|
Senior Member
Join Date: May 2007
Posts: 258
|
Dan-- great install! looks OEM. I think i have decided to glue on plywood strips to the two panels and hinge them. another member slotted the recessed area on both sides so that the top can be lifted off, placed in the slots and leaned against the back wall ( obviously not during travel. this might also work for you.
I also have a 2013 ford Cmax ( energi) that i will be setting up for towing. can you please send me pics of the front end of your car so i can see how the install looks?
Thanks for sharing,
Jim Legler, AKA Relgel
06 Dip
|
|
|
|
|
|
|
Currently Active Users Viewing This Thread: 2 (0 members and 2 guests)
|
|
|
 Posting Rules
|
You may not post new threads
You may not post replies
You may not post attachments
You may not edit your posts
HTML code is Off
|
|
|
|
 » Recent Discussions
 |
|
|
|
|
|
|
|
|
|
|
|
|
|
|
|
|
|
|
|
|
|
|
|
|
|


 Linear Mode

