 |
|
 01-12-2010, 09:29 AM
|
#239
|
|
Senior Member
Monaco Owners Club
Join Date: Feb 2009
Posts: 1,496
|
I just built a shoe shelf for the rear closet, (DW requested it of coarse). Very easy and worth while project. It allowed me to move the vacume from under the bed making it easier to get to.
__________________
Del & Lori 2007 Diplomat 40PDQ - 2020 Grand Cherokee TrailHawk Hemi Toad, M&G Brake System, Blue Ox.
|

|

|
 |
Join the #1 RV Forum Today - It's Totally Free!
iRV2.com RV Community - Are you about to start a new improvement on your RV or need some help with some maintenance? Do you need advice on what products to buy? Or maybe you can give others some advice? No matter where you fit in you'll find that iRV2 is a great community to join. Best of all it's totally FREE!
You are currently viewing our boards as a guest so you have limited access to our community. Please take the time to register and you will gain a lot of great new features including; the ability to participate in discussions, network with other RV owners, see fewer ads, upload photographs, create an RV blog, send private messages and so much, much more!
|
|
01-12-2010, 09:50 AM
|
#240
|
|
Senior Member
Monaco Owners Club
Join Date: Feb 2009
Posts: 1,496
|
I just got rid of the annoying Monaco extra dinning chairs and replaced them with lighter, foldable, and more comfortable chairs from Bed Bath and Beyond. No more smashed fingers. 
Sorry, could not invert pics. MM to the rescue 
__________________
Del & Lori 2007 Diplomat 40PDQ - 2020 Grand Cherokee TrailHawk Hemi Toad, M&G Brake System, Blue Ox.
|
|
|
|
|
01-24-2010, 11:02 PM
|
#241
|
|
Senior Member
Monaco Owners Club Tiffin Owners Club
Join Date: May 2007
Location: SE Pennsylvania
Posts: 1,850
|
For anyone who has an entertainment head unit with line-out leads for a sub-woofer, Kenwood makes a compact powered sub-woofer that is small enough to fit on the floor under the dash. I was able to install it by temporarily taking out the drawers in the center console next to the driver. Finally I can actually hear the bass notes of the music I listen to on the road. What an improvement! And the unit is completely hidden on the floor behind the dash.
More details here on my Diplomat web site.

|
|
|
|
|
01-26-2010, 11:27 AM
|
#242
|
|
Senior Member
Monaco Owners Club
Join Date: Aug 2007
Location: Gardnerville, Nevada
Posts: 1,336
|
Multiplex Switches mod
This is for those of you that have the Multiplex system in your coach. I found out that each switch cover panel in my coach had the capability of handling 6 functions and each switch could be programmed to handle any multiplex function in the coach. So in the bathroom area where I had a 4 switch cover I added 2 more light switches and now have the ability to turn on the 2 reading lights over the bed. I also had to replace the 4 switch cover with a 6 switch cover.
Everyone maybe already know about this flexibility but it was new to me. I had the folks at DeMartini program the switch. Looking at the Intellitec web site it appears you can download the program and do this yourself provided you have a computer and correct wiring to attach to the programmable switch. So now I'm looking at the other light switches that only have 4 functions and considering what I might want to add.
__________________
Ken, Chris and Maverick (Golden Retriever)
2009 Beaver Contessa
1984 LS1 CJ7 & 2017 Yamaha YXZ SS SE
|
|
|
|
|
02-01-2010, 04:20 AM
|
#243
|
|
Senior Member


Monaco Owners Club Texas Boomers Club
Join Date: Feb 2008
Location: Denmark and Spain
Posts: 2,030
|
Here is a tip for all you do-it-yourself guy's who does their own greasing of the zerks:
When I crawl under the coach I find my self hunting for the zerks because I don't want to forget any of them. First of all they are hard to see and once I have found them I need to wipe off dirt etc before starting the actual greasing. This is a tough job sometimes because there is not a lot of room left for my masculin torso 
Next time I do this will be the last time I hunt for and clean the zerks, because I am going to fit highly visible zerk covers.
Last time in the US I couldn't find them anywhere, but here is a link where to get them for what I will consider a very reasonable amount of money.
Gentlemen - on your marks - start greasing!!!
__________________
The Great Dane
|
|
|
|
|
02-01-2010, 05:34 AM
|
#244
|
|
Senior Member
Monaco Owners Club
Join Date: Aug 2006
Location: Ft Myers Fl / Omaha Ne
Posts: 617
|
Awesome idea, only wish I would have thought of it. Thanks for the tip, have mine on order!
__________________
Chuck & Mary
2008 Monaco Diplomat 40 SKQ
2008 Enclave Toad
|
|
|
|
|
02-01-2010, 07:22 AM
|
#245
|
|
Senior Member
Monaco Owners Club
Join Date: Feb 2009
Posts: 1,496
|
Quote:
Originally Posted by The Danes Are Coming

Here is a tip for all you do-it-yourself guy's who does their own greasing of the zerks:
When I crawl under the coach I find my self hunting for the zerks because I don't want to forget any of them. First of all they are hard to see and once I have found them I need to wipe off dirt etc before starting the actual greasing. This is a tough job sometimes because there is not a lot of room left for my masculin torso
Next time I do this will be the last time I hunt for and clean the zerks, because I am going to fit highly visible zerk covers.
Last time in the US I couldn't find them anywhere, but here is a link where to get them for what I will consider a very reasonable amount of money.
Gentlemen - on your marks - start greasing!!! |
Great idea, I just ordered them. 
__________________
Del & Lori 2007 Diplomat 40PDQ - 2020 Grand Cherokee TrailHawk Hemi Toad, M&G Brake System, Blue Ox.
|
|
|
|
|
02-02-2010, 02:25 PM
|
#246
|
|
Senior Member
Monaco Owners Club Holiday Rambler Owners Club
Join Date: Dec 2006
Posts: 1,723
|
While were at the Quartzsite gathering last month we went to Gamblers Surplus RV parts. I picked up a couple of switches so we could also add the feature of a water pump switch in the bathroom like RobinM did a while ago. I think that the engineers at Monaco never used a bathroom in a RV otherwise there would be a switch to turn on the water in there.
So here are some pictures of the switch I installed like Robin did. The four gang switch was 12.00 and the three gang was 9.00, I think that was a good bargain.

Old switch.

New switch.

Wiring hook ups.

Finished project took about an hour and a half, I stopped for lunch.
__________________
Mike & Sharon and our Pup Frankie
2008 HR Endeavor 40PDQ

|
|
|
|
|
02-02-2010, 03:28 PM
|
#247
|
|
Senior Member
Monaco Owners Club Excel Owners Club
Join Date: Nov 2006
Location: Hangin' with Sacs and the Pins
Posts: 9,412
|
Drifter...I wish I would have known you found one.  That is exactly what we have been looking for. Can you please post the part #? 
Awesome job - by the way.
__________________
 MM MM
*MonacoMama with the 2 Pins & SacsTC Nearby* *2007 Monaco Diplomat 40' SFT<>2006 Chevy VortecMax Toad<>2006 Buick Lucerne Leading the Way*
|
|
|
|
|
02-03-2010, 11:17 AM
|
#248
|
|
Senior Member
Monaco Owners Club Workhorse Chassis Owner
Join Date: Dec 2006
Location: Socal/NE Oregon
Posts: 602
|
WOW....alot of great ideas here! I really havent started on the "mods" to much but have done a few.
Installed a Craftsman "top" tool chest in a bay.
Added a Viar 150psi air compressor system.
I plan on
A 32" LCD in place of the 100 pound 26" monster.
Small LCD in the bedroom
Small LCD in the mid-bay for outdoor viewing
Add a crank up sat dish (I have it, but havent installed it yet)
Add power cord reel
Move and modify a cabinet thats useless in the bedroom to next to the swivel rocker
Replace the to short couch/fold out bed, with a longer jacknife couch.
Add various storage cans/shelfs through-out the bays to eliminate clutter.
Finish the Harley-hauler toad project.
Its gunna be a busy year.
__________________
Chuck, Ruth, with 4 legged Molly
2007 Tiffin Allegro 30DA
2011 Ranger, 1987 FLHTP
|
|
|
|
|
02-09-2010, 10:29 AM
|
#249
|
|
Senior Member
Monaco Owners Club Holiday Rambler Owners Club
Join Date: Feb 2010
Location: Buffalo, NY
Posts: 1,632
|
What a great thread. I haven't read through it all yet, just scanned it over. There's so much here, and looks like there are a lot of talented members.
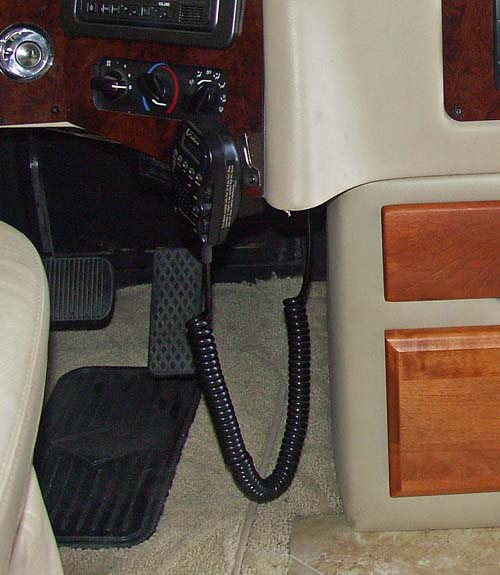
My first mod was installing a Cobra 75WXST compact CB radio using the factory CB prep antenna. The small junction box is tucked up behind the dash, and only the microphone with all of the controls is visible. It hangs from a clip on the lower right corner of the dash (using one of the existing screws.)
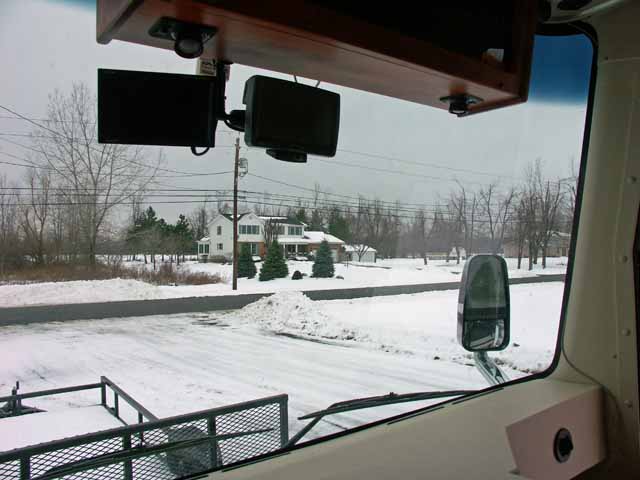
One of the early mods I did was to mount my GPS and an additional rear view monitor to the back of the TV cabinet. I needed somewhere for the GPS, and I had a hard time seeing the backup monitor where it is placed behind the steering wheel. Fortunately, the backup monitor has a video output, and I could just run a long cable from that to the 7" LCD monitor. (You can see the cable snaking around the dash on the right edge of the picture, I have since run it up the A pillar so it's completely hidden.) I used a RAM mount, and by putting it on the back of the cabinet, the wires are out of the way, and the screw holes wont be visible if I ever take it down. With the monitor and GPS up there, it's just like taking a quick glance in the rear view mirror to see them. The backup monitor is to the left, and the GPS on the right.
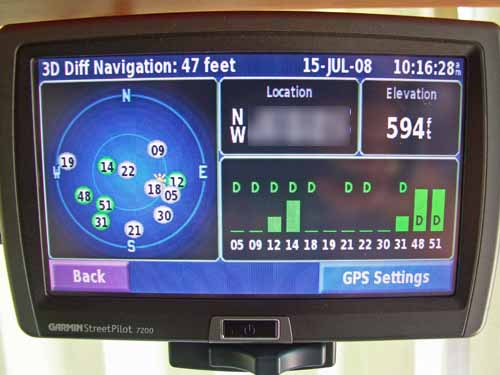
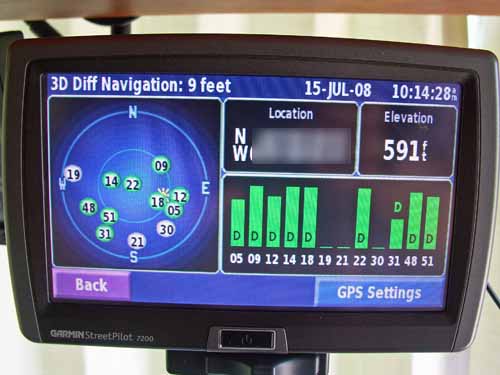
One issue with the GPS being up there under the TV is that it sometimes lost sync with the satellites. I guess the built in antenna doesn't have enough of a view of the sky from there. So I mounted an external GPS antenna on the top of the front cap. I drilled down through the front cap into the TV cabinet, and mounted the antenna such that it completely covered the hole. Then it was a simple task to run the antenna wire to the GPS. I installed the external antenna a couple years ago, and I haven't lost satellite reception since.
This was the satellite reception without the antenna:
And this is the reception with the new antenna (significantly stronger!)
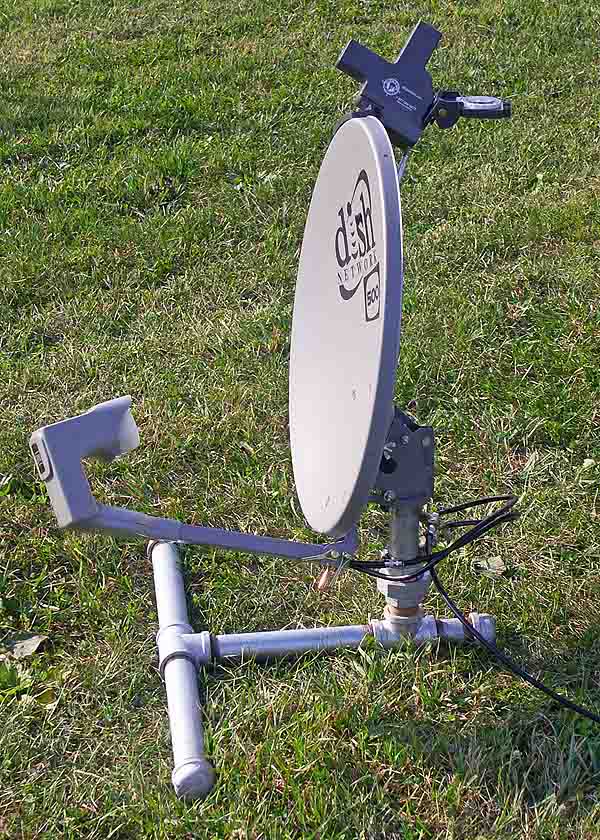
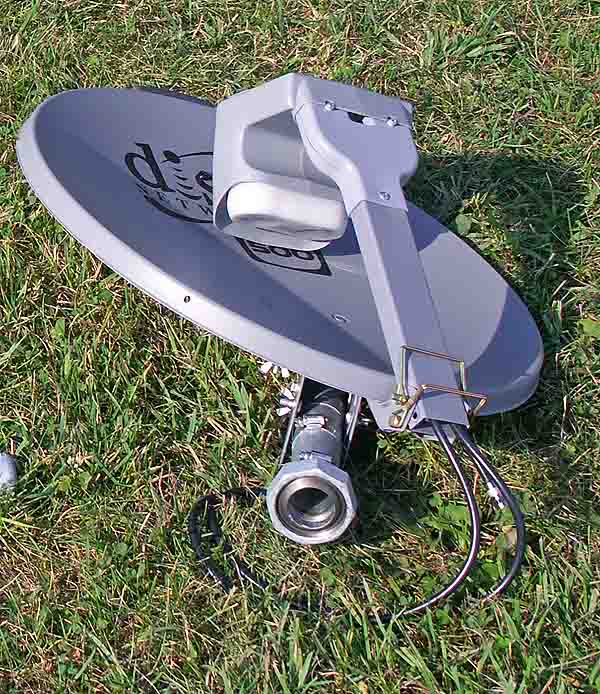
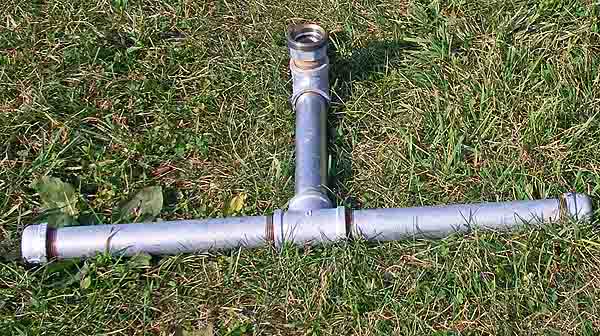
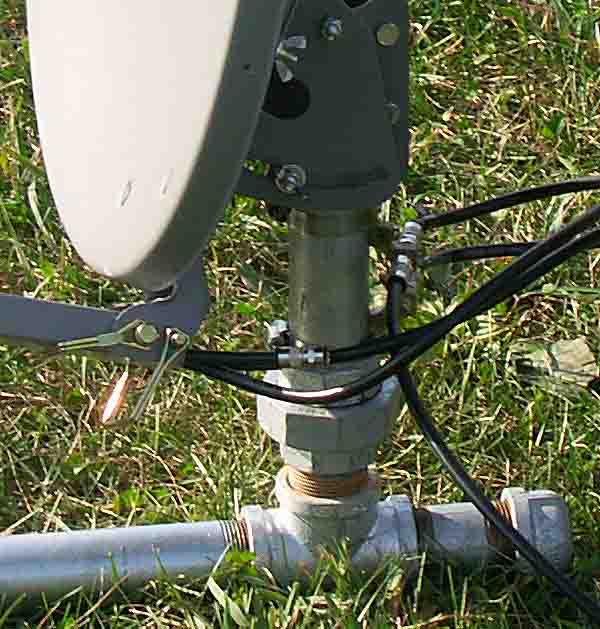
My next project was a portable satellite dish mount. I have a roof-mount KingDome in-motion dome, but I was never really able to get it working satisfactorily with my dual tuner DVR. I didn't want a big bulky tripod. I had seen the low profile upside down mounts made from PVC pipe, and tried that. It had too much flex in it, and I had trouble aiming my dual LNB dish while upside down. So I instead made my own design out of galvanized pipe. It uses a union so that it can be easily broken down for storage, and it's absolutely rigid and stable. Using an Align-A-Site it's easy to aim without spending any time leveling the stand. I also modified the LNB arm by drilling out the welds and using lynch pins to make it foldable.
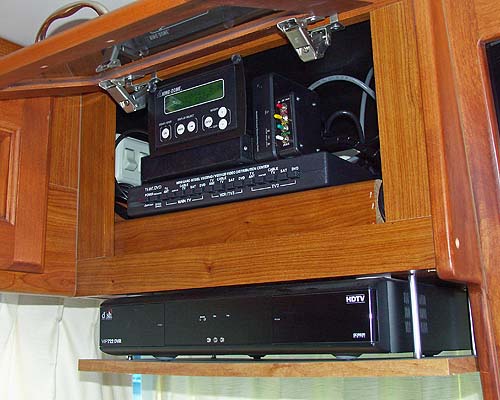
Speaking of satellite, I didn't have room for my DVR receiver, so I built an additional shelf under the entertainment cabinet. I also had a tough time dealing with power connections, and switching the receiver on and off, so I built an automatic switch box that includes a remote control for multiple circuits (the small box with the colored toggle switches.) It operates much like the ignition cut-out for the TV, except that I can control each of the four outlets (DVR, dome, WiFi bridge, and a spare) so that they are either always off, always on, or automatically turns off when the ignition is on (because of the DVR's hard drive, it's not good to have it on while moving, so this way I can't forget to turn it off when breaking camp!) It's a simple wooden shelf, held in place with some long thin carriage bolts running up through the shelf and into the bottom of the cabinet, with washers and nuts on the inside of the cabinet. The threads of the carriage bolts are hidden by pieces of chrome plated copper tubing cut from a length of water supply riser normally used to connect up a sink faucet.
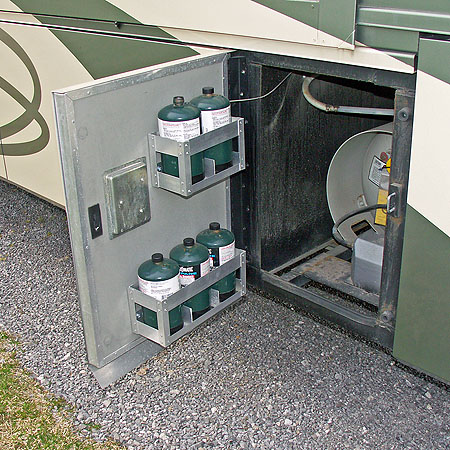
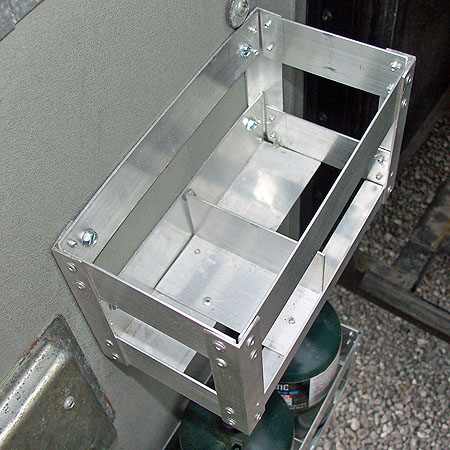
I use a portable grill that uses the little 1 pound propane cylinders. They are convenient, but a pain to store them, and it seemed like I was always running out. So I made some racks to fit on the propane compartment door, which seemed like the perfect space to keep them, as it is accessible, yet vented. They are made of some simple aluminum angles and bars, cut to length and pop-riveted together. I can now keep a year's supply on hand and not worry about running out. (I had considered going with a larger refillable tank, but that has it's own storage issues, and with the amount I use the payback time to cover the expense of the tank is too long.) Hmm... looking at the pictures, it would appear I need to clean up the road dirt in that compartment!
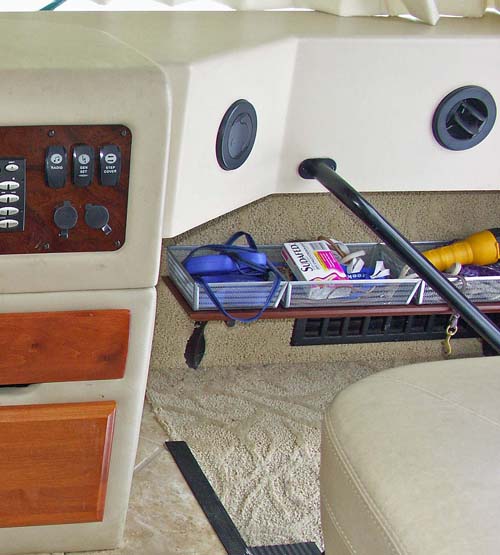
My most recent addition is a a small storage shelf at the top of the entry stairs. It has several small storage baskets that are good for small things like dog leads, flashlight, etc -- things you need as you head out the door.
I've made some other modifications and improvements, but don't have any pictures: - Added a 12 volt cigarette lighter socket to the side of the bed to allow plugging in the cell phone charger while boondocking. It taps power from the harness under the bed.
- Added an in-line water filter in the access panel behind the fridge, in the water line feeding the refer's in-door water dispenser and ice maker. (Similar to the factory installed filter to the special spigot at the kitchen sink.)
- Added a Progressive Industries HW-50C power monitor system. It's wired in after the transfer switch, and sits in the electrical compartment behind the breaker panel. Remote displays are outside by the power cord reel, and inside above the main monitor panel.
- The central vac switch that automatically starts the vacuum when you plug in the hose was always giving me trouble. So I bypassed it and added a switch to the main control panel. Between the system heat and generator switches is an unused switch position. The required hole is already cut out of the metal panel, so I only needed a razor knife to trim away the plastic covering. I found a switch that exactly matches all of the others, and now that switch controls the vacuum. I no longer have to fiddle with the hose until it makes contact, and I don't have to bend down an unplug the hose every time I want to stop the vacuum for a few minutes. It's much more convenient (and reliable!)
- I added a Doran 360RV tire pressure monitor system. The sliding mirror closet doors in back must've been affecting the signal from the toad, so I added an indoor repeater in the back shirt closet. I tapped into the power for the closet light, and now I have no trouble receiving pressures from the toad, even when it is parked in the garage at home!
- Added an Ultra Trick-L-Start to keep the chassis battery charged while plugged in over the winter.
- Added the controller for a US Gear Unified Tow Brake, mounting it by the upper left corner of the dash.
- Added a pair of MaxxAir covers to the stock Fantastic Fans.
- Added a Gen-Turi generator exhaust stack, but modified it to use suction cups on the driver's side window rather than drilling their mounting brackets into the side of the coach.
- Add a spring loaded retractable extension cord reel. It's mounted to the side of the compartment right below the vacuum cleaner, and plugged into the outlet that's right there. It's right above the small hatch in the compartment floor, so it's easy to unreel the cord, feed it through the hatch, and have easy access to power around the patio area.
- While not a permanent mod, I also have a Kyocera KR1 wireless router with a Sprint air card that gives us mobile broadband Internet access. We have two laptops that can connect through it, as well as a wireless print server connected to a scanner/copier/printer in one of the overhead cabinets. I do a lot of work while on the road, and that gives me a fully functional home office.
I know there's a few others that I can't think of right now, as it seems like I'm always tinkering... 
My next plans are to re-work the entertainment center to get better sound performance, and to install a Winegard Traveller automatic rooftop dish that will work better with my DVR than the KingDome that came with the rig.
__________________
Adam and Sue, and a pack of little furballs
2007 Holiday Rambler Endeavor 40PDQ Limited Edition - Cummins ISL 400
2013 Ford F-150 FX4 toad - USGear Unified Tow Brake, Roadmaster Blackhawk II Tow bar, Blue Ox baseplate
Home base near Buffalo NY, often on the road to a dog show
|
|
|
|
|
02-24-2010, 08:29 PM
|
#250
|
|
Member
Monaco Owners Club
Join Date: Feb 2010
Posts: 47
|
Baggage compartment latch
When I bought my MH one of the baggage door handles had been removed and was in pieces. I contacted trimark and they supplied me with the parts to rebuild it. The only thing I was unhappy with was the latch. It was plastic although they told me all were plastic. Well I rebuilt my handle, installed it and shut it for the first time. The plastic latch broke. I discovered when the last owners broke the handle open they bent the catch on the motor home up so when it shut it broke the latch. So not impressed with the plastic latch I made a aluminum one out of bar stock. I made it with a hack saw, angle grinder and file. Works great and hopefully no more breaking.


Mat
__________________
2002 Monaco Diplomat
|
|
|
|
|
03-01-2010, 06:54 PM
|
#251
|
|
Senior Member
Country Coach Owners Club
Join Date: Jul 2009
Location: Sequim, WA
Posts: 1,421
|
Noisy Screen Door
One of the items on my post-Arizona-trip to-do list was to try and silence the rattling screen door. It made a racket any time the road surface was not extremely smooth.
The bulk of the noise was coming from the grid/grill/grate that is in the lower section of the door. Clearly this was meant to protect the screen from feet, knees, dogs, etc., poking holes in the screen or just punching it out of the frame.
I bought a tube of DAP silicone rubber caulking compound and fashioned a tip that would allow putting the caulk down in the little voids between the grill and its frame. The tip was a piece of plastic tubing I had laying around. The tube's tip was trimmed back so that the hole was just slightly smaller than the tubing. The tube was inserted into the tip and sealed using self-vulcanizing rubber electrical tape.
The pictures should help clarify.


Oh, yes, it really quieted the door down. The little plastic sliders still rattle a little if left open but the more they are closed the less they rattle.
FWIW
__________________
Dave & Cathy, 2002 Country Coach Affinity, 42', #6103, CAT C12, Sold - Retired From RV'ing, Linux Mint
|
|
|
|
|
03-02-2010, 06:30 AM
|
#252
|
|
Senior Member
Tiffin Owners Club Freightliner Owners Club
Join Date: Jan 2009
Location: Somewhere on the road
Posts: 615
|

Dave, the thing I found on mine was where the grill attaches to the door, there are four rivets, one on each corner. One of the rivets had broken off and the long part of the rivet was sitting there sliding back and forth inside the grill. I put a self tapping screw in the grill and made it sitt still. No more rattles.
Bill
Quote:
Originally Posted by DiplomatDave
One of the items on my post-Arizona-trip to-do list was to try and silence the rattling screen door. It made a racket any time the road surface was not extremely smooth.
The bulk of the noise was coming from the grid/grill/grate that is in the lower section of the door. Clearly this was meant to protect the screen from feet, knees, dogs, etc., poking holes in the screen or just punching it out of the frame.
I bought a tube of DAP silicone rubber caulking compound and fashioned a tip that would allow putting the caulk down in the little voids between the grill and its frame. The tip was a piece of plastic tubing I had laying around. The tube's tip was trimmed back so that the hole was just slightly smaller than the tubing. The tube was inserted into the tip and sealed using self-vulcanizing rubber electrical tape.
The pictures should help clarify.


Oh, yes, it really quieted the door down. The little plastic sliders still rattle a little if left open but the more they are closed the less they rattle.
FWIW |
__________________
Bill O'Dell,Retired U.S. Army, Retired LEO, 2014 Tiffin, Phaeton, QBH, 2023 Chevrolet Taho 4x4.
|
|
|
|
|
|
|
Currently Active Users Viewing This Thread: 1 (0 members and 1 guests)
|
|
|
 Posting Rules
|
You may not post new threads
You may not post replies
You may not post attachments
You may not edit your posts
HTML code is Off
|
|
|
|
 » Recent Discussions
 |
|
|
|
|
|
|
|
|
|
|
|
|
|
|
|
|
|
|
|
|
|
|
|
|
|


 Linear Mode

