|
|
 09-16-2011, 11:48 AM
|
#1
|
|
Senior Member
Workhorse Chassis Owner
Join Date: Aug 2007
Location: Coarsegold, CA
Posts: 917
|
Multi-Function Switch AGAIN!
Hi All,
My mutli-function switch just checked out for the fourth time. I am tired of this and am wondering what I cah do to lighten the load on this thing. Can I add relays to take the load off the switch.
I seem to have one flasher for the turn signals and the hazards. I changed it over to a heavy duty flasher with a built in relay. This stopped me from replacing flashers all the time.
There has been discussion a one flasher for turn signals and one for the hazards. I have an early chassis and have never found a flasher for the hazards.
I tow either a Jeep (two lights) or an enclosed trailer (4 lights). Is this putting the load over the top or is it just the motor home itself overloading the GM switch. My 95 Suburban has the identical part and switches a lot fewer lights.
__________________
2001 Winnebago Adventurer, 35U, W-20 8.1
F+R Trac bars, F+R sway bars, SafTsteer, F Sumo Springs, 4 Koni FSDs
2007 Forest River Lexington Ford E450 Chassis
|

|

|
 |
Join the #1 RV Forum Today - It's Totally Free!
iRV2.com RV Community - Are you about to start a new improvement on your RV or need some help with some maintenance? Do you need advice on what products to buy? Or maybe you can give others some advice? No matter where you fit in you'll find that iRV2 is a great community to join. Best of all it's totally FREE!
You are currently viewing our boards as a guest so you have limited access to our community. Please take the time to register and you will gain a lot of great new features including; the ability to participate in discussions, network with other RV owners, see fewer ads, upload photographs, create an RV blog, send private messages and so much, much more!
|
|
09-16-2011, 09:13 PM
|
#2
|
|
Senior Member
Workhorse Chassis Owner Rexhall Owners Group
Join Date: Feb 2003
Location: Everywhere,USA
Posts: 1,518
|
I have been through 2 switches also. The Emergency flashers keep going out on mine. I am looking to adding a switch on the dash for the flashers.
__________________
Full-Timers
in a
2003 Rexhall Aerbus 3550BSL
W22 Workhorse
|
|
|
|
|
09-17-2011, 05:41 AM
|
#3
|
|
Senior Member
Workhorse Chassis Owner
Join Date: Jun 2003
Location: Palisade CO
Posts: 3,588
|
My hazard flasher plugs into a connector at the end of some wires way back in the back on the left side under the dash. I found it by turning the flashers on, lifting the dash up and listening for the clicking
__________________
Clay WA5NMR - Ex Snowbird - 1 year, Ex Full timer for 11 years - 2004 Winnebago Sightseer 35N Workhorse chassis. Honda Accord toad.
|
|
|
|
|
09-17-2011, 06:35 PM
|
#4
|
|
Moderator Emeritus
Winnebago Owners Club Workhorse Chassis Owner Coastal Campers Carolina Campers
Join Date: Jan 2000
Location: Conway, SC
Posts: 23,641
|
Quote:
Originally Posted by Full-Timers

I have been through 2 switches also. The Emergency flashers keep going out on mine. I am looking to adding a switch on the dash for the flashers.
|
I'm only on my second, MFS.  Mine failed under warranty way back in the day. 
__________________
03 Adventurer 38G, Workhorse W22
F&R Track Bars, Safety+ , Ultrapower, Taylor Extremes, SGII
TST 507, Blue Ox, SMI, Koni FSD, CrossFire
RV/MH Hall of Fame - Lifetime Member
|
|
|
|
|
09-19-2011, 12:43 PM
|
#5
|
|
Senior Member
Workhorse Chassis Owner
Join Date: Aug 2007
Location: Coarsegold, CA
Posts: 917
|
What is the trick to removing this switch? Do I have to pull the steering wheel? Everything is loose but the steering wheel adjustment knob is preventing me from removing the bottom panel and I don't want to pull too hard. The top panel seems to be held in by the steering wheel.
__________________
2001 Winnebago Adventurer, 35U, W-20 8.1
F+R Trac bars, F+R sway bars, SafTsteer, F Sumo Springs, 4 Koni FSDs
2007 Forest River Lexington Ford E450 Chassis
|
|
|
|
|
09-19-2011, 03:03 PM
|
#6
|
|
Senior Member
Ford Super Duty Owner
Join Date: May 2010
Location: Chasing 70 degrees in lower 48
Posts: 2,031
|
I have been thinking about going to LED's in toad tow lights and coach brake lights just because of similar posts in the past AND faster light response time. Have read about responce time but finally saw an 18 wheeler with led on one side and incand. on the other. Big difference - the LED brake light was on full long before incand. Very impressive difference and I figure might save our rear end - literally.
|
|
|
|
|
09-19-2011, 04:21 PM
|
#7
|
|
Senior Member
Damon Owners Club Forest River Owners Club Ford Super Duty Owner
Join Date: Dec 2010
Posts: 255
|
Quote:
Originally Posted by ctpres
I have been thinking about going to LED's in toad tow lights and coach brake lights just because of similar posts in the past AND faster light response time. Have read about responce time but finally saw an 18 wheeler with led on one side and incand. on the other. Big difference - the LED brake light was on full long before incand. Very impressive difference and I figure might save our rear end - literally.
|
Thats my thinking also ctpres, I have read some where, maybe here about flashers and leds and their working together?....but it is a whole lot easier to change a bulb.Thats what I like 
Lets us know what the outcome is, interesting topic!
Richard
__________________
May the wind be at your back,The sun in your face
And your love by your side!!
USMC 68/74 RVN 69/70. Semper-Fi!
|
|
|
|
|
09-19-2011, 04:48 PM
|
#8
|
|
Senior Member
Workhorse Chassis Owner Rexhall Owners Group
Join Date: Feb 2003
Location: Everywhere,USA
Posts: 1,518
|
Quote:
Originally Posted by bruceh
What is the trick to removing this switch? Do I have to pull the steering wheel? Everything is loose but the steering wheel adjustment knob is preventing me from removing the bottom panel and I don't want to pull too hard. The top panel seems to be held in by the steering wheel.
|
I thought so but maybe not.
Multifunction Turn Signal Lever
Replacement – On Vehicle
Removal Procedure
1. Remove the tilt lever. Refer to Tilt Lever Replacement – On Vehicle in this supplement.
2. Remove the lower steering column cover. Refer to Steering Column Cover Replacement – Lower in this supplement.
3. Remove the lock cylinder. Refer to Steering Column Lock Cylinder Replacement in this supplement.
4. Remove the upper steering column cover. Refer to Steering Column Cover Replacement – Upper in this supplement.
5. Remove the multifunction lever bolts and lever from the steering column.
6. Disconnect the multifunction lever electrical connector.
__________________
Full-Timers
in a
2003 Rexhall Aerbus 3550BSL
W22 Workhorse
|
|
|
|
|
09-19-2011, 06:09 PM
|
#9
|
|
Senior Member
Workhorse Chassis Owner Rexhall Owners Group
Join Date: Feb 2003
Location: Everywhere,USA
Posts: 1,518
|
Multifunction Turn Signal Lever Replacement
Multifunction Turn Signal Lever Replacement
Removal Procedure
1. Remove the tilt lever by pulling the tilt lever straight out from the steering column tilt latch.
2. Remove the lower steering column cover by removing the two screws from the lower steering cover.
3. Remove the two screws from the upper steering column cover to access the top of the steering column.
3. Remove the lock cylinder by
Place the ignition cylinder in the run position.
Install an awl into the access hole at the top of the steering column.
Turn the ignition cylinder to the start position and remove the ignition cylinder.
4. Remove the upper steering column cover.
5. Remove the multifunction lever bolts and lever from the steering column.
6. Disconnect the multifunction lever electrical connector.
Installation Procedure
1. Connect the multifunction lever electrical connector.
2. Install the multifunction lever and bolts to the steering column.
3. Install the upper steering column cover.
4. Install the ignition cylinder by pushing into the cylinder case, position ignition to the run position.
5. Install the lower steering column cover.
6. Push the till lever into the steering column tilt latch.
 
__________________
Full-Timers
in a
2003 Rexhall Aerbus 3550BSL
W22 Workhorse
|
|
|
|
|
09-19-2011, 09:51 PM
|
#10
|
|
Senior Member
Workhorse Chassis Owner
Join Date: Aug 2007
Location: Coarsegold, CA
Posts: 917
|
Many thanks to full timers. I will put it into practice tomorrow!
__________________
2001 Winnebago Adventurer, 35U, W-20 8.1
F+R Trac bars, F+R sway bars, SafTsteer, F Sumo Springs, 4 Koni FSDs
2007 Forest River Lexington Ford E450 Chassis
|
|
|
|
|
09-19-2011, 09:55 PM
|
#11
|
|
Senior Member
Workhorse Chassis Owner Rexhall Owners Group
Join Date: Feb 2003
Location: Everywhere,USA
Posts: 1,518
|
Quote:
Originally Posted by bruceh
Many thanks to full timers. I will put it into practice tomorrow!
|
Please let me know if it is as easy as it looks here. I need to do mine also.
__________________
Full-Timers
in a
2003 Rexhall Aerbus 3550BSL
W22 Workhorse
|
|
|
|
|
09-20-2011, 04:47 PM
|
#12
|
|
Senior Member
Workhorse Chassis Owner
Join Date: Aug 2007
Location: Coarsegold, CA
Posts: 917
|
Quote:
Originally Posted by Full-Timers
.
3. Remove the lock cylinder by
Place the ignition cylinder in the run position.
Install an awl into the access hole at the top of the steering column.
Turn the ignition cylinder to the start position and remove the ignition cylinder.
|
OK, I am feeling slow here. Any ideas about the access hole at the top of the steering column? Where oh where might it be?
__________________
2001 Winnebago Adventurer, 35U, W-20 8.1
F+R Trac bars, F+R sway bars, SafTsteer, F Sumo Springs, 4 Koni FSDs
2007 Forest River Lexington Ford E450 Chassis
|
|
|
|
|
09-20-2011, 05:41 PM
|
#13
|
|
Senior Member
Workhorse Chassis Owner Rexhall Owners Group
Join Date: Feb 2003
Location: Everywhere,USA
Posts: 1,518
|
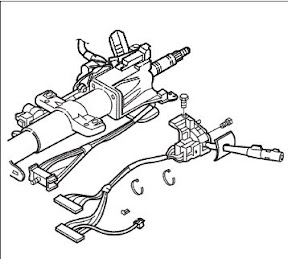
Should be right on top of the cylinder lock (1).
__________________
Full-Timers
in a
2003 Rexhall Aerbus 3550BSL
W22 Workhorse
|
|
|
|
|
09-21-2011, 11:37 AM
|
#14
|
|
Senior Member
Workhorse Chassis Owner
Join Date: Aug 2007
Location: Coarsegold, CA
Posts: 917
|
Quote:
Originally Posted by Full-Timers
3. Remove the two screws from the upper steering column cover to access the top of the steering column.
3. Remove the lock cylinder by
Place the ignition cylinder in the run position.
Install an awl into the access hole at the top of the steering column.
Turn the ignition cylinder to the start position and remove the ignition cylinder.
4. Remove the upper steering column cover.
|
There is a chicken/egg problem here. The access hole is on top of the steering column and can't be accessed UNTIL the top cover is off. I managed to wiggle the top cover off with the lock cylinder in place.
The latest obstacle is the need for a short Torx t25. Unless I want to remove the steering wheel (I really don't), you need a stubby t25 which I don't yet have.
As a side note, observe that there are two step 3s.
Work in progress!
__________________
2001 Winnebago Adventurer, 35U, W-20 8.1
F+R Trac bars, F+R sway bars, SafTsteer, F Sumo Springs, 4 Koni FSDs
2007 Forest River Lexington Ford E450 Chassis
|
|
|
|
|
|
|
Currently Active Users Viewing This Thread: 1 (0 members and 1 guests)
|
|
|
| Thread Tools |
Search this Thread |
|
|
|
| Display Modes |
 Linear Mode Linear Mode
|
 Posting Rules
|
You may not post new threads
You may not post replies
You may not post attachments
You may not edit your posts
HTML code is Off
|
|
|
|
 » Recent Discussions
 |
|
|
|
|
|
|
|
|
|
|
|
|
|
|
|
|
|
|
|
|
|
|
|
|
|