Journey with Confidence RV GPS App RV Trip Planner RV LIFE Campground Reviews RV Maintenance Take a Speed Test Free 7 Day Trial ×
RV Trip Planning Discussions

Go Back   iRV2 Forums > MOTORHOME FORUMS > Class A Motorhome Discussions
Click Here to Login
Join iRV2 Today

Mission Statement: Supporting thoughtful exchange of knowledge, values and experience among RV enthusiasts.
Reply
  This discussion is proudly sponsored by:
Please support our sponsors and let them know you heard about their products on iRV2
 
Thread Tools Search this Thread Display Modes
 
Old 08-21-2014, 09:51 AM   #71
Senior Member/RVM #90
 
MSHappyCampers's Avatar


Monaco Owners Club
Join Date: Nov 2002
Location: Columbus, MS
Posts: 54,758
Well, we're almost there! The guy will be here to lay the vinyl tile tommorrow! I'll post some pics after that!
__________________
Joe & Annette
Sometimes I sits and thinks, sometimes I just sits.....
2002 Monaco Windsor 40PBT, 2013 Honda CRV AWD
MSHappyCampers is offline   Reply With Quote
Join the #1 RV Forum Today - It's Totally Free!

iRV2.com RV Community - Are you about to start a new improvement on your RV or need some help with some maintenance? Do you need advice on what products to buy? Or maybe you can give others some advice? No matter where you fit in you'll find that iRV2 is a great community to join. Best of all it's totally FREE!

You are currently viewing our boards as a guest so you have limited access to our community. Please take the time to register and you will gain a lot of great new features including; the ability to participate in discussions, network with other RV owners, see fewer ads, upload photographs, create an RV blog, send private messages and so much, much more!

Old 08-21-2014, 11:37 AM   #72
Senior Member
 
Gilleshps's Avatar
 
Join Date: May 2011
Posts: 166
Ernie is it safe to lay/glue over this vinyl?
It's solid, no bubbles or lifting aside from the edge meeting the hall which I will cut off.

All done replacing the subfloor, finally!
Attached Thumbnails
Click image for larger version

Name:	image-78390900.jpg
Views:	242
Size:	458.4 KB
ID:	71570   Click image for larger version

Name:	image-2794626679.jpg
Views:	231
Size:	462.5 KB
ID:	71571  

Gilleshps is offline   Reply With Quote
Old 08-22-2014, 01:27 PM   #73
Senior Member/RVM #90
 
MSHappyCampers's Avatar


Monaco Owners Club
Join Date: Nov 2002
Location: Columbus, MS
Posts: 54,758
Getting excited! The guy is laying the tile and putting down new shoe mold as we speak! Can't wait to show you the pics!
__________________
Joe & Annette
Sometimes I sits and thinks, sometimes I just sits.....
2002 Monaco Windsor 40PBT, 2013 Honda CRV AWD
MSHappyCampers is offline   Reply With Quote
Old 08-23-2014, 05:36 AM   #74
Senior Member
 
Ernie Ekberg's Avatar
 
Join Date: Dec 2000
Location: Weatherford, Tx 76086 USA
Posts: 1,715
Send a message via AIM to Ernie Ekberg Send a message via Yahoo to Ernie Ekberg
Quote:
Originally Posted by Gilleshps View Post
Ernie is it safe to lay/glue over this vinyl?
It's solid, no bubbles or lifting aside from the edge meeting the hall which I will cut off.

All done replacing the subfloor, finally!
the grout lines in old may telegraph thru- but if you can live with that- sure go ahead
__________________
Ernie Ekberg
Foretravel
Mineral Wells, Texas
Ernie Ekberg is offline   Reply With Quote
Old 08-23-2014, 02:22 PM   #75
Senior Member/RVM #90
 
MSHappyCampers's Avatar


Monaco Owners Club
Join Date: Nov 2002
Location: Columbus, MS
Posts: 54,758
OK, got 'er done! The DW has been wanting to remove the carpet and ceramic tile and put down a premium vinyl tile. Below is a blow-by-blow of the process.

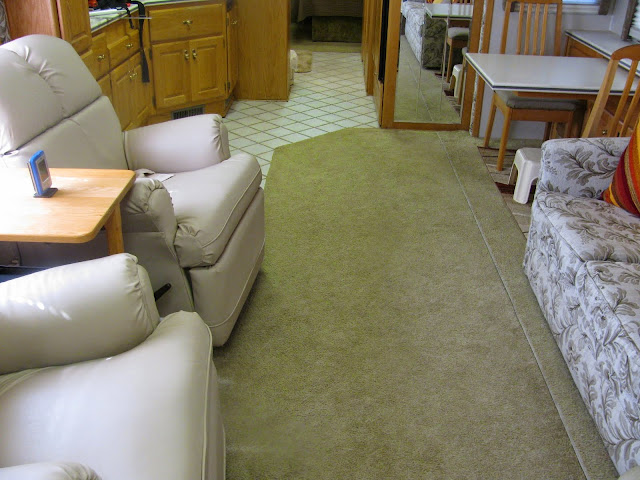
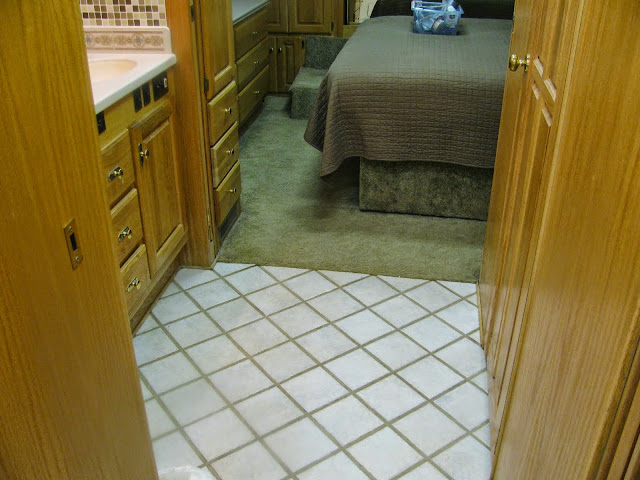
These shots are what the old carpet and tile looked like. Actually, they don't show how BAD the old carpet was and the cracks in the ceramic tile!


Getting the old carpet out was easy, except for pulling out hundreds of staples that were holding the foam carpet pad! The carpet was stapled around the perimeter, but those staples pulled out with the carpet. I had to use a small pair of side snips to individually pull every staple!

Than came the real fun, getting the ceramic tile up! I had to use an old wood chisel (about 1 1/2" wide) and a hammer to chisel up those squares, usually breaking them up into about a dozen pieces! Once in a while I would get lucky and the entire tile would pop up, but not often! If you have a hammer drill that will vibrate and not rotate, and a chisel bit, you can save yourself a TON of work! After getting all the ceramic tiles up, then I had to chip up all the grout and the cement that was used to stick the tiles down! Monaco sure didn't use any cheap cement to stick that stuff down! Many times chunks of the OSB board, which was under the carpet and tile, pulled up with the tile. I used the Durham's Rock Hard Water Putty to fill all these holes. BTW, I highly recommend that putty! It is easy to mix and dries fast! I had a tendency to put too much water but I got the hang of it after a while.


After the floor was reasonably clean and level, the next step was to put down the Luan board. I had never heard of this until the building supply store showed it to me. It's thinner than 1/4" plywood and has some flex which helps in tight places. I wanted to make each piece as large as possible in order to have fewer seams or joints, because those usually must be leveled using the putty. You've heard of the old saying "measure twice, cut once" ? Well, in this case you better measure SEVERAL times and cut once! Don't ask me how I know that!

I decided not to use cement under the Luan, but chose to screw it down securely. I used #6 x 1" coarse thread drywall screws. Monaco told me that there were two layers of 1/2" OSB, and I didn't want the screws to go through into the basement and risk puncturing cables or water pipes. I didn't want any squeaks in the floor so I put the screws 6" apart around the perimeter and 8" apart throughout the board. That took close to 100 screws per 4'x8' board! You have to run the screws in so the head is pulled below the surface of the board. You can't take a chance on the head sticking up to cause a raised spot in the vinyl over a period of time. Next step is to use the putty to fill and level every single screw hole!! That's HUNDREDS of holes! But wait, you're not through yet! After it dries then you've got to sand every one of those patches! Of course, if you're good enough with the putty so it's perfectly smooth, they you can skip that last step. I wasn't!! Below is what it looked like when it was finally ready for the tile to be laid.


I didn't attempt to lay the tile myself. I'm really not that dumb! The professional installer came in and completed the job in one day, which included installing new hardwood shoe mold that I had stained to match the cabinets. I was pretty proud of myself for matching the color so closely! He only charged me $190, including his helper, and he provided the glue. I thought that was very reasonable!

I worked HARD for about a week getting it to the point where he could lay the tile! My knees are worn completely out (yes, I used knee-pads), and I'm sore in places that I didn't even know I had places! If you're a young whipper-snapper in good physical shape, reasonably handy at that sort of thing, then go for it! If you're a fat old geezer like me and can squeeze out the money to pay Ernie or some other professional to do the entire job, then by all means do it!

I haven't figured my total cost for the project, but if anyone is interested I will post that later.

We're gonna replace the carpet in the cockpit area and on the slide at a later time.

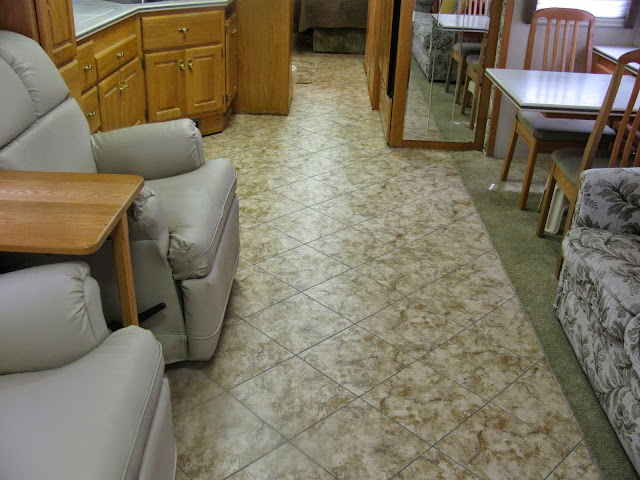
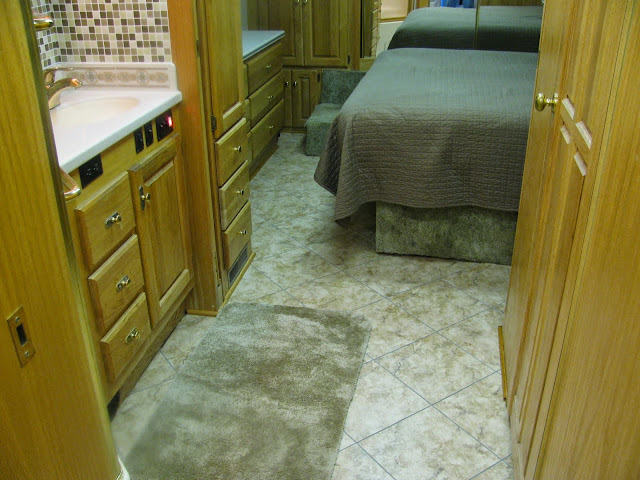
Below are pics of the completed project. The first shot towards the front shows the true color of the tile. The others came out off-color for some reason.


__________________
Joe & Annette
Sometimes I sits and thinks, sometimes I just sits.....
2002 Monaco Windsor 40PBT, 2013 Honda CRV AWD
MSHappyCampers is offline   Reply With Quote
Old 08-23-2014, 02:40 PM   #76
Senior Member
 
Ernie Ekberg's Avatar
 
Join Date: Dec 2000
Location: Weatherford, Tx 76086 USA
Posts: 1,715
Send a message via AIM to Ernie Ekberg Send a message via Yahoo to Ernie Ekberg
What a difference!!!!!
__________________
Ernie Ekberg
Foretravel
Mineral Wells, Texas
Ernie Ekberg is offline   Reply With Quote
Old 08-23-2014, 05:54 PM   #77
Registered User
 
Monaco Owners Club
Join Date: Oct 2009
Location: Varies Depending on The Weather
Posts: 8,517
Outstanding job and an exceptional improvement over the old tile and carpet.

Now it's time to enjoy your hard work!

Dr4Film ----- Richard
Dr4Film is offline   Reply With Quote
Old 08-24-2014, 09:20 AM   #78
Senior Member
 
vsheetz's Avatar


Fleetwood Owners Club
Ford Super Duty Owner
Join Date: Jun 2012
Location: SoCal
Posts: 15,749
Nice!!
__________________
Vince and Susan
2011 Tiffin Phaeton 40QTH (Cummins ISC/Freightliner)
Flat towing a modified 2005 Jeep (Rubicon Wrangler)
Previously a 2002 Fleetwood Pace Arrow 37A and a 1995 Safari Trek 2830.
vsheetz is offline   Reply With Quote
Old 08-24-2014, 11:05 AM   #79
Senior Member
 
Tomtall's Avatar
 
Winnebago Owners Club
Workhorse Chassis Owner
Join Date: Dec 2013
Location: S.W., Michigan
Posts: 686
WOW

I'd be scared to walk on it! Great job and color choices.
__________________
2003 Winnebago WFG33V Adventurer - 8.1 Gas, Workhorse Chassis - Medium Titanium Metalic

"For GOD'S sake, be human"
Tomtall is offline   Reply With Quote
Old 08-24-2014, 01:09 PM   #80
Member
 
rvharry's Avatar
 
Tiffin Owners Club
Join Date: Dec 2005
Posts: 37
Looks Good, very nice job, whose tile was used
rvharry is offline   Reply With Quote
Old 08-24-2014, 01:11 PM   #81
Senior Member/RVM #90
 
MSHappyCampers's Avatar


Monaco Owners Club
Join Date: Nov 2002
Location: Columbus, MS
Posts: 54,758
Quote:
Originally Posted by rvharry View Post
Looks Good, very nice job, whose tile was used

Nafco AMGT42 premium vinyl 12" tiles
__________________
Joe & Annette
Sometimes I sits and thinks, sometimes I just sits.....
2002 Monaco Windsor 40PBT, 2013 Honda CRV AWD
MSHappyCampers is offline   Reply With Quote
Old 08-24-2014, 09:22 PM   #82
Senior Member
 
Thor Owners Club
Join Date: Jun 2011
Posts: 2,893
I can see that the prep work is what makes the project a success.....Very nice job Joe.
Fred1609 is offline   Reply With Quote
Old 08-25-2014, 06:30 AM   #83
JC2
Senior Member
 
JC2's Avatar
 
Texas Boomers Club
Join Date: Dec 2003
Location: Mo/Texas
Posts: 3,555
Very nice project Mr Joe. Whatever keeps the bride happy will pay off in the long haul. How much of the carpet under the slide did you remove? Did you have to lift the slide to do this? Have you moved the slides in/out enough to see if there is any evidence of marks on the vinyl yet from the rollers?
JC2 is offline   Reply With Quote
Old 08-25-2014, 07:42 AM   #84
Senior Member/RVM #90
 
MSHappyCampers's Avatar


Monaco Owners Club
Join Date: Nov 2002
Location: Columbus, MS
Posts: 54,758
Quote:
Originally Posted by JC2 View Post
Very nice project Mr Joe. Whatever keeps the bride happy will pay off in the long haul. How much of the carpet under the slide did you remove? Did you have to lift the slide to do this? Have you moved the slides in/out enough to see if there is any evidence of marks on the vinyl yet from the rollers?

We did not remove the carpet covering the slide. We plan to replace that, the carpet on the base of the bed, and the carpet in the cockpit area with new carpet in the near future. In fact, we are looking at carpet now to decide what we want to use.

We just moved the slides in and out a couple of times to be sure there were no apparent problems. One side of the bed base was making an indention in the old carpet so we plan to use a piece of thin plastic to place under that corner when moving the slide in and out.
__________________
Joe & Annette
Sometimes I sits and thinks, sometimes I just sits.....
2002 Monaco Windsor 40PBT, 2013 Honda CRV AWD
MSHappyCampers is offline   Reply With Quote
Reply


Currently Active Users Viewing This Thread: 1 (0 members and 1 guests)
 
Thread Tools Search this Thread
Search this Thread:

Advanced Search
Display Modes

Posting Rules
You may not post new threads
You may not post replies
You may not post attachments
You may not edit your posts

BB code is On
Smilies are On
[IMG] code is On
HTML code is Off
Trackbacks are Off
Pingbacks are Off
Refbacks are Off


Similar Threads
Thread Thread Starter Forum Replies Last Post
Replacing flooring JSBennett Gulf Stream Owner's Forum 4 12-05-2014 08:56 AM
Flooring dilemma jcmack Newmar Owner's Forum 2 04-29-2014 08:26 AM
New flooring hardwood for Revolution - documenting process akeyzoo Class A Motorhome Discussions 106 04-20-2014 06:51 PM
Bounder: Question on New MH BarryN514 Fleetwood Owner's Forum 26 11-07-2013 07:34 AM

» Featured Campgrounds

Reviews provided by


All times are GMT -6. The time now is 03:07 AM.


Powered by vBulletin® Version 3.8.8 Beta 1
Copyright ©2000 - 2024, vBulletin Solutions, Inc.