 |
|
 05-01-2014, 08:00 PM
|
#1
|
|
Member
Join Date: May 2014
Location: Novato, CA
Posts: 87
|
Our little Bantam - R-vision
Picked up a slightly used Bantam, and started working on her right away. The interesting thing about this trailer is that it is 14 years old, but had the original tires, and had never left the county it was bought in. Estimated total miles is under 2,000. It went to a local lake about 15 times. Tire tread was like new, but sun rotted.
picture after a good bit of cleaning:


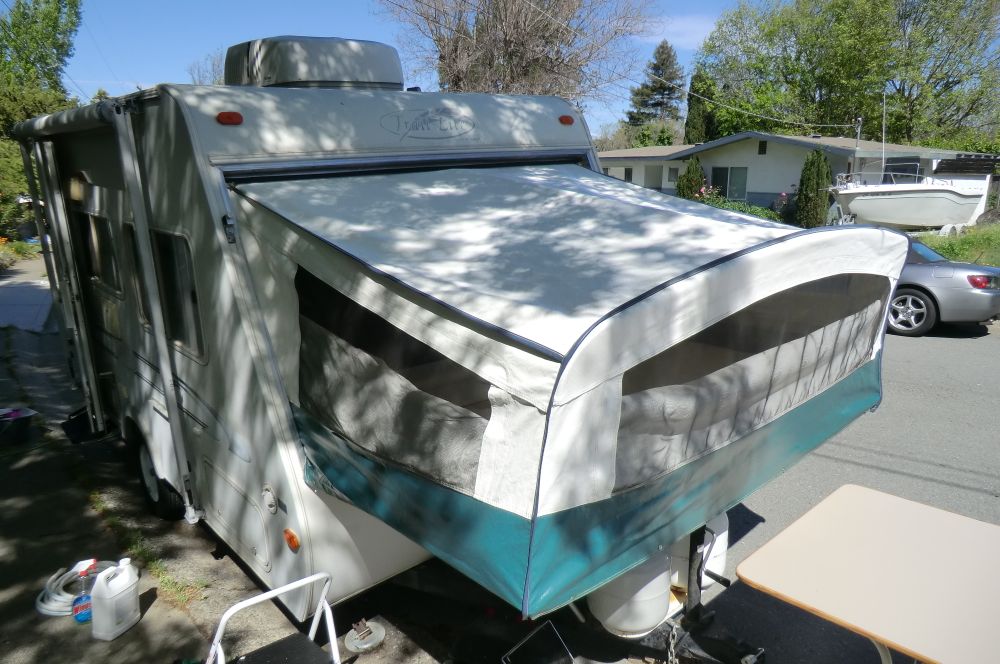
Anyhow, she has been well baked by the Central California sun, most everything on the outside of the trailer is converting back to the elements. If it was plastic, it is either powder now, or well faded. Rubber seals on the front bunk will be getting replaced, new tires, new battery, LED interior lights, water pump rebuild, and a lot of new bits for the exterior as needed. Will be resealing the roof and other parts very soon.
Currently working on the front hitch area. Junky factory paint was chipping off, and debating moving the propane tanks back for better spacing.
What it started with:

Cleaned and painted with SEM trim black:

I think they placed the propane tanks so far forward for tongue weight as this trailer is very light on the front. (No WD hitch needed yet.)
LEDs in:

Those are the pics i took, done a fair bit more. She was pretty dirty. The previous owners seem to have done little if anything in terms of cleaning or maintenance.
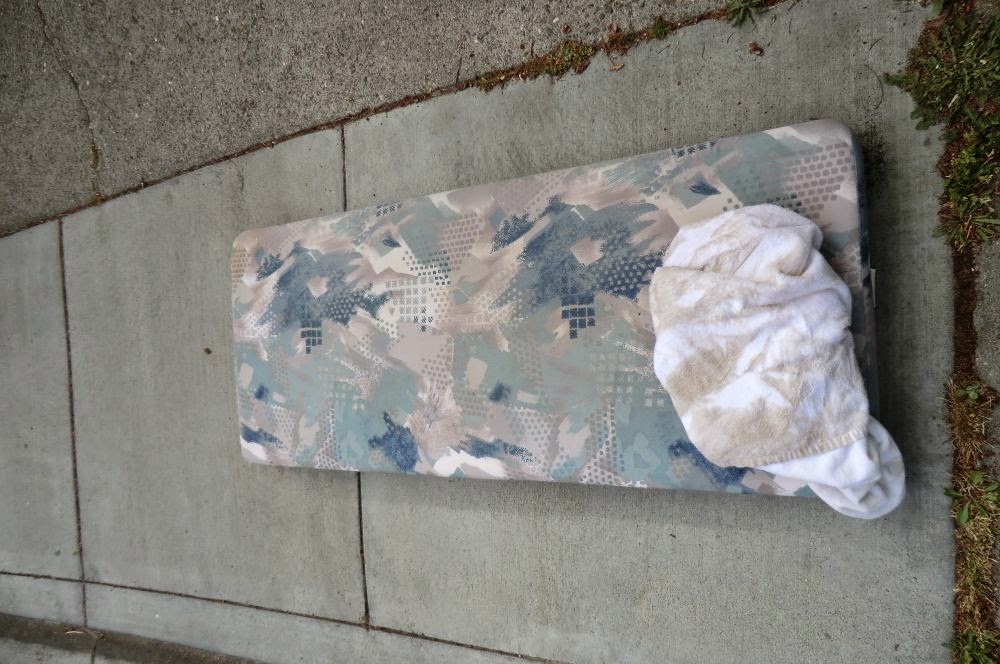
Now the big question. The front tent canvas has some wonderful mildew stains on the inside. The outside was easy enough to clean, but the the inside is a fabric like coating to cut down on moisture/dripping. How can I clean this material? Carpet cleaner? I used some Resolve on the seat cushions with pretty good results. Is there something better I can use? Here is a picture to give you an idea of what it looks like. (No mildew smells, and not visible from the outside.)

Thanks for looking. Really looking forward to putting this trailer to work. 
-Wayne
|

|

|
 |
Join the #1 RV Forum Today - It's Totally Free!
iRV2.com RV Community - Are you about to start a new improvement on your RV or need some help with some maintenance? Do you need advice on what products to buy? Or maybe you can give others some advice? No matter where you fit in you'll find that iRV2 is a great community to join. Best of all it's totally FREE!
You are currently viewing our boards as a guest so you have limited access to our community. Please take the time to register and you will gain a lot of great new features including; the ability to participate in discussions, network with other RV owners, see fewer ads, upload photographs, create an RV blog, send private messages and so much, much more!
|
|
05-02-2014, 04:11 AM
|
#2
|
|
Senior Member
Join Date: Jul 2013
Location: Incheon, S. Korea
Posts: 203
|
That looks like an awesome little trailer! I use bleach and soap per the manufacturers instruction to clean the mildew, but you can get some pretty good cleaners in the states. Search the forum for "mildew" and/or "stains" and I'm sure you'll get some good suggestions.
What did you pay for it?
|
|
|
|
|
05-02-2014, 10:33 AM
|
#3
|
|
Member
Join Date: May 2014
Location: Novato, CA
Posts: 87
|
I probably paid a little too much since she did not include the normal trailer supplies and has had so many little things to deal with. But I paid $3000. It was originally listed at $3900, and was out in the middle of nowhere. She had a few emails, but no one stop by to check it out. She then dropped the price to $3000 and she had a lot of interest and several people want to check it out. I was not aware of this, but was the first person to see the trailer, right after we decided to buy it, another buyer showed up.
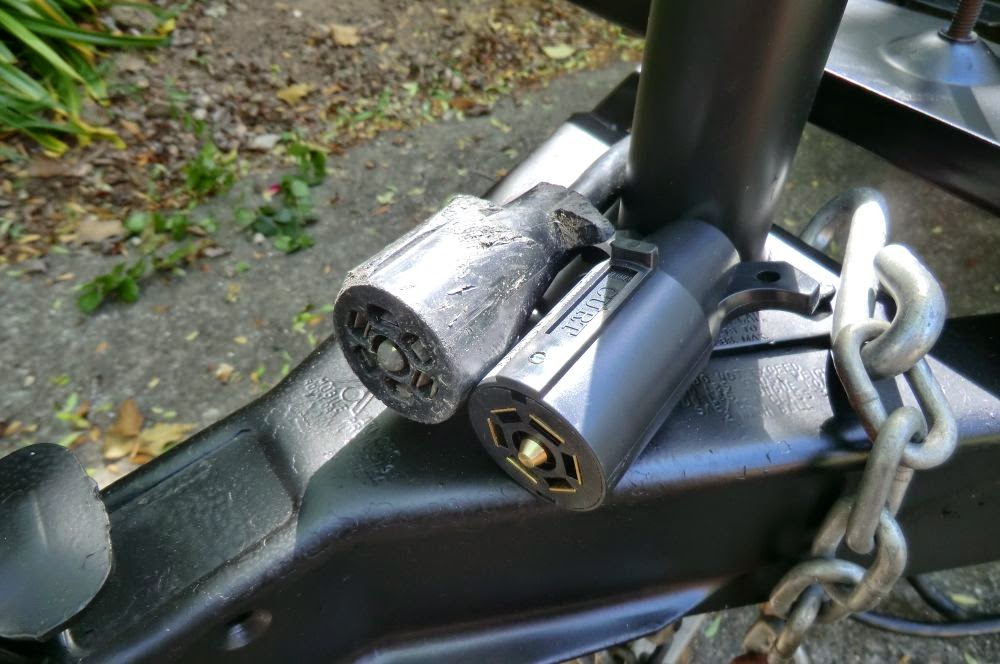
Still need to level the trailer so I can test the refrigerator. The only items I need to test are the awning (missing pull cord), outside shower and the outside cook top. Should be able to test those items this weekend. Will also be rewiring the 7 pin connector as the old one is badly rusted, new tow chain as the existing one is badly rusted, and hopefully instal some wheels on the back so I can get this LOW trailer up my driveway.
Speaking of which, I'll be lifting the trailer also. If anyone would like a "lift kit" for theirs, let me know. I can make up a few spare at the same time. I think I'll go for 2 or 3 inches depending on how bad the driveway rolling goes. This will give me more ground clearance for the driveway and I do plan to take this down smooth dirt roads and onto the occasional beach. Right now there is very little ground clearance. The bigger advantage is I'll be able to upgrade to 14 or even 15" tires, this will allow a higher load rating on the tires, this is a big plus as am not that comfortable with the lower rating on the 13" tires. (Anyone need a brand new pair of 13" tires. LOL)
-Wayne
|
|
|
|
|
05-03-2014, 01:19 AM
|
#4
|
|
Senior Member
Join Date: Jul 2013
Location: Incheon, S. Korea
Posts: 203
|
You did just fine on the price!
|
|
|
|
|
05-03-2014, 06:33 PM
|
#5
|
|
Senior Member
Thor Owners Club Pond Piggies Club Outdoors RV Owners Club
Join Date: Jun 2000
Location: NE. Ohio USA
Posts: 5,973
|
For your exterior fiberglass skin, try a product called Gel Gloss. It's a cleaner and a wax. A friend of ours had a 99' Aerolite hybrid that looked like crap. The exterior surface was blackish, oxidized, faded.... obviously not cleaned in many years.
Took 2 of us about an hour to clean the back end. Take some old (clean) terry cloth shop towels or old terrycloth bath towels and put a half dollar dollop on the rag, work on a area of about 12" to 18" square. You will see all the black and gray colored weathered stains come off. Don't wipe it all off. Let it dry for 15-20 minutes and wipe it off with a clean towel. Use a new area of the rag as you go. When the rag gets filled up with junk, I'll put them in a pail and soak them in hot water with a little laundry soap and rinse them many times with clean water and let them dry out.
A 1/2 gallon or quart should be plenty. I use it 2-3 times a year to keep mine in like new condition. They make a "heavy duty" formula that has a added "UV" protector, I use on the area with decals.
|
|
|
|
|
05-03-2014, 10:20 PM
|
#6
|
|
Senior Member
Join Date: Apr 2014
Location: Austin,TX
Posts: 464
|
Grats! I have a 2004 Bantam 19 in great condition. When I bought it there were a few specs of mildew on the tenting windows. Simple Green took care of it. Spray it on, wait a few minutes, scrub it off.
Word of caution, these are known for leaks developing at the bottom front seam. Make sure it stays caulked. Yours doesn't have the propane surround that mine does, which is another common point of entry.
Here is a pic of mine taken today. I'm currently laying in the front bunk as I type!

__________________
2018 Primetime Crusader 319RKT
2013 RAM 2500 4X4 Laramie CrewCab, 6'4'' bed, 3.42 RAR, 6.7L Cummins Turbo Diesel, Payload 2547, Max tow 17,480, PullRite Superglide
|
|
|
|
|
05-05-2014, 12:38 PM
|
#7
|
|
Member
Join Date: May 2014
Location: Novato, CA
Posts: 87
|
Thanks folks!
I got a little more done on Saturday. I added some wheels to the back of the frame so I could get the trailer up my rather steep driveway. I had to remove the rear leveling jacks, but they are rather horrible versions anyhow, so no loss. Need to find some good ones now. Here are a few pics of the wheels in action:


Went right up the driveway with no fuss. I expected it to make some nasty noises, etc. I was careful to make sure it was a straight push up, not turning. I placed the wheels so the rear bumper has about 2 inches of clearance before the wheels hit. This leaves me a little room for a fixed jack at the rear corners.
Now that the trailer is in the driveway, she is much more enjoyable to work on. I started by stripping the old paint and rust from the propane tank mount and painting it up. I also removed the old snapped off bolts that held it in place and put in some new hardware.


The area behind the propane tanks is for holding the spare tire, or so I assume. I'm missing the hardware to actually attach the tire, but not a big deal. I'm debating putting a bike mount in this space to hold a tandem bike (without wheels), but not sure yet. I think the bike may be in the way there, especially when turning sharp, and when putting the bunk down. It may need to live on the rear of the trailer instead.
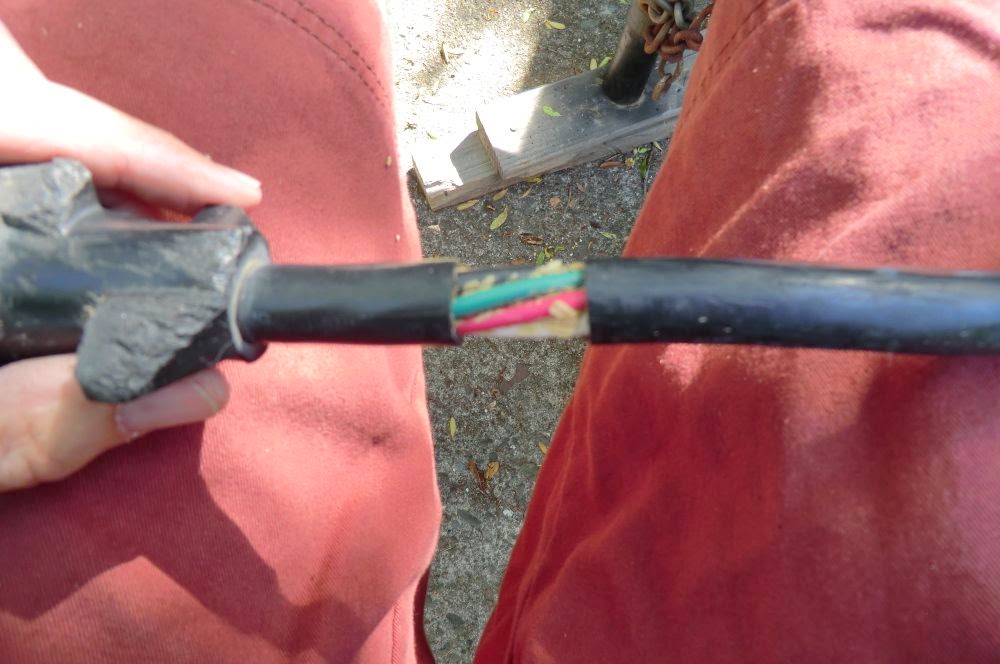
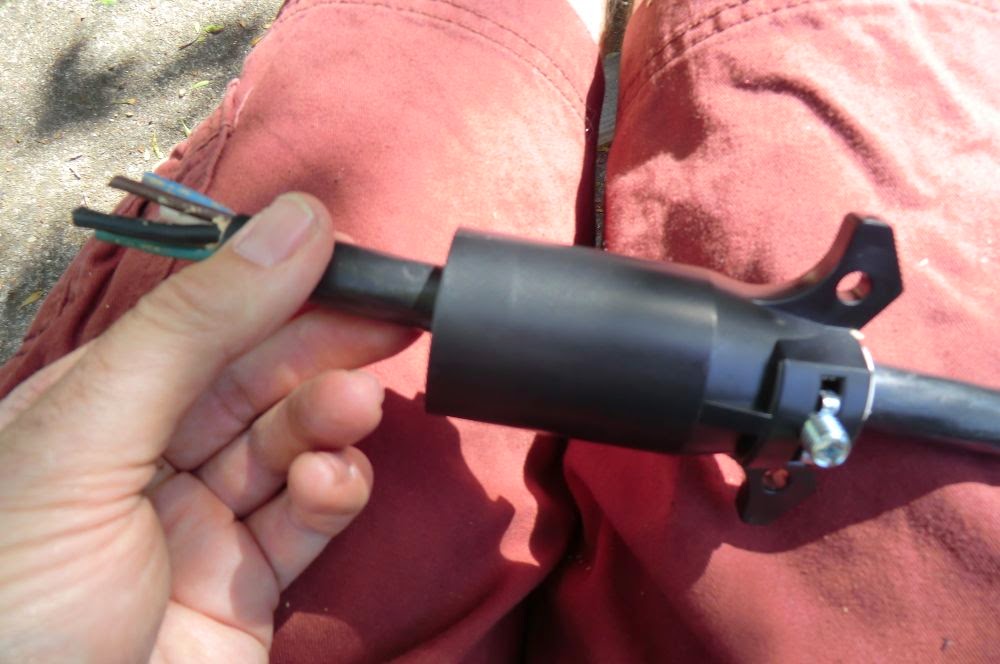
I also started rewiring the trailer connector. The old one was is horrible shape and did not work reliably.
Old and new:
Cutting into the old cable:
Slip on new housing:
Strip the wires:
https://lh3.googleusercontent.com/-A...o/CIMG2773.JPG
Make connections:

Of course when I tested the new connector my tail lights would not work. So now I need to play with the VOM and see what went wrong. House lights worked. Put all colors in the right places according to the connector labels, but I recall someone commenting that sometimes one or two of the wires need to be flipped.
Also installed new safety chains as the old ones were in bad shape.
Quote:
|
Word of caution, these are known for leaks developing at the bottom front seam. Make sure it stays caulked. Yours doesn't have the propane surround that mine does, which is another common point of entry.
|
Yes, that seam is pretty much open on this trailer. I have my caulking to seal it up, but have not done so yet. I also picked up some roof seam tape as the front and rear roof seams look like they may have leaked a bit into the walls on the driver side. (Very slight delimitation of skins, but walls are solid.) By the way, nice camp site!
The exterior of the trailer is in very good condition, I was surprised how good the walls look after a sponge bath to wipe off some oxidation. I plan to put a light waxing on to keep them looking good, and make it easier to wash off the road soils.
So the trailer is sitting level in the driveway, and the front end is basically back together. I'll turn on the propane and finally test the little refrigerator out. Keeping fingers crossed.
Still more to do, but most of the big things are getting checked off.
-Wayne
|
|
|
|
|
05-05-2014, 12:41 PM
|
#8
|
|
Member
Join Date: May 2014
Location: Novato, CA
Posts: 87
|
Forgot to mention, I have now received three offers from random people to buy the trailer! This just amazes me. People see me working on it, ask a few questions and then offer to buy it. LOL Seems I was not the only one looking for something this size.
-Wayne
|
|
|
|
|
05-05-2014, 05:07 PM
|
#9
|
|
Member
Join Date: May 2014
Location: Novato, CA
Posts: 87
|
I also cleaned up the interior cushions a bit, they looked a bit nasty. They look better now, and smell and feel better to.


You can see what came out of this one cushion:
Anyone have a better cleaning product for these cushions? That can of resolve did OK, but only cleaned about 2 cushions, and I think the cleaning could have been better. Might just recover them, I don't know. Going to have to deal with a couple of dogs sleeping on them... LOL

-Wayne
|
|
|
|
|
05-05-2014, 06:31 PM
|
#10
|
|
Senior Member
Thor Owners Club Pond Piggies Club Outdoors RV Owners Club
Join Date: Jun 2000
Location: NE. Ohio USA
Posts: 5,973
|
Good picture updates.. 
|
|
|
|
|
05-06-2014, 03:35 PM
|
#11
|
|
Senior Member
Join Date: Apr 2014
Location: Austin,TX
Posts: 464
|
I don't want to scare you, but the frame is not meant to be used to lift the camper like that. Only the Axle and tongue jack should be weight bearing points with the ground.
The leveling "jacks" as you call them, are not jacks at all. They are stabilizers. They are not meant to lift the frame in any way.
Your littel wheels are lifting the camper up by the back of the frame. Weak points will develop from the stress and your frame can bend.
This can ruin your camper. With the frame bent, suddenly leaks will develop as seams seperate.
There is a proper way to get a trailer into a driveway with a steep entrance, but it involves backing in at an angle, then once both wheels are up, straighten out.
Yes, it is a pain. Other options include storing your camper at a storage facility that doesn't have this kind of issue. You can also use some lumber to build a longer ramp to "flatten out" the rise to your driveway or look at removing or raising the bumper if that is the only thing that scrapes.
|
|
|
|
|
05-06-2014, 04:45 PM
|
#12
|
|
Member
Join Date: May 2014
Location: Novato, CA
Posts: 87
|
I'm not scared. I could not get the trailer up at an angle, that was tried first.
This trailer is only 17 feet long, has fully boxed 2"x4" 120 wall steel frame members and weighs about 2400 lbs. Those wheels are about 5.5 feet behind the main axle. The wheels do not take the full camper load as you can see the main axle is still in contact with the ground. I think we will be just fine. I do agree that a LONG trailer, or really low rollers is a very poor solution. This has neither.
Honestly, other then the junky paint on the frame I was rather surprised to see how decent the steel structure is under this light weight little trailer. Expected to see angle iron instead of HREW boxed sections under there. Could it use more cross members? Yes. They rely on the trailer box to act as a cross member (stressed skin), not really ideal when you consider what the floor of these boxes are made from. But hey, the trailer is 14 years old and going strong. I suspect it has another 14 years of life left in it.
-Wayne
|
|
|
|
|
05-07-2014, 11:19 PM
|
#13
|
|
Member
Join Date: May 2014
Location: Novato, CA
Posts: 87
|
Got a bit more work done. Re-upgraded the LED interior lights to new bulbs that are soft white for a very natural look. Kept some of the old bluer bulbs in less used fixtures as they put out a bit less light, might be nice for mood lighting.
Crawled under the trailer and pulled out the old brake-away safety switch. It was missing the key, so I assume it was powering the brakes if I installed a battery.
Cleaned the stove as it was a little messy.
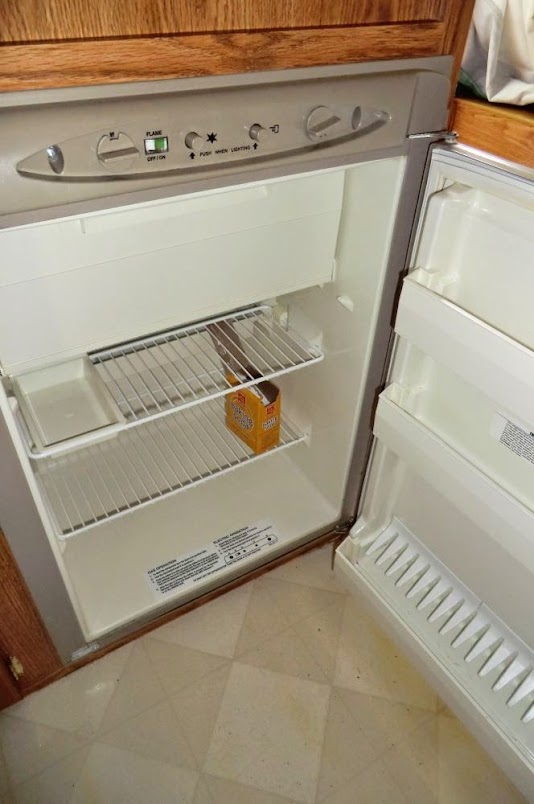
Cleaned the fridge as it was way dirty and smelly, only found one dead fly in it. Yuk! Then tested the fridge on propane and it works! So basically it looks like all the systems are good to go.
Working on replacing the battery box bolts. The heads were so rusted I could not find them. I used vice drips from below to back them out.
Still need to mess around with the awning. It is about the only thing left to play with. Then it should be mostly cleaning and prepping. Still need to organize everything, add some drawers, etc. I can't believe there are no drawers in this trailer. Where do people keep their forks & spoons? Or underwear & socks? LOL
-Wayne
|
|
|
|
|
05-08-2014, 11:19 AM
|
#14
|
|
Member
Join Date: May 2014
Location: Novato, CA
Posts: 87
|
Why can't you edit posts on this site? Silly.
Anyhow, here are the photos that go with the last update. We know, you all like photos. 
New - warmer LEDs - really light up the trailer well.

Nice clean stove. Really got sick of looking at the dirty thing every time I walked into the trailer.

Fridge is almost like new now. (except for the busted lock I still need to fix.) Does anyone sell the little plastic lock for these somewhere?
And the new break-away switch.

Ordered up some new jacks for the back of the trailer, the old ones will not fit with the wheels, and wanted to upgrade anyhow. Also have some small things like a new awning pull strap, propane hoses and a paper towel rack. LOL
That is it for now.
-Wayne
|
|
|
|
|
|
|
Currently Active Users Viewing This Thread: 1 (0 members and 1 guests)
|
|
|
| Thread Tools |
Search this Thread |
|
|
|
| Display Modes |
 Linear Mode Linear Mode
|
 Posting Rules
|
You may not post new threads
You may not post replies
You may not post attachments
You may not edit your posts
HTML code is Off
|
|
|
|
 » Recent Discussions
 |
|
|
|
|
|
|
|
|
|
|
|
|
|
|
|
|
|
|
|
|
|
|
|
|
|


 Jim Kathy & Robert ~ NE. OH.


