 |
 10-30-2016, 08:53 PM
|
#1
|
|
Senior Member
Monaco Owners Club
Join Date: May 2013
Location: Pace FL 32571
Posts: 329
|
Simple help I hope, connecting air tank fittings
I feel kind of dumb, but here go's. I have air leaks at my front air tank at the fittings and hose connections. How do you tighten the fittings, I can't see how to remove or tighten the fittings. At the 90 fittings it look like it screws into the tank and them you have to screw the hose connections into the fittings without being able to use a connection at the hose that turns into and out of a connection without turning the hose itself. I have in the pass used hose that had a connections that you can turn with your fingers until it gets tight then use a wrench.
__________________
Bruce and Carolyn, Sissy the Boss
2005 Monaco Diplomat M-40PAQ
400ISL Cummins
|

|

|
 |
Join the #1 RV Forum Today - It's Totally Free!
iRV2.com RV Community - Are you about to start a new improvement on your RV or need some help with some maintenance? Do you need advice on what products to buy? Or maybe you can give others some advice? No matter where you fit in you'll find that iRV2 is a great community to join. Best of all it's totally FREE!
You are currently viewing our boards as a guest so you have limited access to our community. Please take the time to register and you will gain a lot of great new features including; the ability to participate in discussions, network with other RV owners, see fewer ads, upload photographs, create an RV blog, send private messages and so much, much more!
|
|
10-31-2016, 09:52 PM
|
#2
|
|
Senior Member
Vintage RV Owners Club Fleetwood Owners Club Ford Super Duty Owner
Join Date: Mar 2013
Location: Nor Cal
Posts: 1,343
|
Trying to visualize from you description...
Does the hose have a hose clamp around it at the fitting?
Is the fitting attached to the hose, barbed?
a)Seems to me that you'll have to remove the hose from the fitting(and possibly, cut some of the worn hose off);
b)If the barbed fitting is threaded into the 90* fitting, remove it;
c)Remove the 90* fitting from the air tank;
Clean all threads of debris.
On the go back, add Teflon tape to the 90* fitting, rethread then tighten; add Teflon tape to the connector that goes into the 90* and tighten; then, reattach hose to connector and tighten hose clamp.
If that's all wrong, please elaborate.
Can you post a picture?
Rich
__________________
Rich & Pati
06 Outback Sydney M28-FRLS
00 F350 7.3L some Mods __03 15' Klamath SS w/30hp
|
|
|
|
|
11-01-2016, 01:51 AM
|
#3
|
|
Senior Member
Monaco Owners Club
Join Date: May 2013
Location: Pace FL 32571
Posts: 329
|
airhose fittinngs
Thanks for your info, the hose and fitting fit together as a fitted connection. I am thinking you are correct. The tubing is connected to a connector and you have to cut the tubing from the fitting and get a new connector push hose into a new connector reconnect your other parts. I did not know how the tubing was
secured to a fitting and what steps was required to fix the leak.
__________________
Bruce and Carolyn, Sissy the Boss
2005 Monaco Diplomat M-40PAQ
400ISL Cummins
|
|
|
|
|
11-01-2016, 02:32 AM
|
#4
|
|
Community Administrator


Fleetwood Owners Club Workhorse Chassis Owner
Join Date: Sep 2010
Location: Marquette, Michigan "Da UP" & Lehigh Acres Florida
Posts: 21,827
|
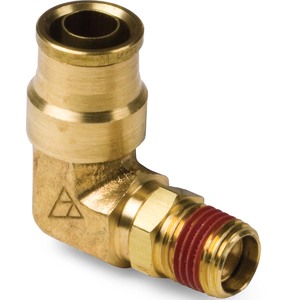
Does the fitting look like this?
__________________
John & Cathy R.
06 Pace Arrow 38L Workhorse W24
|
|
|
|
|
11-09-2016, 07:50 AM
|
#5
|
|
Senior Member
Monaco Owners Club
Join Date: May 2013
Location: Pace FL 32571
Posts: 329
|
Yes it does. Sorry for the late response.
__________________
Bruce and Carolyn, Sissy the Boss
2005 Monaco Diplomat M-40PAQ
400ISL Cummins
|
|
|
|
|
11-09-2016, 10:19 AM
|
#6
|
|
Community Administrator
Fleetwood Owners Club Workhorse Chassis Owner
Join Date: Sep 2010
Location: Marquette, Michigan "Da UP" & Lehigh Acres Florida
Posts: 21,827
|
Push the collar at the hose down towards the elbow then pull the hose out.
Download Product Literature from DiscountHydraulicHose.com
__________________
John & Cathy R.
06 Pace Arrow 38L Workhorse W24
|
|
|
|
|
11-09-2016, 11:02 AM
|
#7
|
|
Community Administrator
Tiffin Owners Club
Join Date: Sep 2013
Location: DFW, Texas
Posts: 21,571
|
After you have removed the hose as John suggested, make sure the end is cut exactly square. If the cut is not square the hose will not seat properly in the fitting, causing it to leak. When you reinstall the hose, make sure you seat it all the way in.
__________________
 2017 Phaeton 40IH XSH Maroon Coral - Power Glide Chassis with IFS 2017 Phaeton 40IH XSH Maroon Coral - Power Glide Chassis with IFS
Previous '15 Tiffin Allegro RED 38QRA and '06 Itasca Sunrise 35A
'16 Jeep JKU Wrangler Sahara or '08 Honda Goldwing
|
|
|
|
|
11-10-2016, 02:48 AM
|
#8
|
|
Senior Member
Monaco Owners Club
Join Date: May 2013
Location: Pace FL 32571
Posts: 329
|
followup
That was exactly the information I was looking for. Thank you very much for your help. At much senior age I still am learning and still having fun.
__________________
Bruce and Carolyn, Sissy the Boss
2005 Monaco Diplomat M-40PAQ
400ISL Cummins
|
|
|
|
|
|
Currently Active Users Viewing This Thread: 1 (0 members and 1 guests)
|
|
|
 Posting Rules
|
You may not post new threads
You may not post replies
You may not post attachments
You may not edit your posts
HTML code is Off
|
|
|
|
 » Recent Discussions
 |
|
|
|
|
|
|
|
|
|
|
|
|
|
|
|
|
|
|
|
|
|
|
|
|
|


 Linear Mode

