 |
|
 09-20-2016, 02:30 AM
|
#351
|
|
Senior Member
Join Date: May 2011
Location: Sweden
Posts: 375
|
Glenn, I'm sure I speak for the entire forum when I say you deserve a GIANT THANK YOU for sharing your knowledge in such a clear and factual manner! 
If somebody had presented powder coating to me this way I would most likely have had a powder coating setup years ago. There's going to be a run on powder coating guns and ovens for the RV community now 
You've sold me. It's certainly bumped the priority on my tool list!
I've been checking on various guns and the reviews. I can't say I'm impressed by the reviews of the Harbor Freight gun, and from the reviews it seems that it is a gun that would put someone off from powder coating because of powder delivery issues. A gun setup over here starts just above the $200 mark and goes up from there. I have found a local shop that deals in powder, and I am going to stop off there next time I'm in town.
A standard oven here is smaller than a standard U.S. oven, so I have started to look at other possibilities oven wise.
__________________
Erik
1989 Winnebago Elandan under "extreme" renovation
Renovation thread
|

|

|
 |
Join the #1 RV Forum Today - It's Totally Free!
iRV2.com RV Community - Are you about to start a new improvement on your RV or need some help with some maintenance? Do you need advice on what products to buy? Or maybe you can give others some advice? No matter where you fit in you'll find that iRV2 is a great community to join. Best of all it's totally FREE!
You are currently viewing our boards as a guest so you have limited access to our community. Please take the time to register and you will gain a lot of great new features including; the ability to participate in discussions, network with other RV owners, see fewer ads, upload photographs, create an RV blog, send private messages and so much, much more!
|
|
09-20-2016, 06:31 AM
|
#352
|
|
New to the RV World
Vintage RV Owners Club American Coach Owners Club
Join Date: Aug 2013
Location: Rochester, NY
Posts: 3,092
|
I tried to look at e-bay over on your side of the pond and it keep directing me back over here. What you would really like to find is a place that sells used equipment, limiting yourself to restaurant equipment is something you would like to avoid. Try looking at actions of places going out of business. Here are a couple of examples of what you are looking for. Building a oven is also an option. I do not know if you have three phase of are 220 volt.
This was a quick search.
BLODGETT Mark V commercial Electric Convection OVEN on wheels 3 phase 208 volt
 Used Hobart Electric Commercial ML-43656-B Restaurant Oven MUST GO!!
 Blodgett Dubble Door commercial Electric convection oven

These are just some examples of what to look for and what they will cost. This last one if the electric is right and the size is right (they did not list the size). It looks to be the size of what I have now, I would like a taller oven now. Most of the time you are hanging parts in it sot height is important.
You want to find used, but here is a new on.
New Powder Coating Batch Oven! 2x3x5

I just keep looking and finally found a used lab oven of the right size. Most likely you are looking for something larger that a kitchen oven, but smaller that a insdutrial oven. There are not that many out there.
You want an electric, convection, vented oven.
Sorry to have hijacked you thread like this, but it got away from me. I will be developing a primer with pictures on my web site, This may have to wait until the last race is over.
It is easy to put a lot of importance on a fancy gun, and guns are important.
When you get right down to it they are a simple device, a spark plug with the ground being on the item to be powder coated, a way to control air from a compressor (an air gun), and a way to deliver powder.
There are two methods for supplying powder, a cup on the gun and batch suction from a remote location. I like the batch remote style as the gun is much lighter and easier to move around. The side effect is you waste a little more powder between color changes.
A trigger on the gun is more convenient than foot peddle.
A lot of people sell this basic stye gun

They are basically all the same, a cup feed gun with a remote trigger and range in price from $50.00 to $150. They will get the job done just as well as an expensive gun (practice, practice practice)
This is a better gun with the trigger on the gun and still a cup feed, not a bad option, On a set of valve covers you will have to add powder several times. Not that you will use that much, but there is an optimum amount of powder needed in the cup to give you good flow of powder.

This same gun at one time was offered as a batch gun and is what I have. Yow will never need 100Kvolts. Normal voltage is around 40,000 and generally less than that, It is the reverse of what you would think, as you go up in layers, you reduce the voltage.
This is a batch feed gun, you do not need a large hopper, I use a quart paint can

These are a little more expensive and are a littler harder to find with a small hopper as they are really a commercial gun.
http://www.wagner-sprint.com/index_en.html
I will have to do another post on ovens, what to look for, and guns, what to look for
Their web sit is a little hard to follow, but they have good stuff, I have their gun.
http://www.columbiacoatings.com/
This is the gun I have

This may be it's replacement.
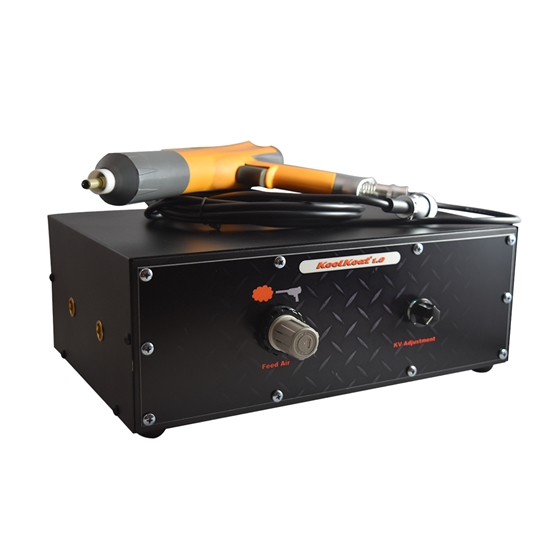
but missing some of the controls I have
http://www.columbiacoatings.com/stor...-Koat-1-0.aspx
They will build guns to order
Next one up

The white tanks are the remote hoppers, they hang on a wall and are connected to the gun with a hose.
|
|
|
|
|
09-21-2016, 07:52 AM
|
#353
|
|
New to the RV World
Vintage RV Owners Club American Coach Owners Club
Join Date: Aug 2013
Location: Rochester, NY
Posts: 3,092
|
I am working on a much more refined presentation than the one above, when done I will add the new one to my thread and put a link to it here. This will take days to complete. Once done, you might have the moderators delete my posts and just leave the link. It will refocus the attention back on your project. I feel guilty of hijacking your thread.
|
|
|
|
|
09-21-2016, 07:58 AM
|
#354
|
|
Community Administrator


Fleetwood Owners Club Workhorse Chassis Owner
Join Date: Sep 2010
Location: Marquette, Michigan "Da UP" & Lehigh Acres Florida
Posts: 21,827
|
Quote:
Originally Posted by GlennLever

I am working on a much more refined presentation than the one above, when done I will add the new one to my thread and put a link to it here. This will take days to complete. Once done, you might have the moderators delete my posts and just leave the link. It will refocus the attention back on your project. I feel guilty of hijacking your thread.
|
Let me know what you decide.
__________________
John & Cathy R.
06 Pace Arrow 38L Workhorse W24
|

|
|
|
09-22-2016, 06:32 AM
|
#355
|
|
Senior Member
Join Date: May 2011
Location: Sweden
Posts: 375
|
Quote:
Originally Posted by GlennLever
I am working on a much more refined presentation than the one above, when done I will add the new one to my thread and put a link to it here. This will take days to complete. Once done, you might have the moderators delete my posts and just leave the link. It will refocus the attention back on your project. I feel guilty of hijacking your thread.
|
Don't worry about it. It's certainly a pertinent discussion to the project(s) at hand, and I have a powder coating gun arriving next week. 
__________________
Erik
1989 Winnebago Elandan under "extreme" renovation
Renovation thread
|
|
|
|
|
09-22-2016, 06:43 AM
|
#356
|
|
Senior Member
Join Date: May 2011
Location: Sweden
Posts: 375
|
Quote:
Originally Posted by GlennLever
I tried to look at e-bay over on your side of the pond and it keep directing me back over here. What you would really like to find is a place that sells used equipment, limiting yourself to restaurant equipment is something you would like to avoid. Try looking at actions of places going out of business. Here are a couple of examples of what you are looking for. Building a oven is also an option. I do not know if you have three phase of are 220 volt.
|
I have 25 amp 3 phase 380v service. 380v between the phases and 230v single phase to neutral. I am going to start with the regular oven I have and I'll probably end up building one once I can scrounge some building materials. I also ordered a simple gun to get me started and to figure out if I need something better long term. I suspect this is one of those setups that it's easy to end up spending quite a bit on.
__________________
Erik
1989 Winnebago Elandan under "extreme" renovation
Renovation thread
|
|
|
|
|
09-22-2016, 06:52 AM
|
#357
|
|
Senior Member
Join Date: Dec 2013
Location: Chicago Area
Posts: 1,295
|
Quote:
Originally Posted by DeOrellana
There is no such thing as a shop too big! Nature abhors a vacuum, and a workshop is the perfect proof.
|
Too big is defined by having space to collect more projects than you can ever finish. I finally learned a few years back to stop collecting.
BTY: Seeing all that rust reminds me of some of the Youtube videos I have seen of using molasses syrup to remove the rust. Soak the metal for a week and the rust is completely gone without damaging the metal.
__________________
2004 AllegroBay 34XB Nov 2017 Banks, Front & Rear Trac bars, Konis
Sold:'83 Revcon Prince 31' FWD GM Performance 502 w/Edelbrock MPFI, Thorley Tri-Ys & Magnaflows, 4L85E 4 spd. Tested to exceed 100 mph.
|
|
|
|
|
09-22-2016, 07:26 AM
|
#358
|
|
Senior Member
Join Date: May 2011
Location: Sweden
Posts: 375
|
I haven't posted updates for a few days. Tuesday I hold my electronics workshop so I don't get much done. And with all the painting I've been doing I have gotten tendinitis in my right arm. That was the final straw that prompted me to send off for a powder coating gun. With everything that needs painting on the Elandan, I'll need it.
But that hasn't stopped me.  I've been taking it relatively easy and working mostly left handed out in the shop. I've been continuing to put the lathe back together as the paint dries.
I put the main input shaft and the oil pump back in. I forgot to take pictures of it being assembled, but here it is in place.

While I was positioning the shaft I used the engine hoist to hold the end of the shaft in the correct position until I could get the bearing box in place.

I decided to keep the internals of the main gearbox as they were. There is no need to disassemble it further, and I like the patina inside it. The oil circulating will be protecting it.
This is one of those times when you realize that you missed something.  The oil pump is positioned using pins inserted from below. One of these pins cannot be inserted after the gearbox is mounted on the lathe bed.  

I guess the gearbox is coming off again... But I figured I'll finish assembling it except for positioning the oil pump before I lift the gearbox and insert the pin. Just in case I missed something else...
The end bearing box was slid into place with newly cleaned bearings. The two machined holes at the bottom presses oil into the bearings.

The end cover on the main input shaft and the shaft is properly in place.

The front end cap in place, along with the main axle trim ring. I can't lift the gearbox without the cap in place.

The back of the main axle has a retainer ring which is held on with set screws. It was pretty badly mangled, so it has been cleaned up and deburred.

One of the set screws had a little copper bushing at the bottom so that the screw would not mess up the threads. The other bushing was missing. I took a piece of copper pipe and tried to punch out a new bushing, but it turned out that the copper was harder than my hole punch. :( I ended up cutting in out with a pair of tin snips. Good thing nobody will see it, but it will do the job just fine.

The oil distribution pan was next. The new oil is a light tan color, and I though antique white from a 1972 Mercedes 350 SL was a perfect color to be able to see the oil flow. The oil gets pumped up through the pipe in the middle, and then flows out along the runners on the oil distribution pan and drips into all the bearings. One of the screws for the pan was missing when I took it apart, so when I get the lathe operational I'll have to make a new one.

Closeup of the drip oiling system. The oil drips into the cup above the bearing, and the overflow runs onto the gear next to the bearing through the valley behind the drip arm.

It doesn't look like much, but this splash shield gave me quite a bit of work. I suspect that somebody has taken the top off the gearbox in an effort to fix the oil pump. In the process, this shield was badly mangled. The access cover didn't fit any more, it was bent out of shape and screws were missing. It took over an hour with the shrinker/stretcher, welder and body hammers to get it back into shape. Now the access cover now fits well and comes off easily. It wasn't painted before, so I left it unpainted.

And now the gearbox is ready to be lifted off.

__________________
Erik
1989 Winnebago Elandan under "extreme" renovation
Renovation thread
|
|
|
|
|
09-22-2016, 07:32 AM
|
#359
|
|
Senior Member
Join Date: May 2011
Location: Sweden
Posts: 375
|
Quote:
Originally Posted by Daveinet
Too big is defined by having space to collect more projects than you can ever finish. I finally learned a few years back to stop collecting.
|
Yeah, I need to do that too. Someday. There a farm down the road for sale for $40k... Cheap storage space
Quote:
|
BTY: Seeing all that rust reminds me of some of the Youtube videos I have seen of using molasses syrup to remove the rust. Soak the metal for a week and the rust is completely gone without damaging the metal.
|
I've tried that. I have a 2.5 cubic meter dunk tank that I poured a molasses mix into. It worked well on flat panels, but it gets into everything and is difficult to clean afterwards. I dunked the rear end of the Mercedes E-Class you see in some of the pictures in the tank, and it came out rust free. But it was still a lot of prep work after that. And you absolutely need to make sure that you can clean out all hollow items, and they need to be protected against flash rust which will happen as soon as you hit it with the power washers. It also smells really bad. I don't think I will do that again.
__________________
Erik
1989 Winnebago Elandan under "extreme" renovation
Renovation thread
|
|
|
|
|
09-22-2016, 07:34 AM
|
#360
|
|
New to the RV World
Vintage RV Owners Club American Coach Owners Club
Join Date: Aug 2013
Location: Rochester, NY
Posts: 3,092
|
Quote:
Originally Posted by DeOrellana
Don't worry about it. It's certainly a pertinent discussion to the project(s) at hand, and I have a powder coating gun arriving next week. |
All I can do is laugh. "I have a powder coating gun arriving next week"
I think you will love it.
Do a simple scape practice piece first.
Make it small enough that it can hang rather than set in the oven.
Sand blast it, just blow the the dust off it, put it in the oven at 450 F for 45 minutes, take it out and let it fully cool, handle the hanger only (coat hanges make great hooks, a good source is a place that has a company that does uniforms they usual do not collect the hangers the uniforms came on)
( I use a pair of needle nose vise grips, gives you something to hold on to)
try gloss black you will always have a use for that color.
Start from the center (or inside corners) first. Coat the piece with powder (a raw sprayed piece with the right amount of powder should look a little like felt (soft and fuzzy), you want the powder 2 to 3 mil thick, (powder and guns are all different, I spray at 18 to 20 PSI ( small one or two pound adjustments on the air pressure) with the voltage around 40 KV, if you have problems try reducing the voltage))
If the end tip of the gun is a movable cone if you slant it side to side you can change the shape of the spray pattener which can help get inside corners
All powder spray is a little different and you need to experiment a little, remember with powder (different from paint) if you do not like what you see blow to off and start again.
Put the sprayed piece in the oven (preheated oven) at the recommended temperature plus 5 degrees Usual temperature is around 400 degrees (verify that the settings on the oven are what happens in the oven), leave it in there for 45 minutes (smaller pieces can stay in a shorter length of time. IMPORTANT temperature is judged by the pieces temperature, not the temperature in the oven, also when you open the door of the oven the oven cools very quickly (open the door and you can put you hand inside almost right away) (when curing leave the door closed).
Take it out and let it fully cool.
Experiment with it, drop it on the floor, pour some gas on it, hit with a hammer, a malit, you will damage it, but what you want to know is what it can take.
I think you can tell I am passionate about powder.
Feel free to e-mail me with questions, I check my computer fairly often though out the day (sent in PM)
Quote:
Originally Posted by DeOrellana
I have 25 amp 3 phase 380v service. 380v between the phases and 230v single phase to neutral. I am going to start with the regular oven I have and I'll probably end up building one once I can scrounge some building materials. I also ordered a simple gun to get me started and to figure out if I need something better long term. I suspect this is one of those setups that it's easy to end up spending quite a bit on.
|
Building a oven is a good project, I think you have the skills. You will out grow the home oven almost instantly.
So many thing to pass on. You will need heat tape. People will want to sell you lots of trinkets, It is hard to tape the inside of a hole, small holes you can fold tape into a cone and have it fit tightly in the hole, bolt holes, I have a can of sacrificial bolt that I thread into the threaded holes. screw them in until they just start to come out the other side, you can use them over and over. Heater hose fitting of various sizes work in pipe holes these can be used over and over again. The tape you have to have, people will try and sell you expensive silicone plugs and caps for covering holes and stuff.
have what I would call the first chapter of the powder coat primer almost done, there is a lot to write about and will not be an "Interesting fun piece " to read.
wow another wordy response.
Glenn
|
|
|
|
|
09-22-2016, 08:23 AM
|
#361
|
|
Senior Member
Join Date: May 2011
Location: Sweden
Posts: 375
|
Quote:
Originally Posted by GlennLever
All I can do is laugh. "I have a powder coating gun arriving next week"
I think you will love it.
Do a simple scape practice piece first.
Make it small enough that it can hang rather than set in the oven.
|
I'm sure I will. I need to rebuild the calipers on the Jeep, so I will be practicing on first some scrap sheet metal and then I have some scrap calipers that I will try.
Quote:
|
I think you can tell I am passionate about powder.
|
Yes, yes I can.
Quote:
|
Building a oven is a good project, I think you have the skills. You will out grow the home oven almost instantly.
|
Glenn[/QUOTE]
I know I already have. I have a few rims that need doing.

Once I get going, I know I will need both a good sized powder cabinet and a big oven. If I get as passionate about it as you are I might start powder coating on the side. Truckers and construction machines repaint their rims every four to five years due to rust from road salt. I don't blast rims myself, but I don't know anybody local who powder coats them. If that is the case, I would build an oven to handle a set of 4 truck rims which are the same size as most wheeled back hoes. Until then, I'll use the small oven that I have.
__________________
Erik
1989 Winnebago Elandan under "extreme" renovation
Renovation thread
|
|
|
|
|
09-22-2016, 09:46 AM
|
#362
|
|
New to the RV World
Vintage RV Owners Club American Coach Owners Club
Join Date: Aug 2013
Location: Rochester, NY
Posts: 3,092
|
Quote:
Originally Posted by DeOrellana
If that is the case, I would build an oven to handle a set of 4 truck rims which are the same size as most wheeled back hoes. Until then, I'll use the small oven that I have.
|
That would be a BIG oven.
I general charge $65 for a standard trailer rim. I have two different stye fixtures for supporting them, I will send pictures later.
Not sure what you do for income, but suspect with the toys you have the income from powder coat work will interest you very long. It helps support my racing addiction (I'm retired so my income is fixed on savings and Social Security). Most of the cost in powder coat work is your time.
Another pointer, adjustment of powder and pressure.
Image an experienced smoker, he has a cigarette that is burning well, he takes a heavy draw on his cigarette, and then exhales, He is not blowing it out but exhaling. Think about the thickness of the smoke and the force of the exhale. That is about what you want out of the gun. It should be relatively dense, and not blowing so hard as to blow the powder you have on the piece off.
most instructions say say 6 or more inches away, I am generally a little closer.
If you touch the piece the powder on the piece will change shape, and form what looks like a HEAVY orange peel, this is bad. If your spark is up to high the same thing will happen.
|
|
|
|
|
09-22-2016, 10:01 AM
|
#363
|
|
New to the RV World
Vintage RV Owners Club American Coach Owners Club
Join Date: Aug 2013
Location: Rochester, NY
Posts: 3,092
|
I missed this message until I got the e-mail notification.
This is interesting. I have almost exactly the same hook on my engine hoist.
I had to make the "U" bracket the hook is hanging from and I am not sure where I got the hook from, it might have been on the hoist when I bought it.
|
|
|
|
|
09-22-2016, 01:38 PM
|
#364
|
|
Senior Member
Join Date: May 2011
Location: Sweden
Posts: 375
|
Quote:
Originally Posted by GlennLever
I missed this message until I got the e-mail notification.
This is interesting. I have almost exactly the same hook on my engine hoist.
I had to make the "U" bracket the hook is hanging from and I am not sure where I got the hook from, it might have been on the hoist when I bought it. |
Looks almost exactly like the base on my engine hoist. Mine came from Harbor Fright.
__________________
Erik
1989 Winnebago Elandan under "extreme" renovation
Renovation thread
|
|
|
|
|
|
|
Currently Active Users Viewing This Thread: 1 (0 members and 1 guests)
|
|
|
| Thread Tools |
Search this Thread |
|
|
|
| Display Modes |
 Linear Mode Linear Mode
|
 Posting Rules
|
You may not post new threads
You may not post replies
You may not post attachments
You may not edit your posts
HTML code is Off
|
|
|
|
 » Recent Discussions
 |
|
|
|
|
|
|
|
|
|
|
|
|
|
|
|
|
|
|
|
|
|
|
|
|
|


