 |
|
 01-07-2014, 11:05 AM
|
#113
|
|
Senior Member
Join Date: Dec 2012
Posts: 254
|
I have seen those franken-ovens...
The plan is like this...
Get the oven wired for now and as it has a self clean cycle, run that.
This will clean and test the oven and elements all in one!
We are gonna use it as it is for a few parts... not sure if the headlamp castings will fit, if not it will be the plasma or sawzall to the rescue to convert the two into one. Maybe it would be simpler to just cannibalize the oven and build the components into a new cabinet..
|

|

|
 |
Join the #1 RV Forum Today - It's Totally Free!
iRV2.com RV Community - Are you about to start a new improvement on your RV or need some help with some maintenance? Do you need advice on what products to buy? Or maybe you can give others some advice? No matter where you fit in you'll find that iRV2 is a great community to join. Best of all it's totally FREE!
You are currently viewing our boards as a guest so you have limited access to our community. Please take the time to register and you will gain a lot of great new features including; the ability to participate in discussions, network with other RV owners, see fewer ads, upload photographs, create an RV blog, send private messages and so much, much more!
|
|
01-07-2014, 11:31 AM
|
#114
|
|
New to the RV World
Vintage RV Owners Club American Coach Owners Club
Join Date: Aug 2013
Location: Rochester, NY
Posts: 3,092
|
Quote:
Originally Posted by Keyair

I have seen those franken-ovens...
The plan is like this...
Get the oven wired for now and as it has a self clean cycle, run that.
This will clean and test the oven and elements all in one!
We are gonna use it as it is for a few parts... not sure if the headlamp castings will fit, if not it will be the plasma or sawzall to the rescue to convert the two into one. Maybe it would be simpler to just cannibalize the oven and build the components into a new cabinet..
|
I wouldn't think it would be to hard to convert that one into a great powder coat oven.
Put one of the rack all the way at the top to hang things from.
The full height of the double oven.
Cut out the center, some insulation and sheet metal, I would look to hing the door on the side rather than the bottom (piano hing and latch). Couple of strips of of metal bolted to the inside of the two doors to make them one
Make all pretty,
Frankenstein oven.
|
|
|
|
|
01-08-2014, 10:43 PM
|
#115
|
|
Senior Member
Join Date: Dec 2012
Posts: 254
|
Yes indeed.
I thought I would have some provisional news, but it seems my oven needs a 4 pin plug and the compressor only 3...
My electrical guru is coming over to figure it out tomorrow I hope.
I think we will be running a dedicated circuit for it.
|
|
|
|
|
01-09-2014, 08:51 AM
|
#116
|
|
New to the RV World
Vintage RV Owners Club American Coach Owners Club
Join Date: Aug 2013
Location: Rochester, NY
Posts: 3,092
|
Quote:
Originally Posted by Keyair
Yes indeed.
I thought I would have some provisional news, but it seems my oven needs a 4 pin plug and the compressor only 3...
My electrical guru is coming over to figure it out tomorrow I hope.
I think we will be running a dedicated circuit for it.
|
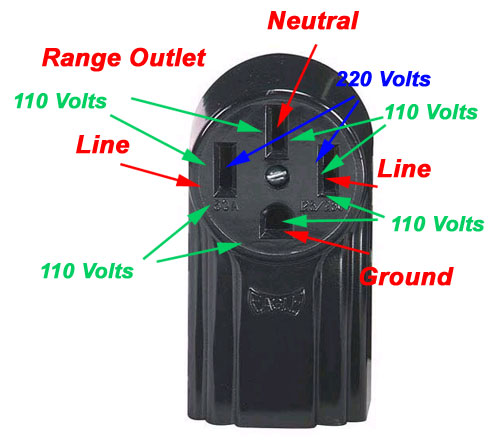
The two outside vertical tangs are your two hots (110 on one side of neutral, 110 on the other side of neutral (220 potential across the tangs)), upper tang is electrical ground (neutral), and the bottom tang is earth ground. Both earth and Neutral are connected to the same bus bar in the breaker box. (code says you cannot connect the two together in the plug outlet, but it works)

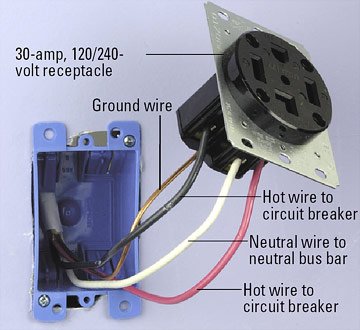 ♦

I had sort of the same problem. My welder has a three prong outlet in the garage. My MH has a four prong 50 amp plug. I just made an adapter that would plug into the wall outlet and terminated after one foot in a four prong outlet that the MH land line plugs into. You will need one of these when you travel in the RV to plug into some older camp grounds.
The adapter means you do not change the oven, and you do not change the wiring in your house.
I would take pictures of the adapter, but it is in the MH which is at Caledonia RV. Next time I'm there I can if you want.
|
|
|
|
|
01-09-2014, 11:03 AM
|
#117
|
|
Senior Member
Join Date: Dec 2012
Posts: 254
|
Good info!
I am not an electrics guy, especially 110v and 220v!
I get my specialist in for that!
So, this is the type of plug EVERYTHING else has in my garage... Compressor, TIG, and Plasma.

When the garage was wired, the plan was to have 2 separate 220v/50A circuits to allow me to move equipment where I needed it. Only one was installed at that time, and that was dedicated to the Compressor. I have been plugging my other things into that outlet up until now.
If I go ahead and have the other circuit put in now, I would prefer to have just one outlet type, and use some kind of adaptor if its possible and safe?
I also was thinking to have a Heavy Duty 220v extension cable to hand to give me flexibility.
The oven clearly has 4 wires. It will be an occasional use item, so I will be putting it on wheels to be able to move it about.

Your thoughts would be welcome.
|
|
|
|
|
01-09-2014, 11:59 AM
|
#118
|
|
New to the RV World
Vintage RV Owners Club American Coach Owners Club
Join Date: Aug 2013
Location: Rochester, NY
Posts: 3,092
|
Quote:
Originally Posted by Keyair
Good info!
I am not an electrics guy, especially 110v and 220v!
I get my specialist in for that!
So, this is the type of plug EVERYTHING else has in my garage... Compressor, TIG, and Plasma.

When the garage was wired, the plan was to have 2 separate 220v/50A circuits to allow me to move equipment where I needed it. Only one was installed at that time, and that was dedicated to the Compressor. I have been plugging my other things into that outlet up until now.
If I go ahead and have the other circuit put in now, I would prefer to have just one outlet type, and use some kind of adaptor if its possible and safe?
I also was thinking to have a Heavy Duty 220v extension cable to hand to give me flexibility.
The oven clearly has 4 wires. It will be an occasional use item, so I will be putting it on wheels to be able to move it about.

Your thoughts would be welcome. |
Keeping all the plugs the same is a good thing, my oven, compressors, welders all have the same three prong plug as you do. Any one can be plugged into any 220 outlet in the basement or garage. My breakers are all 20 amp.
The different plug styles were to keep people from plugging a 20 amp piece of equipment into a 50 circuit so that the circuit protector on that circuit would be correct for the piece of equipment and wire gauge in the wall.
I suspect that your compressor, and welders are on 20 amp circuit, which is enough for the oven. If you need more amps, I believe you will need heavier gauge wire than 12 gauge.
If I were you I would put a three prong plug on the oven. Green and white wires are earth ground and neutral (electrical ground). twist them together and connect to the ground prong on the plug. Black and red are the two hot legs, makes no difference which goes to which prong on the plug 220 potential between the two, 110 between one leg and the ground.
I would go to Home Depot an buy and oven cord with a molded one plug in the right configuration for your wall outlet and make the connection in the box on the back of the oven (with wire nuts tighten with electricians pliers).
Question, I'm going to the pain doctor now and will return in about 2 hours. I'll PM my phone number.
The extension cord is an excellent idea, I have one so I can plug into the garage and have the welder out in the driveway. I used 10 gauge in the cord becuase of the length, purchase at my welding supply. Nice and flexible.
|
|
|
|
|
01-09-2014, 07:15 PM
|
#119
|
|
Senior Member
Join Date: Dec 2012
Posts: 254
|
Thanks Glenn,
My electrics guy was over today, and fixed me all up.
We went with a 4 wire on the secondary circuit, and we are good!
Time for tests!
Test #1...
The headlamp casting fit in the Oven!

As did another test piece, a GTV6 Alfa valve cover.

Test #2...
The oven works... very well in fact... reached 450deg F in 15 minutes, and went on through steps to max out at 550deg F!
Plenty for outgassing and PCing!


Tomorrow I will run a cleaning cycle on both ovens, and hopefully at the weekend do some test pieces!
|
|
|
|
|
01-09-2014, 07:23 PM
|
#120
|
|
Senior Member
Join Date: Apr 2012
Posts: 1,414
|
I like the oven idea for powder coating. I use a ceramic kiln set up with a separate tstat and contactor to maintain the 450 deg for the powdercoating. I can reach 1700 deg and thought about glass enamel on parts, tougher than powdercoating by far but not for aluminum.
__________________
Dave and Laura & two cats
02 Discovery with Accord toad
retired auto rv tech and teacher, wife rt nurse
|
|
|
|
|
01-09-2014, 09:41 PM
|
#121
|
|
New to the RV World
Vintage RV Owners Club American Coach Owners Club
Join Date: Aug 2013
Location: Rochester, NY
Posts: 3,092
|
four hints,
1)Start cure time from the time the metal reaches temperature, not from the time the oven reaches temperature. 450 for 30 minutes is plenty hot to out gas. You will never need the higher temps although it is nice that you can get them. You can use those temps to cure VHT (very high temperature) paint. There is a cure cycle printed on VHT paint cans that I follow for headers. If you follow it the paint lasts and stands up to use for a long time.
2)A smoother finish can be had by preheating the oven to temperature before putting the part in.
3)Don't lay the part on the rack as there will be bumps in the finish on the edges. Use coat hangers to build a support for the rear to sit on the rack, or better yet hang the part form the rack with the rack at the top of the oven. Use screw holes in the part. I'll take a picture tomorrow how to make the hanger. You can move the part around with the hangers and not disturb the powder.
Where are you applying the powder?
4)Use convection bake to cure the parts the air movement in the oven will produce an evener heat and help get the part to temperature quicker. You might have to make a deverter for the fan so that it does not blow directly on the part, you do not want to blow the powder of the part before it starts to cure.
Looks like a nice setup.
The three wire with ground will pass code if you are ever inspected.
I did not realize how big the headlight bezel was. You should be able to get the powder in the groves with no problems.
If you bump the part putting it in the oven take it back out and touch up the area where the powder was rubbed off, you do not have to do the whole part over.
My oven

Note the vent on the top, the fumes the powder gives off when curing is toxic, keep your garage door open when curing.
|
|
|
|
|
01-09-2014, 10:55 PM
|
#122
|
|
Senior Member
Join Date: Dec 2012
Posts: 254
|
Good info.
I am gonna try a couple of steel brackets first...
These two either side of the jacks.
If I screw up its not so important.

|
|
|
|
|
01-10-2014, 06:28 AM
|
#123
|
|
Senior Member


Join Date: Apr 2004
Posts: 3,797
|
Keyair, a wonderful series of posts for your Airstream restoration. Also, it's neat to see another Alfisti that likes motorhomes. I have '76 and '91 Spiders. Do you visit Alfa Romeo Bulletin Board & Forums ? I am "Conedriver" there...
__________________
George Schweikle Lexington, KY
2005 Safari (Monaco)Trek 28RB2, Workhorse W20, 8.1, Allison 1000 5 spd, UltraPower engine & tranny, Track bars & sway bars, KONI FSD, FMCA 190830, Safari Int'l. chapter. 1999 Safari Trek 2830, 1995 Safari Trek 2430, 1983 Winnebago Chieftain, 1976 Midas Mini
|
|
|
|
|
01-10-2014, 07:30 AM
|
#124
|
|
New to the RV World
Vintage RV Owners Club American Coach Owners Club
Join Date: Aug 2013
Location: Rochester, NY
Posts: 3,092
|
Quote:
Originally Posted by Keyair
Good info.
I am gonna try a couple of steel brackets first...
These two either side of the jacks.
If I screw up its not so important.
 |
Black brackets?
Sand blast, out gas at 450 for 30 minutes, 20 KV on the gun, apply powder until it has a "Cloth felt" appearance, preheat oven, cure according to powder instructions, I always put clear on top of base coat when going for gloss.
Going to the basement now to work on some wheels, will send some pictures of hangers shortly.
|
|
|
|
|
01-10-2014, 08:18 AM
|
#125
|
|
New to the RV World
Vintage RV Owners Club American Coach Owners Club
Join Date: Aug 2013
Location: Rochester, NY
Posts: 3,092
|
Here are some examples of hangers and the wheel fixture I use.
The hanger that loops around and hooks back to itself is good for heavier parts.
The one through the hole with the triangle on the bottom can be used with even the smallest hole, you have to unbend the hook at the top to get the piece off the hanger for small holes.
The hanger for the valve cover is good for cast valve covers, it is a coat hanger, it just looks like heavy wire because it has so many coats of powder on it.
See the next post for the rest of the pictures.
|
|
|
|
|
01-10-2014, 08:19 AM
|
#126
|
|
New to the RV World
Vintage RV Owners Club American Coach Owners Club
Join Date: Aug 2013
Location: Rochester, NY
Posts: 3,092
|
More hanger pictures
|
|
|
|
|
|
|
Currently Active Users Viewing This Thread: 1 (0 members and 1 guests)
|
|
|
 Posting Rules
|
You may not post new threads
You may not post replies
You may not post attachments
You may not edit your posts
HTML code is Off
|
|
|
|
 » Recent Discussions
 |
|
|
|
|
|
|
|
|
|
|
|
|
|
|
|
|
|
|
|
|
|
|
|
|
|


 Linear Mode

