 |
|
 07-10-2011, 07:42 PM
|
#1
|
|
Senior Member
Vintage RV Owners Club
Join Date: Jul 2006
Location: Sauvie Island, OR
Posts: 2,596
|
'Nother Redneck Project, Dually Conversion of Pickup- Cont'd
Project: Dually Conversion on the Pickup—Swing Out Brackets on the Camper & Fenders bondo-ed
Well, its been a little over a month since I’ve been able to make any headway on my dually conversion project.
When I left off, the fenders had just been bolted on and the truck was driven home after a couple test drives to confirm that the brake shoes in the rear were at the exactly correct position.
Since then, the truck really hasn’t moved other than to be moved out of the way to mow the grass.
Now, that has changed  .
Over the last couple days, I finished a couple tasks on this project.
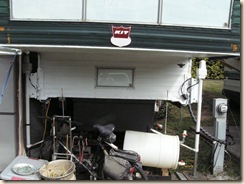
First, I got some old Hi-Jacker swing out brackets off of craigslist for $100. Took them over to Terry’s, had him beef up them up a bit, painted them white and then bolted them on the camper.
Discovered that the stock swing out brackets only gave me 3/4” between the jack and the dually fender to load and unload. I’d much rather not have to perform a NASA grade maneuver every time I go to load, so a few weeks later, over the fourth of July weekend to be exact, I returned down south and had Terry cut me two 3” wide x 14”tall x 3/16” thick hunks of plate steel, which I drilled, painted and then bolted onto the swing out brackets and onto which I bolted the jacks.
I now have an 1 1/2” of additional clearance on each side to squeeze my truck through. I’ll still need to watch, but the tolerances are nowhere near as tight  .
Now, all I need to do is call Jay over at Torklift and get the parts I need to make those Wobbl-stopprs hinged at the jack mount point, and I should be able to slide under the camper as smooth as greased lightning  .
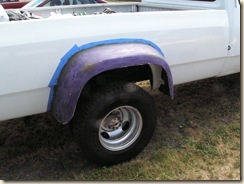
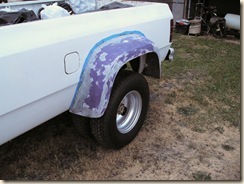
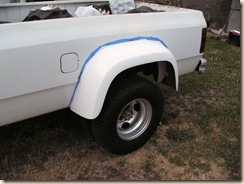
The next thing I did was used the majority of a can of Bondo-Glass to fill in any gaps and imperfections in the fenders so that they are now perfectly matched to the truck’s body. The bondo was still tacky when I left to write this blog entry, so I’ll wait till tomorrow before attempting to sand the fiberglass down smooth.
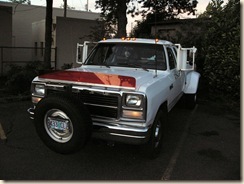
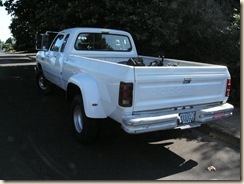
I also took this full truck view picture as I realized there wasn’t really a good set back view of the truck with the fenders installed.
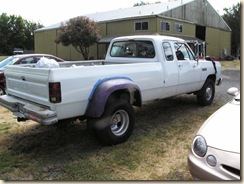
Please forgive the smudge in the center of the lense, had no clue it was there until I went to upload the pictures!
__________________
'92 Dodge W250 "Dually" Power Wagon
'74 KIT 1106 Kamper Slide-in Truck Camper
'06 Heartland Bighorn 3400RL Fifth wheel
Follow along with me in the The Journey of

|

|

|
 |
Join the #1 RV Forum Today - It's Totally Free!
iRV2.com RV Community - Are you about to start a new improvement on your RV or need some help with some maintenance? Do you need advice on what products to buy? Or maybe you can give others some advice? No matter where you fit in you'll find that iRV2 is a great community to join. Best of all it's totally FREE!
You are currently viewing our boards as a guest so you have limited access to our community. Please take the time to register and you will gain a lot of great new features including; the ability to participate in discussions, network with other RV owners, see fewer ads, upload photographs, create an RV blog, send private messages and so much, much more!
|
|
07-11-2011, 07:09 PM
|
#2
|
|
Senior Member
Vintage RV Owners Club
Join Date: Jul 2010
Posts: 218
|
nice job redneck.
Outlaw
__________________
 John & Colleen Weston & Cassie(our cat) -Olympia,WA
1978 GMC Midas Class A 30FT-454 Engine, 400 T
|
|
|
|
|
07-12-2011, 12:03 AM
|
#3
|
|
Senior Member
Vintage RV Owners Club
Join Date: Jul 2006
Location: Sauvie Island, OR
Posts: 2,596
|
Project: Dually Conversion on the PickupFenders sanded and ready for primer and pain
Well, small update today  . I am thankful to God for putting as good a neighbors as I have right now at the RV park in site 4.
So, today, I went about sanding the fenders. I started out working on the passenger side fender using what I had available for sanding tools, a foam hand sanding block and a package of pre-cut pieces of 60 Grit sand paper.
Lemme tell you what, hand sanding down glass bondo sucks.
I ate through most of my sand paper hand sanding the passenger side fender and it was looking like I wasnt going to get much further today.
As I was sitting in the screen room patio giving my wrists a rest, my neighbors came home from their daily outing. We exchanged friendly greetings and waylaid them with the woes of my undertaking.
A few minutes later, as I was adding a fresh coat of 40% deet bug repellent to the interesting cake of fiberglass dust, dirt, sweat, sun block and the last coating of deet, my neighbor came back out and dug around in his motorhomes storage compartments until he produced a Dewalt oscillating sander and an extra package of 3M Sandblaster 60 grit sand paper.
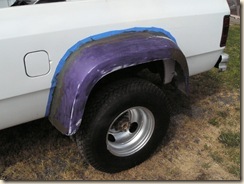
With many thanks for the loan, I finished sanding both fenders down in under an hour and a half, doing both the coarse and fine sanding the glass surface needed to ready it for primer and paint.
The fenders are now a nice even surface with only the mismatched colors of the bondo-glass and the old fiberglass fenders showing where the fenders had been worked, I still havent worked out what the devil the original paint color was before somebody repainted that poor old donor truck purple.
 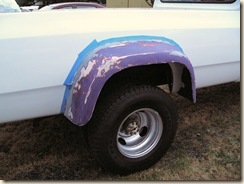
Providing the weather holds out tomorrow, its been threatening to rain all day today, I will have the fenders primed, and ready for their color coat of paint (which will have to wait another day till the next unemployment check shows up so I can buy the can of white rustoleum I need and some timber to do another beefing-up project to the campers tub (I already have a can of Rustoleum Automotive primer and the clear coat, just no regular white).
Once the fenders are painted, I can lay down a nice bead of sealant along the edge of the fender and the truck bed, the fenders are a perfect contour match, but not water tight.
I will need to wait till I can head back down south to visit family with the truck to spray on the rubber undercoater (Also made by Rustoleum) to the underside of the fenders and the truck bed, that and I want to get the marker lights wired in and the wires epoxied in place before I coat everything in undercoater.
Some have asked about her first trip. Sadly, I doubt shell be on the road with the camper aboard until September at the earliest, possibly October for the 2011 Fall Colors Rally.
__________________
'92 Dodge W250 "Dually" Power Wagon
'74 KIT 1106 Kamper Slide-in Truck Camper
'06 Heartland Bighorn 3400RL Fifth wheel
Follow along with me in the The Journey of
|
|
|
|
|
07-12-2011, 12:51 PM
|
#4
|
|
Senior Member
Join Date: Sep 2007
Location: texas
Posts: 2,422
|
nice when you say south where is family
|
|
|
|
|
07-13-2011, 03:22 PM
|
#5
|
|
Senior Member
Vintage RV Owners Club
Join Date: Jul 2006
Location: Sauvie Island, OR
Posts: 2,596
|
Quote:
Originally Posted by whem2fish

nice when you say south where is family
|
Wish I could say it was the true "south"  , but south for me is about 70 miles due south down the interstate to where my family is at. Root-wise, we're actually mid-westerners, given that we're from Illinois  .
__________________
'92 Dodge W250 "Dually" Power Wagon
'74 KIT 1106 Kamper Slide-in Truck Camper
'06 Heartland Bighorn 3400RL Fifth wheel
Follow along with me in the The Journey of
|
|
|
|
|
07-14-2011, 04:55 AM
|
#6
|
|
Senior Member
Join Date: Sep 2007
Location: texas
Posts: 2,422
|
only reason i ask im south off 35W
|
|
|
|
|
07-14-2011, 03:44 PM
|
#7
|
|
Senior Member
Vintage RV Owners Club
Join Date: Jul 2006
Location: Sauvie Island, OR
Posts: 2,596
|
Quote:
Originally Posted by whem2fish
only reason i ask im south off 35W
|
Yer quite a ways south and east of me 
__________________
'92 Dodge W250 "Dually" Power Wagon
'74 KIT 1106 Kamper Slide-in Truck Camper
'06 Heartland Bighorn 3400RL Fifth wheel
Follow along with me in the The Journey of
|
|
|
|
|
07-15-2011, 11:04 PM
|
#8
|
|
Senior Member
Vintage RV Owners Club
Join Date: Jul 2006
Location: Sauvie Island, OR
Posts: 2,596
|
Project: Dually Conversion on the Pickup—Fenders Primed, Painted and done
Well, the fenders are finally white!
My luck, being what is, its been raining on and off and down in the 60s since my last entry, preventing any painting work on the fenders, until today, that is.
Today, the weather was clear, the wind was calm and the temperature was 75, ideal painting conditions!
So, after slathering myself in SPF 50 sunblock and 40% deet bug repellent, I papered up the sides of the truck, pulled 50 gallon garbage sacks over the tires and got those fenders, primed, painted and clear coated.
The direct sun and warm temperatures sped the drying process of the paint, coupled with fast-drying Rustoleum Automotive Primer, I had the fenders finished in under three hours.
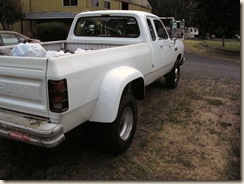
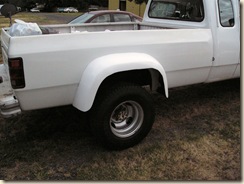
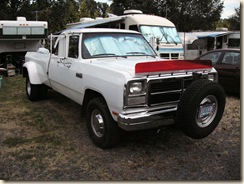
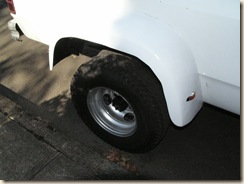
Here’s the finished product from the passenger side. I managed to get the tape off from around the fender on this side today, but decided to let the paint harden more before I attempted to take the tape off the drivers side.
The white will never be a perfect match to the existing paint job, shy of going to a professional paint shop where they can age-match the paint, one has to just settle for close-enough when working with a rattle can.
 Looks good to me, and that’s really what’s important  .
I still need to get the tube of white automotive sealant out to lay a bead along the edge between the fender and the truck bed, as while they’re a perfect contour match now, they’re not glued together, so a bead of sealant will be needed to keep road spray from coming up between the truck bed and dually fender.
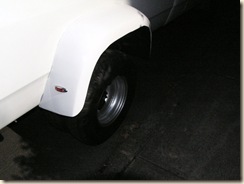
As I was saying, driver’s side still needs me to come along with my sharp razor knife to clean cut the edge along the truck bed and remove the last of the painters tape so that it’ll look as nice as the passenger side.
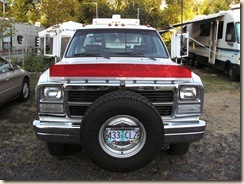
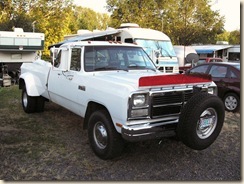
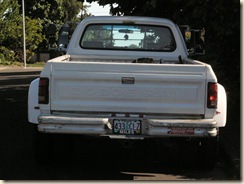
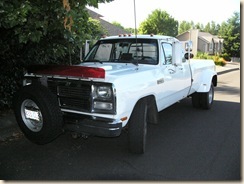
Last, but not least, a nice from-the-front shot of my “new” dually .
Next up, adding all those extra pesky clearance lights! Well, that and finding those oh-so redneck appropriate rear mud-flaps.
Technically, if I’m reading the DOT laws correctly, I don’t need the extra marker lights, my truck is only 94” wide and the extra marker lights are supposedly not needed unless your 102” or wider, but given that I seem to have the worst luck when it comes to LEOs, I’ll just spend the time adding the extra clearance lights  .
__________________
'92 Dodge W250 "Dually" Power Wagon
'74 KIT 1106 Kamper Slide-in Truck Camper
'06 Heartland Bighorn 3400RL Fifth wheel
Follow along with me in the The Journey of
|
|
|
|
|
07-15-2011, 11:22 PM
|
#9
|
|
Senior Member
Vintage RV Owners Club Texas Boomers Club Fleetwood Owners Club
Join Date: May 2011
Location: Cherokee, Texas
Posts: 406
|
Looks great
__________________
1979 "Vintage" Pace Arrow 28 Ft,
|
|
|
|
|
07-16-2011, 03:12 AM
|
#10
|
|
Senior Member
Join Date: Sep 2007
Location: texas
Posts: 2,422
|
looks good i found if not having a load on the truck i lower air pressure to 40 on rear then i dont feel every bump
|
|
|
|
|
07-16-2011, 09:30 AM
|
#11
|
|
Senior Member
Join Date: Apr 2011
Posts: 125
|
Looks great Red. I would suggest you caulk the fenders from the inside as well as the outside to keep the spray/pebbles from pushing the caulk out.
Chris
|
|
|
|
|
07-17-2011, 05:46 PM
|
#12
|
|
Senior Member
Vintage RV Owners Club
Join Date: Jul 2006
Location: Sauvie Island, OR
Posts: 2,596
|
Quote:
Originally Posted by whem2fish
looks good i found if not having a load on the truck i lower air pressure to 40 on rear then i dont feel every bump
|
I currently have my duals at 50 PSI each, and they seem to be getting maximum tread application (I'm anal, I do the chalk test to perfect my unloaded PSI settings to stretch the tread life of tires out as long as I can make them go while maximizing every penny of fuel economy I can squeeze out the guzzler , I suffer through a rougher ride to keep the unloaded mpgs at the 10.5mpg mark )
Quote:
Originally Posted by HoRotica
Looks great Red. I would suggest you caulk the fenders from the inside as well as the outside to keep the spray/pebbles from pushing the caulk out.
Chris
|
I'll lay on a little extra, there's roughly a 1/16" of an inch gap between the fender and the bed of the truck.
__________________
'92 Dodge W250 "Dually" Power Wagon
'74 KIT 1106 Kamper Slide-in Truck Camper
'06 Heartland Bighorn 3400RL Fifth wheel
Follow along with me in the The Journey of
|
|
|
|
|
07-18-2011, 10:27 PM
|
#13
|
|
Senior Member
Vintage RV Owners Club
Join Date: Jul 2006
Location: Sauvie Island, OR
Posts: 2,596
|
Project: Dually Conversion on the PickupCab Clearance Lights Installed
Well, another day, another little update. Managed to figure out a method of getting my measurements right so I could properly position my clearance lights on the cab of the truck.
I had a pleasant surprise when I unpacked the clearance lights to do the job today. Figuring that they were like RV Lights with a recess in the back to pack the butyl tape, I originally had planned I would need to caulk the bases to get them seal to the cab.
Upon unpacking them, I discovered the lights actually came with a nice thick rubber gasket on the bottom that clamps down firmly to the roof of the vehicle to seal it in place across the entire base of each light, so no extra sealant was necessary.
Getting the lights in place and marked with my pencil was actually easiest part of the project. The wire snaking project that came next was a test of my patience and ingenuity.
After several failed attempts at free-feeding the thin wire for the lights and having it go every way but where I wanted it to, I ended up having to use an old section of 8-gauge THNN as a wire snake to feed the section of 12 gauge wire for the positive leads from the lights (They were designed from the factory to ground to the sheet metal) through all five holes and down into the cab.
I tapped it into one of the front running lights to power them (just physically could not reach the head light switch, took half the dash apart in the attempt and tore up my hands good, but finally gave up and tapped into easier to access wire in the engine compartment.
 After all was said and done, I decided to gas up the truck (buy dumping the generator fuel Id been keeping in the tank), take a chance and drive her in tonight to get online.
My main motivation on driving the truck in was having to jump start myself off my secondary battery, left the passenger door open a little too long with the starter battery already being low from sitting for long periods of time with the radio slowly consuming its reserves.
After that little escapade, it was obvious to me that the battery needed charging and driving the truck was about the only way I was going to get it done (I dont have a free standing battery charger, yet).
Once I procure the 5 additional clearance lights I need (4 for the fenders, 2 amber, 2 red, and one 3 light strip for the center of the rear), I will have completed all of the major work in the dually conversion.
If some how I can managed to round up some gas money in August (provided work doesnt come through with a contract for me), Ill load up the camper and take her out to the Columbia River Gorge to ride a trail that was made from an old section of the Historic Highway 30 that was recovered a while back.
__________________
'92 Dodge W250 "Dually" Power Wagon
'74 KIT 1106 Kamper Slide-in Truck Camper
'06 Heartland Bighorn 3400RL Fifth wheel
Follow along with me in the The Journey of
|
|
|
|
|
07-29-2011, 09:03 PM
|
#14
|
|
Senior Member
Vintage RV Owners Club
Join Date: Jul 2006
Location: Sauvie Island, OR
Posts: 2,596
|
Project: Dually Conversion on the PickupCompleted
Well, I can officially say that the dually conversion is completed!
In a marathon effort, I drilled, mounted, and wired in the marker lights on the fenders and in the center of the rear of the truck, coated the underside of the fenders and the enclosed sides of the truck bed with Rustoleum Automotive Undercoating Spray, and sanded and painted the ends of the axle tubes where they are visible in the center of the wheels.
So, where to begin
..
Lets go with the order in which I did them  .
Clearance Lights
Perhaps the most tiring part of the job, given that I didnt wrap it all up till 4am this morning, the marker lights I used are Parker Sealed LED marker light sold for $6.99 each at our local Stuarts Auto Supply.
Since the D300 the fenders came off of had no marker lights, I had to make the wiring loom from scratch, taping into the feed wires from the tail lights on each respective side of the truck.
I had originally planned to use a wider, more square marker light in my original plans, but changed course when I found the smaller, but similarly illuminated (Each marker light has two bright LEDs in them, in both the ones I used and the ones I had originally planned to use) that had a far more attractive shape and backing plate (Chrome wins over flat black plastic any day of the week  ).
I positioned the marker lights on the fenders by first marking the height down from the body crease based on the measurement of the distance between the crease and the front corner marker lights that were already on the truck.
Next, I calculated the change in height along the bottom lip of the fender to figure the distance up from the bottom to get a perfectly level line across the fender and made a mark.
Finally, I traced a using a piece of stiffer cardboard that I could bend to the contour of the fender to trace my positioning line.
The next part involved a little fiddling to see where the light fit best in the curve of the fender and as far out towards the outer edge of the fender as possible while keeping that fit. Once I was satisfied, I marked the drill holes from the base of one of the lights and replicated the placement for the other three marker lights.
Once the drill holes were marked and drilled, I made a larger center hole for the wires to pass through to the underside of the fender where I assembled the wiring loom and secured it inside plastic chaff guard to the underside edge of the fender with cable clamps.
After each fender was wired up, I tested the lights to make sure they functioned correctly before taping and papering off the fender to seal everything up in Rustoleum Automotive Undercoater.
The very last clearance light installed was the three red light bar, which I ended up securing to the lip on the top of the bumper, as there was enough clearance for the tailgate to function properly and saved the hassle of having to cut a notch out of the bumper.
Undercoating the Fenders and Painting the Axle Tube ends
Undercoating was a fairly easy, the most challenging part was laying under the fender and applying the spray without getting rained on by the overspray.
To protect the fiberglass fenders and the side of the truck bed enclosed by the fiberglass fenders, I used Rustoleum Automotive Undercoater.
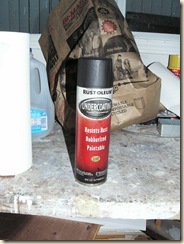
This product comes in two versions, Regular, which costs around $4 and has a dry time of roughly an hour and Professional Grade, which is a little thicker, has a faster drying time, and costs $8 a can.
I used regular, mostly due to cash restraints.
Once the fenders were finished with their wiring and undercoating, I sanded the ends of the axle tube (The section of the hub that you tires go over when you mount them) to remove the mixture of rust and old white paint that was on there, then coated them with gloss black VMF Self-Priming Epoxy Paint.
 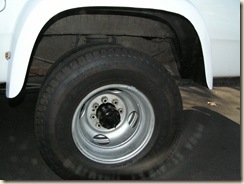
For the time being, Ive left the lug nuts alone. I dont know if cleaning and repainting them will simply cause me problems later on trying to reinstall the lug nuts, or not, so for the time being Im going to leave them alone.
Conclusion
The dually conversion of my truck has turned as extremely well in the end.
Theres still a few minor details to wrap up, caulking the fender gap, installing appropriately redneck dually mud flaps, but all the major details are completed.
Sadly, itll be a while before I can really test the truck and camper out to see how it performs with the extra tires in back, so there will likely be a follow up post at some later date detailing how the truck handled.
Thanks to everyone thats cheered me on and kept up with me during this major undertaking .
__________________
'92 Dodge W250 "Dually" Power Wagon
'74 KIT 1106 Kamper Slide-in Truck Camper
'06 Heartland Bighorn 3400RL Fifth wheel
Follow along with me in the The Journey of
|
|
|
|
|
|
|
Currently Active Users Viewing This Thread: 1 (0 members and 1 guests)
|
|
|
 Posting Rules
|
You may not post new threads
You may not post replies
You may not post attachments
You may not edit your posts
HTML code is Off
|
|
|
|
 » Recent Discussions
 |
|
|
|
|
|
|
|
|
|
|
|
|
|
|
|
|
|
|
|
|
|
|
|
|
|


 Linear Mode

