 |
|
 11-23-2010, 06:15 AM
|
#1
|
|
Junior Member
Vintage RV Owners Club
Join Date: Nov 2010
Posts: 9
|
Re-Attaching outlets and molding to walls
Our 20 year old Holiday Rambler Aluma Lite class A has a number of electrical outlets and various moldings that are coming apart from the wall. Some have had numerous holes drilled through them to hold them in place and in most cases, there is nothing but a very thin piece of wall board to hold them in place, causing them to separate over time.
Is there a better way to anchor these pieces to the wall (especially when replacing with new items?)? The wall board is very thin and conventional wall anchors don't fit (too long).
Help!
David
|

|

|
 |
Join the #1 RV Forum Today - It's Totally Free!
iRV2.com RV Community - Are you about to start a new improvement on your RV or need some help with some maintenance? Do you need advice on what products to buy? Or maybe you can give others some advice? No matter where you fit in you'll find that iRV2 is a great community to join. Best of all it's totally FREE!
You are currently viewing our boards as a guest so you have limited access to our community. Please take the time to register and you will gain a lot of great new features including; the ability to participate in discussions, network with other RV owners, see fewer ads, upload photographs, create an RV blog, send private messages and so much, much more!
|
|
11-23-2010, 10:48 AM
|
#2
|
|
Registered User
Join Date: Aug 2002
Location: Socorro, NM (until ?)
Posts: 1,552
|
You might try "gluing" the moldings in place with an adhesive caulk... you will either need to tape (3 M VHB double stick tape would work great... or any other thick double stick tape) or nail them (thin wire brads) while the adhesive dries. Use a latex based one and it will clean up easily while still wet. The "clear" latex caulks will pretty much "disappear" once they dry. As for the electrical outlets. Do you mean the boxes? For that... personally I would remove the electrical box, and glue a small block of wood behind the screw hole. Once dried, I would drill a small pilot hole that is the same size as the screw (less the threads). Some folks would use a wall anchor but they can also strip out and then they are a PITA to remove. the wood block would give a better attachment.
|
|
|
|
|
11-23-2010, 01:16 PM
|
#3
|
|
Senior Member
Vintage RV Owners Club
Join Date: Jul 2006
Location: Sauvie Island, OR
Posts: 2,596
|
Quote:
Originally Posted by dgmelp

Our 20 year old Holiday Rambler Aluma Lite class A has a number of electrical outlets and various moldings that are coming apart from the wall. Some have had numerous holes drilled through them to hold them in place and in most cases, there is nothing but a very thin piece of wall board to hold them in place, causing them to separate over time.
Is there a better way to anchor these pieces to the wall (especially when replacing with new items?)? The wall board is very thin and conventional wall anchors don't fit (too long).
Help!
David
|
Are the outlets in raised boxes on the wall or just stuffed in a cut out opening without a gang box behind them?
__________________
'92 Dodge W250 "Dually" Power Wagon
'74 KIT 1106 Kamper Slide-in Truck Camper
'06 Heartland Bighorn 3400RL Fifth wheel
Follow along with me in the The Journey of

|
|
|
|
|
11-23-2010, 01:41 PM
|
#4
|
|
Senior Member
Winnebago Owners Club Workhorse Chassis Owner
Join Date: Aug 2007
Location: Sonoma County, CA
Posts: 6,401
|
Quote:
Originally Posted by Lorna
Y As for the electrical outlets. Do you mean the boxes? For that... personally I would remove the electrical box, and glue a small block of wood behind the screw hole. Once dried, I would drill a small pilot hole that is the same size as the screw (less the threads). Some folks would use a wall anchor but they can also strip out and then they are a PITA to remove. the wood block would give a better attachment.
|
I used a thin strip of aluminum (1/8" x 3/4") instead of the wooden block on my RV. Glued the aluminum strip to the back side of the paneling and then drilled a small pilot hole.
__________________
Wayne & Roberta
08 Winnebago Destination 39W Gas UFO Workhorse Chassis......It's really weird being the same age as old people. I thought getting old would take much longer.
|
|
|
|
|
11-23-2010, 02:08 PM
|
#5
|
|
Moderator Emeritus


Join Date: Jan 2007
Location: Litchfield Park, Arizona
Posts: 10,530
|
If you're going to replace the receptical boxes you might consider getting shallow boxes designed for "old work". They are usually blue plastic and once inserted into the opening two screws on the front tighten up "ears" on the back side which hold the box tight to the wall.
Rick
__________________
Rick, Nancy, Peanut & Lola our Westie Dogs & Bailey the Sheltie.
2007 Itasca Ellipse 40FD
|
|
|
|
|
11-23-2010, 05:03 PM
|
#6
|
|
Registered User
Vintage RV Owners Club Gulf Streamers Club
Join Date: Oct 2010
Location: Indiana
Posts: 4,951
|
Quote:
Originally Posted by RickO
If you're going to replace the receptical boxes you might consider getting shallow boxes designed for "old work". They are usually blue plastic and once inserted into the opening two screws on the front tighten up "ears" on the back side which hold the box tight to the wall.
Rick
|

|
|
|
|
|
11-24-2010, 06:08 AM
|
#7
|
|
Junior Member
Vintage RV Owners Club
Join Date: Nov 2010
Posts: 9
|
Quote:
Originally Posted by RedneckExpress
Are the outlets in raised boxes on the wall or just stuffed in a cut out opening without a gang box behind them?
|
All the outlets and switches are stuffed into a cut out in the wall...there isn't one box in the whole unit! I realize that's part of the problem, and it seems ridiculous that HR would have built these units this way (the first time you loosen an outlet or switch, you raise the danger of not being able to securely remount the outlet).
Do I need to install boxes throughout this unit, and will boxes even fit (its a very shallow space behind the wall)? Or do I use the thin strip of aluminum glued behind the wall and drill two holes to mount the switches and outlets? Is that safe enough?
Thank you!
David
|
|
|
|
|
11-24-2010, 11:13 AM
|
#8
|
|
Senior Member
Vintage RV Owners Club
Join Date: Jul 2006
Location: Sauvie Island, OR
Posts: 2,596
|
Quote:
Originally Posted by dgmelp
All the outlets and switches are stuffed into a cut out in the wall...there isn't one box in the whole unit! I realize that's part of the problem, and it seems ridiculous that HR would have built these units this way (the first time you loosen an outlet or switch, you raise the danger of not being able to securely remount the outlet).
Do I need to install boxes throughout this unit, and will boxes even fit (its a very shallow space behind the wall)? Or do I use the thin strip of aluminum glued behind the wall and drill two holes to mount the switches and outlets? Is that safe enough?
Thank you!
David
|
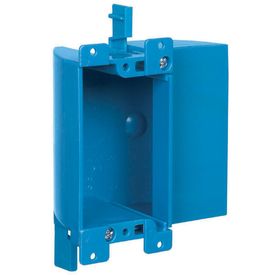
You really never want a 110volt electrical connection exposed to the surrounding structure if possible. If your walls are made from 2x2s there are specifically designed gang boxes that slide sideways into the opens and provide enough space for the wire nuts. They're considered "old work" and should be easily found at home depot, lowes, maynards, etc....
I used this specific style myself, there's a version of it that has little flip up tabs that clamp the box in place to the surrounding wall when you tighten the screws they're attached to.
It will look like this:
__________________
'92 Dodge W250 "Dually" Power Wagon
'74 KIT 1106 Kamper Slide-in Truck Camper
'06 Heartland Bighorn 3400RL Fifth wheel
Follow along with me in the The Journey of
|
|
|
|
|
11-24-2010, 11:24 AM
|
#9
|
|
Registered User
Join Date: Aug 2002
Location: Socorro, NM (until ?)
Posts: 1,552
|
Quote:
Originally Posted by dgmelp
All the outlets and switches are stuffed into a cut out in the wall...there isn't one box in the whole unit!
|
And they say the manufactured RVs are SAFER than a self-conversion! 
Stop in at the hardware store and wander down the electrical aisle. You will find plastic electrical boxes that are shallow. These are what you want. Try to get the ones with the "ears" (made for remodels) as opposed to the screw/nail to a post type. If you can't find the ones with the ears at one place, try another. Lowes & Home Depot should carry both types of shallow boxes.
|
|
|
|
|
11-24-2010, 11:29 AM
|
#10
|
|
Senior Member
Vintage RV Owners Club
Join Date: Jul 2006
Location: Sauvie Island, OR
Posts: 2,596
|
Quote:
Originally Posted by Lorna
And they say the manufactured RVs are SAFER than a self-conversion! |
Back in 1974, the gang box above was what was used. All the 110 volt electrical components were household grade. My water lines were galvanized steel and copper. My gas lines were all copper with brass connectors, but several have been replaced since then with rubber lines because the flexation of the camper over some backroads caused the brass nuts on the lines to crack.
__________________
'92 Dodge W250 "Dually" Power Wagon
'74 KIT 1106 Kamper Slide-in Truck Camper
'06 Heartland Bighorn 3400RL Fifth wheel
Follow along with me in the The Journey of
|
|
|
|
|
11-24-2010, 11:30 AM
|
#11
|
|
Senior Member
Winnebago Owners Club Workhorse Chassis Owner
Join Date: Aug 2007
Location: Sonoma County, CA
Posts: 6,401
|
I don't know if it is something relatively new, but the electrical outlets in my RV are an "all in one" product. The wire snap in the back and then you snap a cover on and it becomes it's own box.

__________________
Wayne & Roberta
08 Winnebago Destination 39W Gas UFO Workhorse Chassis......It's really weird being the same age as old people. I thought getting old would take much longer.
|
|
|
|
|
11-24-2010, 12:25 PM
|
#12
|
|
Senior Member
Join Date: Feb 2009
Posts: 151
|
Quote:
Originally Posted by wthomas1
I don't know if it is something relatively new, but the electrical outlets in my RV are an "all in one" product. The wire snap in the back and then you snap a cover on and it becomes it's own box.
|
This is typical of most RV's with the possible exception of the very high end type. The type show in your picture is the cheapest type, the others actually have a removable face plate.
The best way to secure is to take a piece of 1/2" Plywood cut into strips 3/4" x 3" GLUE and clamp so that new wood screws (I use drywall screws)
will attach to the plywood. Be sure to drill a small pilot hole for the screws. I recommend a good quality plywood such as Baltic birch. cabinet shop would be the best source for this see if they have some crap pieces. You don't want to buy a full sheet as it's 5' x 5'.
|
|
|
|
|
11-24-2010, 06:07 PM
|
#13
|
|
Registered User
Vintage RV Owners Club Gulf Streamers Club
Join Date: Oct 2010
Location: Indiana
Posts: 4,951
|
Personally, I wouldnt use anything but the remodelers box shown above (blue gang box). Anything else used on 110v invites a fire..The box is designed to allow some cooling and insulation from flammables. Remember, any junction will cause some heat through resistance. That last one would get you trown in jail if used in your home. Just because its not a 'house' doesnt mean proper practices should be thrown out the window.
|
|
|
|
|
11-26-2010, 04:52 PM
|
#14
|
|
Senior Member
Join Date: Feb 2009
Posts: 151
|
Quote:
Originally Posted by Midniteoyl
Personally, I wouldnt use anything but the remodelers box shown above (blue gang box). Anything else used on 110v invites a fire..The box is designed to allow some cooling and insulation from flammables. Remember, any junction will cause some heat through resistance. That last one would get you trown in jail if used in your home. Just because its not a 'house' doesnt mean proper practices should be thrown out the window.
|
Strange as it's a UL listed device. Granted not for residential use.
There's millions of them in use in RV.
|
|
|
|
|
|
|
Currently Active Users Viewing This Thread: 1 (0 members and 1 guests)
|
|
|
 Posting Rules
|
You may not post new threads
You may not post replies
You may not post attachments
You may not edit your posts
HTML code is Off
|
|
|
|
 » Recent Discussions
 |
|
|
|
|
|
|
|
|
|
|
|
|
|
|
|
|
|
|
|
|
|
|
|
|
|


 Linear Mode

