Journey with Confidence RV GPS App RV Trip Planner RV LIFE Campground Reviews RV Maintenance Take a Speed Test Free 7 Day Trial ×
RV Trip Planning Discussions

Go Back   iRV2 Forums > iRV2.com COMMUNITY FORUMS > Vintage RV's
Click Here to Login
Register FilesVendors Registry Blogs FAQ Community Calendar Today's Posts Search Log in
Join iRV2 Today

Mission Statement: Supporting thoughtful exchange of knowledge, values and experience among RV enthusiasts.
Reply
  This discussion is proudly sponsored by:
Please support our sponsors and let them know you heard about their products on iRV2
 
Thread Tools Search this Thread Display Modes
 
Old 06-28-2016, 04:58 PM   #43
Senior Member
 
beamisl's Avatar
 
Winnebago Owners Club
Ford Super Duty Owner
Join Date: Jul 2014
Location: MI
Posts: 4,733
RedNeck,

My Dad was a tool collector and he sharpened his own blades but I think probably they make them so you can't do that anymore because they can't make enough money with you sharpening them.

Are the tanks fully in yet? I would crap trying to do this. Funny, I de-oxidized the outside of my MH and waxed it and do all sorts of stuff but the idea of removing my carpet ( I have a slide) scares the crap out of me. Probably could do it but leery of it.

You got right in and just went to it. Bravo! Will keep watching, I want to see the finished product here. Lynne
__________________
Retired January 4th, 2018 Lynne & Jerry RVM 105
04 WBGO Itasca Sunova (Miss May) Blue Ox Tow Bar
15 Equinox (Noxi) 18 RAD Mini e-bike, 04 Tracker
beamisl is offline   Reply With Quote
Join the #1 RV Forum Today - It's Totally Free!

iRV2.com RV Community - Are you about to start a new improvement on your RV or need some help with some maintenance? Do you need advice on what products to buy? Or maybe you can give others some advice? No matter where you fit in you'll find that iRV2 is a great community to join. Best of all it's totally FREE!

You are currently viewing our boards as a guest so you have limited access to our community. Please take the time to register and you will gain a lot of great new features including; the ability to participate in discussions, network with other RV owners, see fewer ads, upload photographs, create an RV blog, send private messages and so much, much more!

Old 06-28-2016, 05:03 PM   #44
Senior Member
 
beamisl's Avatar
 
Winnebago Owners Club
Ford Super Duty Owner
Join Date: Jul 2014
Location: MI
Posts: 4,733
RedNeck,

I'm trying to look at all of them. Post on one if you can and I'll keep looking. I want to see your progress with this camper. Keep up the good work!

Lynne
__________________
Retired January 4th, 2018 Lynne & Jerry RVM 105
04 WBGO Itasca Sunova (Miss May) Blue Ox Tow Bar
15 Equinox (Noxi) 18 RAD Mini e-bike, 04 Tracker
beamisl is offline   Reply With Quote
Old 06-28-2016, 05:31 PM   #45
Senior Member
 
Franka548's Avatar
 
Freightliner Owners Club
Retired Fire Service RVer's
Join Date: Apr 2011
Location: N E Ohio
Posts: 4,403
NICE Redneck
Frank
__________________
05 Alfa Gold 40' Motor Home "Goldie",
03 Malibu Toad
in a 24' CargoMate trailer.
Franka548 is offline   Reply With Quote
Old 06-28-2016, 09:48 PM   #46
Senior Member
 
RedneckExpress's Avatar
 
Vintage RV Owners Club
Join Date: Jul 2006
Location: Sauvie Island, OR
Posts: 2,596
Quote:
Originally Posted by beamisl View Post
RedNeck,

My Dad was a tool collector and he sharpened his own blades but I think probably they make them so you can't do that anymore because they can't make enough money with you sharpening them.

Are the tanks fully in yet? I would crap trying to do this. Funny, I de-oxidized the outside of my MH and waxed it and do all sorts of stuff but the idea of removing my carpet ( I have a slide) scares the crap out of me. Probably could do it but leery of it.

You got right in and just went to it. Bravo! Will keep watching, I want to see the finished product here. Lynne
The carbide edged blades for metal are what I've been using the most of, mostly cutting through screws because they put this thing together with some odd ball security screw that's damned near impossible to remove, so I've ended up just cutting through them to remove pieces of framing.

Those tiny blades don't have many teeth and it doesn't take long before they're worn clean off.
__________________
'92 Dodge W250 "Dually" Power Wagon
'74
KIT 1106 Kamper Slide-in Truck Camper
'06 Heartland Bighorn 3400RL Fifth wheel
Follow along with me in the The Journey of
RedneckExpress is offline   Reply With Quote
Old 06-29-2016, 05:01 AM   #47
Senior Member
 
beamisl's Avatar
 
Winnebago Owners Club
Ford Super Duty Owner
Join Date: Jul 2014
Location: MI
Posts: 4,733
RedNeck,

My husband often comments that they make everything for a throw away society. Used to be things lasted a long time, sometimes for ever. Now, they either break and we throw them away or they don't work right and we throw them away.

Clothing is not made like it used to be, it wears out faster and the seems come apart. I can sew so this isn't a huge issue for us but I repair things often or replace pockets for him.

Did you get the tanks installed and do you have a picture of it?

Lynne
__________________
Retired January 4th, 2018 Lynne & Jerry RVM 105
04 WBGO Itasca Sunova (Miss May) Blue Ox Tow Bar
15 Equinox (Noxi) 18 RAD Mini e-bike, 04 Tracker
beamisl is offline   Reply With Quote
Old 06-29-2016, 05:04 AM   #48
Senior Member
 
beamisl's Avatar
 
Winnebago Owners Club
Ford Super Duty Owner
Join Date: Jul 2014
Location: MI
Posts: 4,733
RedNeck,

All I can say is "WOW" you got the skills and guts taking on a project like this. Lynne
__________________
Retired January 4th, 2018 Lynne & Jerry RVM 105
04 WBGO Itasca Sunova (Miss May) Blue Ox Tow Bar
15 Equinox (Noxi) 18 RAD Mini e-bike, 04 Tracker
beamisl is offline   Reply With Quote
Old 06-29-2016, 06:40 AM   #49
Moderator Emeritus
 
JMonroe's Avatar


Jayco Owners Club
RV Trip Wizard
Join Date: Oct 2009
Location: Poinciana FL
Posts: 7,781
Water will find a way in, always.


Nice repairs.
__________________
Jay and Peggy Monroe
"Can't take it with you, not leaving any behind"
2024 Jayco White Hawk 26FK
2024 Ford Expedition
JMonroe is offline   Reply With Quote
Old 06-29-2016, 06:47 PM   #50
Senior Member
 
beamisl's Avatar
 
Winnebago Owners Club
Ford Super Duty Owner
Join Date: Jul 2014
Location: MI
Posts: 4,733
RedNeck,

Look at a thread called "Good Morning Meet & Greet". Come join us! Lynne
__________________
Retired January 4th, 2018 Lynne & Jerry RVM 105
04 WBGO Itasca Sunova (Miss May) Blue Ox Tow Bar
15 Equinox (Noxi) 18 RAD Mini e-bike, 04 Tracker
beamisl is offline   Reply With Quote
Old 07-01-2016, 11:47 AM   #51
Senior Member
 
RedneckExpress's Avatar
 
Vintage RV Owners Club
Join Date: Jul 2006
Location: Sauvie Island, OR
Posts: 2,596
Quote:
Originally Posted by beamisl View Post
RedNeck,

My husband often comments that they make everything for a throw away society. Used to be things lasted a long time, sometimes for ever. Now, they either break and we throw them away or they don't work right and we throw them away.

Clothing is not made like it used to be, it wears out faster and the seems come apart. I can sew so this isn't a huge issue for us but I repair things often or replace pockets for him.

Did you get the tanks installed and do you have a picture of it?

Lynne
Rear tank needs me to get the old one off first, front one is sitting in the cabover, waiting for me to finish the front wall this weekend.

Once that wall is in place, I can build the enclosure to support the tank and plumb in the water line stubs. Decided to put the water pump up under the kitchen sink where it'll be easier to get at.
__________________
'92 Dodge W250 "Dually" Power Wagon
'74
KIT 1106 Kamper Slide-in Truck Camper
'06 Heartland Bighorn 3400RL Fifth wheel
Follow along with me in the The Journey of
RedneckExpress is offline   Reply With Quote
Old 07-06-2016, 08:32 PM   #52
Senior Member
 
beamisl's Avatar
 
Winnebago Owners Club
Ford Super Duty Owner
Join Date: Jul 2014
Location: MI
Posts: 4,733
RedNeck,

Sounds like you got some solid plans. Finding the time to get it done is another thing. I still work so often have to wait until a day off and then it rains or something else needs done. Got the basement door handles on passenger side done months ago but haven't come up with the right time and weather to do the driver's side.

Well, we'll get it done when the time is right I guess. Right now I really want to retire but need to work another 18 months due to insurance. Wish I had worked at GM instead of the medical field. I would be retired already.

Lynne
__________________
Retired January 4th, 2018 Lynne & Jerry RVM 105
04 WBGO Itasca Sunova (Miss May) Blue Ox Tow Bar
15 Equinox (Noxi) 18 RAD Mini e-bike, 04 Tracker
beamisl is offline   Reply With Quote
Old 07-07-2016, 01:56 AM   #53
Senior Member
 
RedneckExpress's Avatar
 
Vintage RV Owners Club
Join Date: Jul 2006
Location: Sauvie Island, OR
Posts: 2,596
Quote:
Originally Posted by beamisl View Post
RedNeck,

Sounds like you got some solid plans. Finding the time to get it done is another thing. I still work so often have to wait until a day off and then it rains or something else needs done. Got the basement door handles on passenger side done months ago but haven't come up with the right time and weather to do the driver's side.

Well, we'll get it done when the time is right I guess. Right now I really want to retire but need to work another 18 months due to insurance. Wish I had worked at GM instead of the medical field. I would be retired already.

Lynne
I work 8-9 hours at work, then come home and work another 2-3 on the camper till I start losing the daylight and my neighbors start going to bed.
__________________
'92 Dodge W250 "Dually" Power Wagon
'74
KIT 1106 Kamper Slide-in Truck Camper
'06 Heartland Bighorn 3400RL Fifth wheel
Follow along with me in the The Journey of
RedneckExpress is offline   Reply With Quote
Old 07-07-2016, 05:52 AM   #54
Senior Member
 
beamisl's Avatar
 
Winnebago Owners Club
Ford Super Duty Owner
Join Date: Jul 2014
Location: MI
Posts: 4,733
Red,

Morning! Been sitting here reading threads and thinking I will not be washing the rig like I planned to this morning. We have not had rain in over 2 months and it is dry and dusty. The CG we stayed at this last week was really dusty and a lot of traffic so the rig is very dusty.

The problem with washing it today is that is will just get dusty when I put it in storage. The barn we store it at is between 3 fields and the front of the barn is open.

I get it about working and then coming home and working. Sometimes you just got to take a night off but I actually like working on the rig. The problem is I can let too many other things go so I put the MH is storage so it isn't in the driveway so I concentrate on other projects at the house like the full basement.

Yuck! Have a nice day! Lynne
__________________
Retired January 4th, 2018 Lynne & Jerry RVM 105
04 WBGO Itasca Sunova (Miss May) Blue Ox Tow Bar
15 Equinox (Noxi) 18 RAD Mini e-bike, 04 Tracker
beamisl is offline   Reply With Quote
Old 07-25-2016, 05:28 PM   #55
Senior Member
 
RedneckExpress's Avatar
 
Vintage RV Owners Club
Join Date: Jul 2006
Location: Sauvie Island, OR
Posts: 2,596
Placeholder

Place holder until such time the thread organization is done
RedneckExpress is offline   Reply With Quote
Old 07-25-2016, 05:29 PM   #56
Senior Member
 
RedneckExpress's Avatar
 
Vintage RV Owners Club
Join Date: Jul 2006
Location: Sauvie Island, OR
Posts: 2,596
Thursday, June 30, 2016


Rebuilding “Ms. Merry”, the Amerigo – And The Mystery of the Trampoline Floor


I’ve been reading George and the late Ms. Tioga’s amazing story, again, as of late, and I’ve always loved George’s narrative style, as he described his adventures being a Vagabonder Supreme with all his friends.

So, today I decided I’d try writing in his fashion, as I’ve always tended to assign human qualities to a great many things that have been a part of my life and talked to them like they were people on many occasions.

The Amerigo, you should already know her name, its Ms. Merry, of course!

Now, Merry’s Chaufer, the trusty old white Dodge pickup, might be a tad more challenging, as his name isn’t really straight forward. His name is Jake, named after his Grandfather, an old red 1979 Chevy C20 Camper Special who drove Ms. Dyna around for my parents when I was a little baby. Jake, however, likes to be called “Red” after his nickname “Redneck Express”, because he thinks it makes him sound tough like a junkyard dog, though he’s more like a sleepy black lab.

Red’s been taking care of Ms. Merry, resting on his back while she undergoes her surgery. Both of them are looking forward to when Ms. Merry is finally done, and its time for Merry, Red, Dawn and Ms. Yuki the Cat to return to the asphalt rivers once again in search of the next horizon.

---------------------------------------------

When we last left off, I was showing you all the new holding tanks for Ms. Merry the Amerigo, who is still feeling rather out of sorts with her insides out and about, scattered into various unsorted piles in the barn with old Mr. Kit, who simply grumbles whenever he’s woke up by me digging around looking for a bit of Ms. Merry to put back and generally mumbles something about “Staying off his lawn”.

Today, I finally decided to tear into Ms. Merry’s floor, the last big mystery left in her bare skeleton.
From the day I first looked at Ms. Merry in her dusty tent up in Washington, I noticed that her floor was rather springy, like walking on a trampoline in some areas. This was very disconcerting, as no Truck Camper’s floor should bounce like a trampoline when you walk on it!

I figured at the time the floor was either built with too thin of plywood when Ms. Merry was put together, or water had gotten into poor Ms. Merry’s floor and the framing had rotted.

So, with all of Ms. Merry’s walls finally put back together and built stronger than ever before, I set about investigating this danged trampoline, as there was no way I was going to put 348 lbs of water on poor Ms. Merry’s floor only to have the tank drop through the first time she decided to climb of Red’s back.

After a great deal of struggle, Mr. Ryobi the Saw and I cut out several peep holes in the floor so I could take a look into Ms. Merry’s floor to find what the trouble was.

The only problem was, every hole I cut, I only found foam!

After a while, Mr. Ryobi the saw was screaming “Enough, this old vinyl and plywood is hard for me to cut, you should using Mr. Milwaukee for this!”, so I got out big Joe and his little buddy Five-Pound, to start ripping up the stubborn plywood and let Mr. Ryobi’s battery go and recharge.

This is what we found:


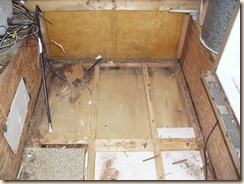
No rot in the frame! Yay!

Now, there is some water damage to the very thin door skin that covers the bottom, but it appears that’s the only thing affected, and I can replace that later when Ms. Merry’s got all her legs again and she can climb off poor Red’s back and give him a rest.

The plywood also wasn’t rotten, or thin….. like every other plywood piece in Ms. Merry, it was 5/8” plenty thick. So, why was her floor so bouncy?

I didn’t find the whole reason until I spent several more hours with Mr. Ryobi, Big Joe and Five Pound.

Turns out, poor Ms. Merry’s floor wasn’t built very well .

Instead of properly securing Ms. Merry’s floor every so often with cross boards, her floor was simply made up of four 2x2s running length-wise the entire span of the floor with only a couple of very loose 2x4 pieces up towards the front to stiffen it. You can see those in the pictures above.

So, with no solid cross beams, the floor in the middle just bowed up as Ms. Merry’s big rear end sagged down.

Well, we couldn’t have that! So, I asked the two Atwood brothers, “Would you please lift up poor Ms. Merry’s rear end so it straightens back out and I can fix her floor?”

“Sure thing boss! But, you’re going to have to turn us, you haven’t got us any power, yet!” replied the Atwood brothers, who always love a chance to lift something big.

So, out came the crank, and I got myself into quite a sweat spinning down each of the Atwood brothers until Ms. Merry’s rear end had lifted just enough to straighten the floor back out.

Once Ms. Merry’s floor was no longer bent, I got out trusty Mr. Dremel and we cut out the old floor almost all the way back to the rear, removing the bent and twisted floor joists.

After I had finished vaccuuming up the floor and pounding over the staples left from removing the center floor joists, I proceeded to cut new 2x6s to frame up the floor in the front to be strong enough to support Ms. Merry’s new fresh water tank, and then several 2x4s to provide support for the dinette seat compartments where Ms. Merry’s batteries were going to go.

Finally, using a 2x6 and a 2x4, I rejoined the remaining portion of the old floor joists from the rear into the new framing in the front portion of the floor.

My poor arms and Mr. Ryobi the Drill were both fairly sore after driving in all of those large screws to clamp all those new pieces of wood togther so they’d become super strong once the glue set.

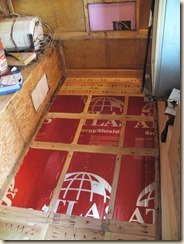
We also got to cut our first pieces of insulation , finally we’re putting things back together!
Put down a bunch more glue on the top of all that new wood, then drop in the new sheet of plywood….


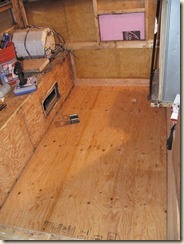
Driving in a whole bunch of two-inch screws and the front section of Ms. Merry’s floor is done!

-----------------------------------------------------------------

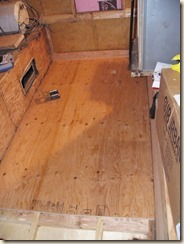
Well, that takes care of the front portion of the camper, I’ll be able to replace the plywood on the rear section as soon as I remove the toilet from the bathroom so I can move the shower stall out of the way and tear out the last piece of the original plywood.

When they built Merry’s floor, they ran a full eight foot sheet from the rear straight up to the front, then a second shorter piece to complete the run, hence the 2x4s in the photo of the original frame structure. The outer edges of the overhanging section simply have small pieces of plywood added on instead of the rear being cut all from one sheet of plywood.

With the new framing and the same thickness of plywood as the replacement, the new floor doesn’t bounce at all and is quite solid.

Next up, I’ll be finishing the framing on the front wall so I can then insulate and close it up, allowing me to then build the framed box for the new fresh water tank and then i’ll have a step again so I can easily get up to the cabover and finish the floor.

Once the cabover floor is in place, I can really start picking up the pace, first repaneling the ceiling up there, then installing the insulation and new quarter inch plywood to the walls in the cabover.

I’ll be returning to more my regular-style of writing for my following posts, but I’ll probably continue to refer to the camper as Merry and my truck as Red, going forward, however, I think I’ll probably stop giving characterizations to everything else, even if it was kind of fun .

Till next time,
Safe Travels .
__________________
'92 Dodge W250 "Dually" Power Wagon
'74
KIT 1106 Kamper Slide-in Truck Camper
'06 Heartland Bighorn 3400RL Fifth wheel
Follow along with me in the The Journey of
RedneckExpress is offline   Reply With Quote
Reply

Tags
install, led, rebuild, restoration, tank, vent


Currently Active Users Viewing This Thread: 1 (0 members and 1 guests)
 

Posting Rules
You may not post new threads
You may not post replies
You may not post attachments
You may not edit your posts

BB code is On
Smilies are On
[IMG] code is On
HTML code is Off
Trackbacks are Off
Pingbacks are Off
Refbacks are Off


» Featured Campgrounds

Reviews provided by


All times are GMT -6. The time now is 06:42 PM.


Powered by vBulletin® Version 3.8.8 Beta 1
Copyright ©2000 - 2024, vBulletin Solutions, Inc.