 |
 09-29-2011, 05:33 PM
|
#1
|
|
Senior Member
Winnebago Owners Club
Join Date: Apr 2011
Location: Idaho
Posts: 109
|
Sinking roof AC unit
I am about 1/3 through my restoration of our 1975 Minnie Winnie. Water leaks through the roof mounted AC unit when it rains. I do notice the unit has settled and now the roof sags more than an inch. Viewed from across the top, it looks rather like a crater with space ship in the middle.
I found one article on the Internet which states that, after removal of the unit, I must locate the ("easy to spot" rafters and determine the spacing ("usually either 16" or 24" on centers").
Then I am to cut 3/4" plywood and, after a series of plywood alterations, I am to slide it in between the ceiling and roof panels so the ends rest on the rafters.
Well, I here to tell ya that I cannot see any rafters at all. It appears my ceiling is made up of vinyl-coated 1/4" plywood panels attached to 1" foam board.
I cannot determine how the even these panels are attached to the roof.
I guess my question is: How can I repair the sag in my roof so I can install my AC unit on a level base.
Any help at all?
I have to do this Saturday and it is supposed to rain Sunday through Thursday.
I think I am in serious trouble!
|

|

|
 |
Join the #1 RV Forum Today - It's Totally Free!
iRV2.com RV Community - Are you about to start a new improvement on your RV or need some help with some maintenance? Do you need advice on what products to buy? Or maybe you can give others some advice? No matter where you fit in you'll find that iRV2 is a great community to join. Best of all it's totally FREE!
You are currently viewing our boards as a guest so you have limited access to our community. Please take the time to register and you will gain a lot of great new features including; the ability to participate in discussions, network with other RV owners, see fewer ads, upload photographs, create an RV blog, send private messages and so much, much more!
|
|
09-29-2011, 09:59 PM
|
#2
|
|
Registered User
Vintage RV Owners Club Gulf Streamers Club
Join Date: Oct 2010
Location: Indiana
Posts: 4,951
|
There prolly are rafters.. 2x4's laid flat with your roof panels and ceiling panels laminated to them with hard foam board filling in the voids in the middle. Your AC should be resting on 2 going side to side 14.5" apart, with 3/4" wood between them front to back, 14.5" apart, forming the opening. In some cases, the side 3/4" pieces might not be there.
Small campers and trailers might not have the AC right on the 2x4's as the roof is small enough that the existing structure can handle the load. In that case, the opening would be cut from the laminate of wood and foam between 2 2x4's 16"-24" apart, as you read.
Page 6 shows both ways.. http://dometic.com/eae64ded-8f1f-4e4...7940a08a.fodoc
As for the 'instructions' you read, I'm really having a hard time picturing what they mean. I would do it a little different depending on what roof you have. If you have the rafters forming the opening, I would 'sister' 3/4" plywood to both rafters after jacking up the roof. Of course, this would require removal of some foam for the plywood. How to do that, I haven't figured with out removing some ceiling panel too. These plywood pieces would be glued and bolted to the 2x4's. If the foam opening type, I would think you'd still have to go side to side with the plywood so the rest on the side walls. This too would require removal of some foam to fit the plywood.
On the removal of some foam to make way for the wood: You said the ceiling leaked, did you not have to remove some of the ceiling panel any way due to wetness/rot?
|
|
|
|
|
09-30-2011, 01:16 PM
|
#3
|
|
Senior Member
Winnebago Owners Club
Join Date: Apr 2011
Location: Idaho
Posts: 109
|
Well, the Winnebago folks just called from the factory.
It appears the walls and roof thickness is 1 1/4" thick. No 2x anything!
He said short of stripping the interior and installing thicker support, the best thing to do on these is to use a 4x8 sheet of 3/4" plywood wrapped in aluminum or sheet metal. Silicone the edges and screw it down so the 8' is across the top, not lengthwise. Once installed, cut the mounting hole from the bottom.
He also said you could suck up the ceiling using lag bolts before installing the AC unit.
Hmmmmmm. I may have to rethink how to do this. I really don't like either method.
There are three steel "U" channels across the top. Maybe I could tie into one of those (about 26" behind of the AC) and attach the other end (69" to the front) to what I am sure is dimensional wood (maybe 1 1/4" X 2") support where the coach ceiling drops down about 10" and goes straight back.
I will attach a drawing in my next message.
|
|
|
|
|
09-30-2011, 01:37 PM
|
#4
|
|
Senior Member
Winnebago Owners Club
Join Date: Apr 2011
Location: Idaho
Posts: 109
|
 Roof sag
I must keep in mind that the industry did not come up with their standard construction values until the 1976 model year. That's when mobile homes had to use 2x4 construction.
I must add that my AC unit is a Coleman Elect-A-Heat that has heating coils in addition to the AC.
Attached is a pic of my possible remedy; where I might be able to span the 69.5 inches with some plywood.
More on this as I progress.
Thanks for all the ideas thus far!
|
|
|
|
|
09-30-2011, 01:46 PM
|
#5
|
|
Senior Member


Vintage RV Owners Club Fleetwood Owners Club
Join Date: Jun 2009
Location: Somewhere in the woods in Belfair, WA, WA
Posts: 1,250
|
Quote:
Originally Posted by gaugeguy

Well, the Winnebago folks just called from the factory.
It appears the walls and roof thickness is 1 1/4" thick. No 2x anything!
He said short of stripping the interior and installing thicker support, the best thing to do on these is to use a 4x8 sheet of 3/4" plywood wrapped in aluminum or sheet metal. Silicone the edges and screw it down so the 8' is across the top, not lengthwise. Once installed, cut the mounting hole from the bottom.
|
OMG- was this seriously from a factory tech?
Please- do not do this. You will be 100% guaranteed a new leaky roof with this method. Anybody who would actually recommend "silicone the edges" to seal a 24 linear foot patch has never tried to fix an RV roof leak.
The 1 1/2" thickness they told you is thin but not uncommon. Most RVs were built out of 1x2s, not 2x4s. The AC should have been adjacent to the metal cross-members, however.
You WILL have to remove the ceiling material and sister in either new 2x2s or better yet some 1" plywood. You may find you will have to add an interior brace that goes all the way across the roof and is bolted to the sidewalls or is supported by new wall studs on the interior.
What you describe is a major roof failure; there will be no easy patch for this.
JMHO.
__________________
Life rocks when your house rolls
Senior Chief & the Cheese Queen
|
|
|
|
|
09-30-2011, 02:01 PM
|
#6
|
|
Senior Member
Ford Super Duty Owner
Join Date: Jan 2011
Location: Kitts Hill, OH
Posts: 2,252
|
instead of regular plywood, I'd use Advantek flooring panels
You should beable to find in any thickness.
It has a 50 year water damage warrenty.
Its very good stuff.
__________________
(RVM#26) THE U-RV 94 F-700/24 foot U-haul box home built RV
|
|
|
|
|
09-30-2011, 02:10 PM
|
#7
|
|
Registered User
Vintage RV Owners Club Gulf Streamers Club
Join Date: Oct 2010
Location: Indiana
Posts: 4,951
|
A 2x4 laid flat is 1 1/2".... Same as a 2x2..
|
|
|
|
|
09-30-2011, 05:16 PM
|
#8
|
|
Senior Member
Winnebago Owners Club
Join Date: Apr 2011
Location: Idaho
Posts: 109
|
The thickness of the ceiling and walls is 1 1/4" not 1 1/2". So any dimensional lumber would have to be trimmed.
The ceiling is composed thusly: (from inside to roof) layer of vinyl cemented to 1/8" plywood, 3/4" of dense foam board, followed by another 1/8" ply, then the aluminum roof skin.
I made a test cut about 6" wide along the drop-down seam. I saved the upper layer of ply and peeled off the foam layer. I also saved the lower layer of ply with the vinyl attached.
My plan is, using 3/4" 9 ply plywood, to install a 6" wide piece all across the top and above the wall bracket inside the cabinets. It will be supported by the brackets as well as the outer portion of the cabinets.
Next, I will cut out a section of the ceiling (just to the upper plywood) from the piece just installed to the metal "U" beam about 23" behind the AC unit. This piece will be approx. 42" wide and 66" long.
I plan to attach the the other end of the new plywood to angle brackets screwed into the "U" beam.
The original vinyl-covered ply will be cemented to the 3/4" ply prior to final installation and the AC hole will be cut, too.
The first end will be inserted into the previously routed-out 6" beam and will be glued and screwed upon assembly.
I think I can then trim the cut lines out with vinyl-wrapped trim pieces (as original).
I think the only thing visible will be the angle brackets on the "U" beam.
Attached are some very crude drawings of "The Plan".
If it doesn't work ......... well, it should have. It will be much stronger than the original!  I'll let you know.
Thanks to all thus far. There's always a wealth of knowledge in these forums!! 
|
|
|
|
|
09-30-2011, 09:36 PM
|
#9
|
|
Registered User
Vintage RV Owners Club Gulf Streamers Club
Join Date: Oct 2010
Location: Indiana
Posts: 4,951
|
Ya, I got that when you uploaded your drawing.. You seem to have a metal beam roof (u-channels).
Just so you know.. I found that the ceiling panels are not quite 1/8", at least on mine, which are also vinyl covered wood.. They are 2.7mm (0.106") and Menards has some panels at 2.7mm for $10-$20 each. I plane to use these to replace mine I had to remove due to water damage. Since they are not the same, I then plan to cover the ceiling in a cloth headliner, leaving the bathroom and shower the original vinyl...
|
|
|
|
|
09-30-2011, 09:53 PM
|
#10
|
|
Registered User
Vintage RV Owners Club Gulf Streamers Club
Join Date: Oct 2010
Location: Indiana
Posts: 4,951
|
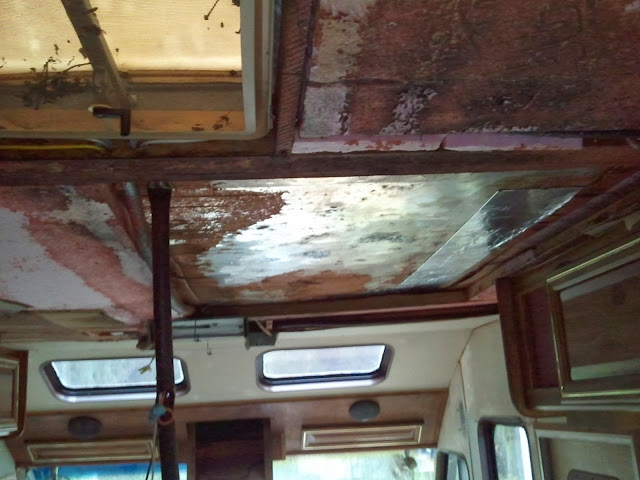
Heres a couple of pic of my inside ceiling. As you can see, I had to pull quite a bit of the ceiling. There was another leak in the bedroom  . As you can see, the ceiling structure is the same 'cept I have wood 2x4's laid flat. This gives me 1.5" foam. Its still panel, foam/frame, panel, aluminum. The tape seen is an Eternabond type tape sold at Lowes in the gutter dept called 'Peel and Stick' (I know, I know), but its thicker than Eternabond and has an aluminum top layer. Its made to repair metal roofs. You can use it on the top/outside to seal edges, seams, etc...

|
|
|
|
|
10-06-2011, 07:23 PM
|
#11
|
|
Senior Member
Winnebago Owners Club
Join Date: Apr 2011
Location: Idaho
Posts: 109
|
Mission complete!
After I dug out the 3/4" foam, I discovered the right side of the ceiling had suffered severe water damage. Even though it has not rained here in months, the thin plywood veneers were still soaked and warped. All the damage was removed.
I installed the 3/4" plywood and finished it of with 1/4" thick "bee board" masonite-like material and trimmed with painted wood.
The AC now sits high on the roof and absolutely no leaks ..... at least from the roof. It rained all day yesterday and today, but it's still dry inside.
I will post a couple of photos later; as well as a drawing of how the original roof was constructed.
|
|
|
|
|
|
Currently Active Users Viewing This Thread: 1 (0 members and 1 guests)
|
|
|
 Posting Rules
|
You may not post new threads
You may not post replies
You may not post attachments
You may not edit your posts
HTML code is Off
|
|
|
|
 » Recent Discussions
 |
|
|
|
|
|
|
|
|
|
|
|
|
|
|
|
|
|
|
|
|
|
|
|
|
|


 Linear Mode

