


An Original NewMar NewAire
RV Projects: Wet Bay Rehab -- 5/12/2020
The NewAire Gets a Plumbing Makeover
One of the least impressive things about our original NewAire is its original wet bay. There's a lot of plumbing crammed into a very limited space, several of the plastic shutoff valves were leaking, and the whole conglomeration was covered with screen-printed plexiglass panels that did not hold up well over time. Sound familiar?

As can be seen above, most of the wet bay panels were time-worn; the the largest had cracked in half at some point in the past and been glued back together. Apologies in advance for not showing the obligatory before picture of the intact wet bay - it was lost somewhere between there and here. You'll have to take our word for it: the whole assembly had become a bit too brittle and wobbly and the leaks were becoming intolerable.

When the panels came off, this is what we faced: a jumble of 1/2" PLEX tubing running in almost every direction.

Wanted to save all the hard PEX barbed fittings, but the plastic shutoffs had to go. Debated on replacement shutoffs, choosing between these two metal quarter turn valves. Decided on the heavier Brass PEX Barb Ball Valve on the right.

Re-plumbing came first; decided to duplicate all the PEX sections with shutoffs and then reassemble with the original hard fittings, replicating all the necessary plumbing in place.

The existing PEX lines were systematically cut out and mapped.
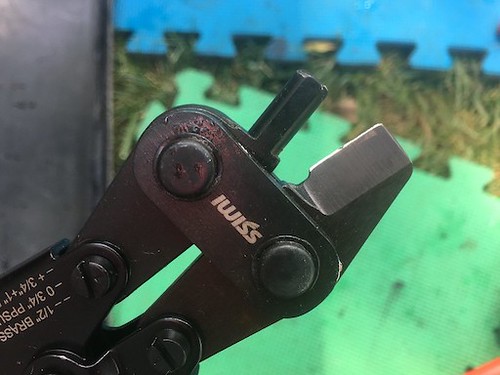
Extracting the original PEX pipe was easy. But a special cutter was required in order to remove the hard fittings; it's called a PEX Crimp Ring Removal Tool.

The tool cuts through and breaks the rings that crimped the old PEX to the hard fittings without damaging the fittings, allowing those to be recycled.
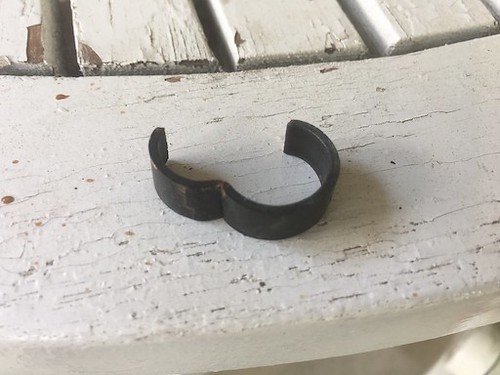
This is what an original crimp ring looks like when cut off a hard fitting.

Cut new 1/2" PEX sections to length (used all white pipe - no red) and employed another special tool called a PEX Pipe Clamp Cinch Tool to attach the PEX to the barbed fittings using Stainless Steel 1/2" PEX Clamps.

The stainless steel crimps are strong and will not corrode over time. These can also be cut off should the need arise.
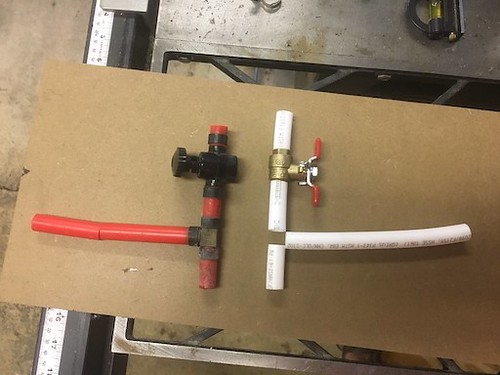

Next task was to individually replicate each PEX plumbing section that included a plastic shutoff valve, being careful to add back any lost length that occurred when removing the original plumbing.

These are all the new plumbing sections with metal valves laid out prior to re-installation. Note that the clear tubing is part of a built-in siphon section used for winterizing.

This is what the wet bay looked like with all the new PEX sections (and fittings) installed. The most difficult part of the job was maneuvering the clamping tool to cinch the stainless clamps in place. Since the wet bay was wide open, it also seemed like a good time to replace the original water pump (upper right). So we did.

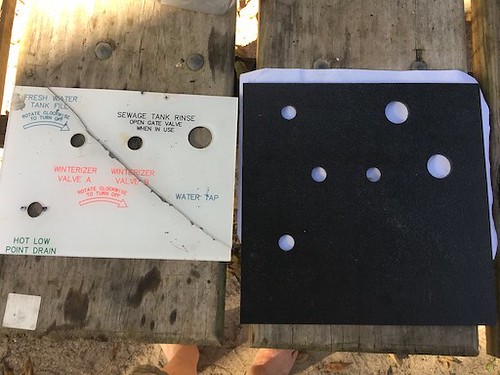
The next task was to re-create all the wet bay panels. The decision to stick with the original layout of lines and valves had already been made, so a precise paper map was made detailing the size of each panel and the location and size of each hole or opening.
ABS 3/32" sheeting was selected for the replacement panels, and each was fabricated to factory dimensions. Then the original plexi panels were cut down on a table saw to be recycled as wet bay labelling. There may have been another/better way to do the labels, but at least some of the original wet bay patina was retained using this approach.


Regular 2-part JB Weld was selected to glue the cut down originals over the new ABS panels. It's durable and works great for low-stress ABS gluing applications.


Here are all the glued-up panels side by side prior to installation.

And here is a shot of the completed wet bay. Note that several tweaks were required as each panel was installed from left to right. Most significantly, those tweaks included an increase the planned hole size for all the brass shutoffs to accommodate the larger quarter turn diameter.

But it all went back together more solid and straight than the originals...

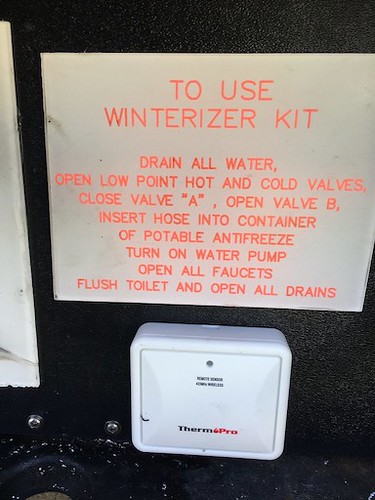
...including legible "how-to" instructions and labelling. BTW: the little white ThermoPro box is a battery-operated remote temperature sensor; we have two ThermoPro indoor/outdoor weather stations inside the motorhome that monitor this sensor.

There you have it: not a show stopper, but it is a refurbished wet bay we can live with.
Next
Real unlimited 4G/LTE wifi for streaming while traveling (honest).

TomAndPeg
The NewAire Gets a Plumbing Makeover
One of the least impressive things about our original NewAire is its original wet bay. There's a lot of plumbing crammed into a very limited space, several of the plastic shutoff valves were leaking, and the whole conglomeration was covered with screen-printed plexiglass panels that did not hold up well over time. Sound familiar?
As can be seen above, most of the wet bay panels were time-worn; the the largest had cracked in half at some point in the past and been glued back together. Apologies in advance for not showing the obligatory before picture of the intact wet bay - it was lost somewhere between there and here. You'll have to take our word for it: the whole assembly had become a bit too brittle and wobbly and the leaks were becoming intolerable.
When the panels came off, this is what we faced: a jumble of 1/2" PLEX tubing running in almost every direction.
Wanted to save all the hard PEX barbed fittings, but the plastic shutoffs had to go. Debated on replacement shutoffs, choosing between these two metal quarter turn valves. Decided on the heavier Brass PEX Barb Ball Valve on the right.
Re-plumbing came first; decided to duplicate all the PEX sections with shutoffs and then reassemble with the original hard fittings, replicating all the necessary plumbing in place.
The existing PEX lines were systematically cut out and mapped.
Extracting the original PEX pipe was easy. But a special cutter was required in order to remove the hard fittings; it's called a PEX Crimp Ring Removal Tool.
The tool cuts through and breaks the rings that crimped the old PEX to the hard fittings without damaging the fittings, allowing those to be recycled.
This is what an original crimp ring looks like when cut off a hard fitting.
Cut new 1/2" PEX sections to length (used all white pipe - no red) and employed another special tool called a PEX Pipe Clamp Cinch Tool to attach the PEX to the barbed fittings using Stainless Steel 1/2" PEX Clamps.
The stainless steel crimps are strong and will not corrode over time. These can also be cut off should the need arise.
Next task was to individually replicate each PEX plumbing section that included a plastic shutoff valve, being careful to add back any lost length that occurred when removing the original plumbing.
These are all the new plumbing sections with metal valves laid out prior to re-installation. Note that the clear tubing is part of a built-in siphon section used for winterizing.
This is what the wet bay looked like with all the new PEX sections (and fittings) installed. The most difficult part of the job was maneuvering the clamping tool to cinch the stainless clamps in place. Since the wet bay was wide open, it also seemed like a good time to replace the original water pump (upper right). So we did.
The next task was to re-create all the wet bay panels. The decision to stick with the original layout of lines and valves had already been made, so a precise paper map was made detailing the size of each panel and the location and size of each hole or opening.
ABS 3/32" sheeting was selected for the replacement panels, and each was fabricated to factory dimensions. Then the original plexi panels were cut down on a table saw to be recycled as wet bay labelling. There may have been another/better way to do the labels, but at least some of the original wet bay patina was retained using this approach.
Regular 2-part JB Weld was selected to glue the cut down originals over the new ABS panels. It's durable and works great for low-stress ABS gluing applications.
Here are all the glued-up panels side by side prior to installation.
And here is a shot of the completed wet bay. Note that several tweaks were required as each panel was installed from left to right. Most significantly, those tweaks included an increase the planned hole size for all the brass shutoffs to accommodate the larger quarter turn diameter.
But it all went back together more solid and straight than the originals...
...including legible "how-to" instructions and labelling. BTW: the little white ThermoPro box is a battery-operated remote temperature sensor; we have two ThermoPro indoor/outdoor weather stations inside the motorhome that monitor this sensor.
There you have it: not a show stopper, but it is a refurbished wet bay we can live with.
Next
Real unlimited 4G/LTE wifi for streaming while traveling (honest).
TomAndPeg

Total Comments 0


