 |
|
 08-25-2019, 08:18 AM
|
#197
|
|
Member
Join Date: Aug 2018
Posts: 67
|
Quote:
Originally Posted by gcasson

Ive had this problem and it was resolved with a new fuel pump; however, I plan to place an adhesive heat shield on it to prevent future occurrences. Hope this helps...
|
I am curious what kind of heat shield you used? Did you wrap the fuel pump in the heat shield material, or did you place it between the pump and the motor somehow?
|

|

|
 |
Join the #1 RV Forum Today - It's Totally Free!
iRV2.com RV Community - Are you about to start a new improvement on your RV or need some help with some maintenance? Do you need advice on what products to buy? Or maybe you can give others some advice? No matter where you fit in you'll find that iRV2 is a great community to join. Best of all it's totally FREE!
You are currently viewing our boards as a guest so you have limited access to our community. Please take the time to register and you will gain a lot of great new features including; the ability to participate in discussions, network with other RV owners, see fewer ads, upload photographs, create an RV blog, send private messages and so much, much more!
|
|
09-01-2019, 10:21 PM
|
#198
|
|
Senior Member
Fleetwood Owners Club
Join Date: May 2013
Posts: 1,485
|
Time to post something to pull this back on the main page so it doesn't get lost.
Did a dumb thing today and damaged my rear cap (as in pilled one side loose from the coach and ripped off the bottom part). My fault completely. Time to learn fiberglass repair. Question: the inside of the cap has a black rough textured surface. Is this undercoating of some sort, paint or the actual fiberglass material? (I know, grind or scrape some off to see, but I was wondering if anyone knew offhand?)
__________________
Dave RVM#66 and Carol
1998 Pace Arrow Vision
Seeing the USA - 200 miles at a time
|
|
|
|
|
09-02-2019, 01:33 PM
|
#199
|
|
Member
Join Date: Aug 2018
Posts: 67
|
Quote:
Originally Posted by daveandcarol
Time to post something to pull this back on the main page so it doesn't get lost.
Did a dumb thing today and damaged my rear cap (as in pilled one side loose from the coach and ripped off the bottom part). My fault completely. Time to learn fiberglass repair. Question: the inside of the cap has a black rough textured surface. Is this undercoating of some sort, paint or the actual fiberglass material? (I know, grind or scrape some off to see, but I was wondering if anyone knew offhand?)
|
I am trying to understand what you mean by the rear cap?
|
|
|
|
|
09-02-2019, 09:12 PM
|
#200
|
|
Senior Member
Fleetwood Owners Club
Join Date: May 2013
Posts: 1,485
|
The big piece of fiberglass that covers the back of the coach. It was fastened to the main structure by a row of pop rivets and a continuous metal bar. Caught the bottom part, pulled the whole right side free and tore off a big chunk of the corner below the tail lights. Assume it's repairable rather than getting an entire new (used) cap. Going to get an estimate on reattaching it, I'll work on the fiberglass repair myself. Or maybe I'll turn it in to insurance, just need to see the repair cost versus my deductible...
__________________
Dave RVM#66 and Carol
1998 Pace Arrow Vision
Seeing the USA - 200 miles at a time
|
|
|
|
|
09-02-2019, 09:25 PM
|
#201
|
|
Member
Join Date: Aug 2018
Posts: 67
|
Quote:
Originally Posted by daveandcarol
The big piece of fiberglass that covers the back of the coach. It was fastened to the main structure by a row of pop rivets and a continuous metal bar. Caught the bottom part, pulled the whole right side free and tore off a big chunk of the corner below the tail lights. Assume it's repairable rather than getting an entire new (used) cap. Going to get an estimate on reattaching it, I'll work on the fiberglass repair myself. Or maybe I'll turn it in to insurance, just need to see the repair cost versus my deductible...
|
IF it is just the flat back panel of the coach, I would think you should be able to buy a flat fiberglass sheet from somewhere. Just cut out the bad spot, cut a piece to fit and fiberglass the seam. It would definitely be easier than the rear piece I had to repair on my rear top corner. Can you post a picture of the damage? 
|
|
|
|
|
09-02-2019, 11:50 PM
|
#202
|
|
Community Administrator


Fleetwood Owners Club Workhorse Chassis Owner
Join Date: Sep 2010
Location: Marquette, Michigan "Da UP" & Lehigh Acres Florida
Posts: 21,827
|
Got any pictures you can post of it?
__________________
John & Cathy R.
06 Pace Arrow 38L Workhorse W24
|
|
|
|
|
09-03-2019, 05:58 PM
|
#203
|
|
Junior Member
Newmar Owners Club
Join Date: Aug 2019
Location: Louisville KY
Posts: 22
|
2005 pace arrow 36D water filtration system
Anyone know the location of the onboard filter for the water filtration system?...thanks
__________________
Mike, Cindy & BELLA (4yo BRITTANY)
2016 VENTANA 4037
TOAD=2012 Fiat 500 Sport
|
|
|
|
|
09-03-2019, 07:24 PM
|
#204
|
|
Senior Member
Fleetwood Owners Club Workhorse Chassis Owner
Join Date: Jan 2011
Location: Prospect, KY
Posts: 1,801
|
mine is in the dump station bay.
__________________
Kevan & Rebecca(BTW) 2009 Fleetwood PaceArrow 38P 8.1 on W24 chassis w/air bags, 1990 Goldwing 1500, 2010 Jeep Liberty, RVM#197, FMCA#F413587, FMA#7985, WCMC, 2 dogs Cody and Sadie
|
|
|
|
|
09-03-2019, 08:09 PM
|
#205
|
|
Senior Member
Fleetwood Owners Club
Join Date: May 2013
Posts: 1,485
|
Will take a photo and post it. My rear cap has an offset below the tail lights. Also, the tail lights wrap partially around the corner. The part that came off was below and beside them (2 pieces). I will probably try to reattach those pieces myself after we get to AZ for the winter. The back side of the cap is black and very rough. I'm trying to figure out if that is an undercoating of some sort or the actual fiberglass (that color has me puzzled). I'll have to scrape some of the surface off to see.
__________________
Dave RVM#66 and Carol
1998 Pace Arrow Vision
Seeing the USA - 200 miles at a time
|
|
|
|
|
09-03-2019, 09:13 PM
|
#206
|
|
Member
Join Date: Aug 2018
Posts: 67
|
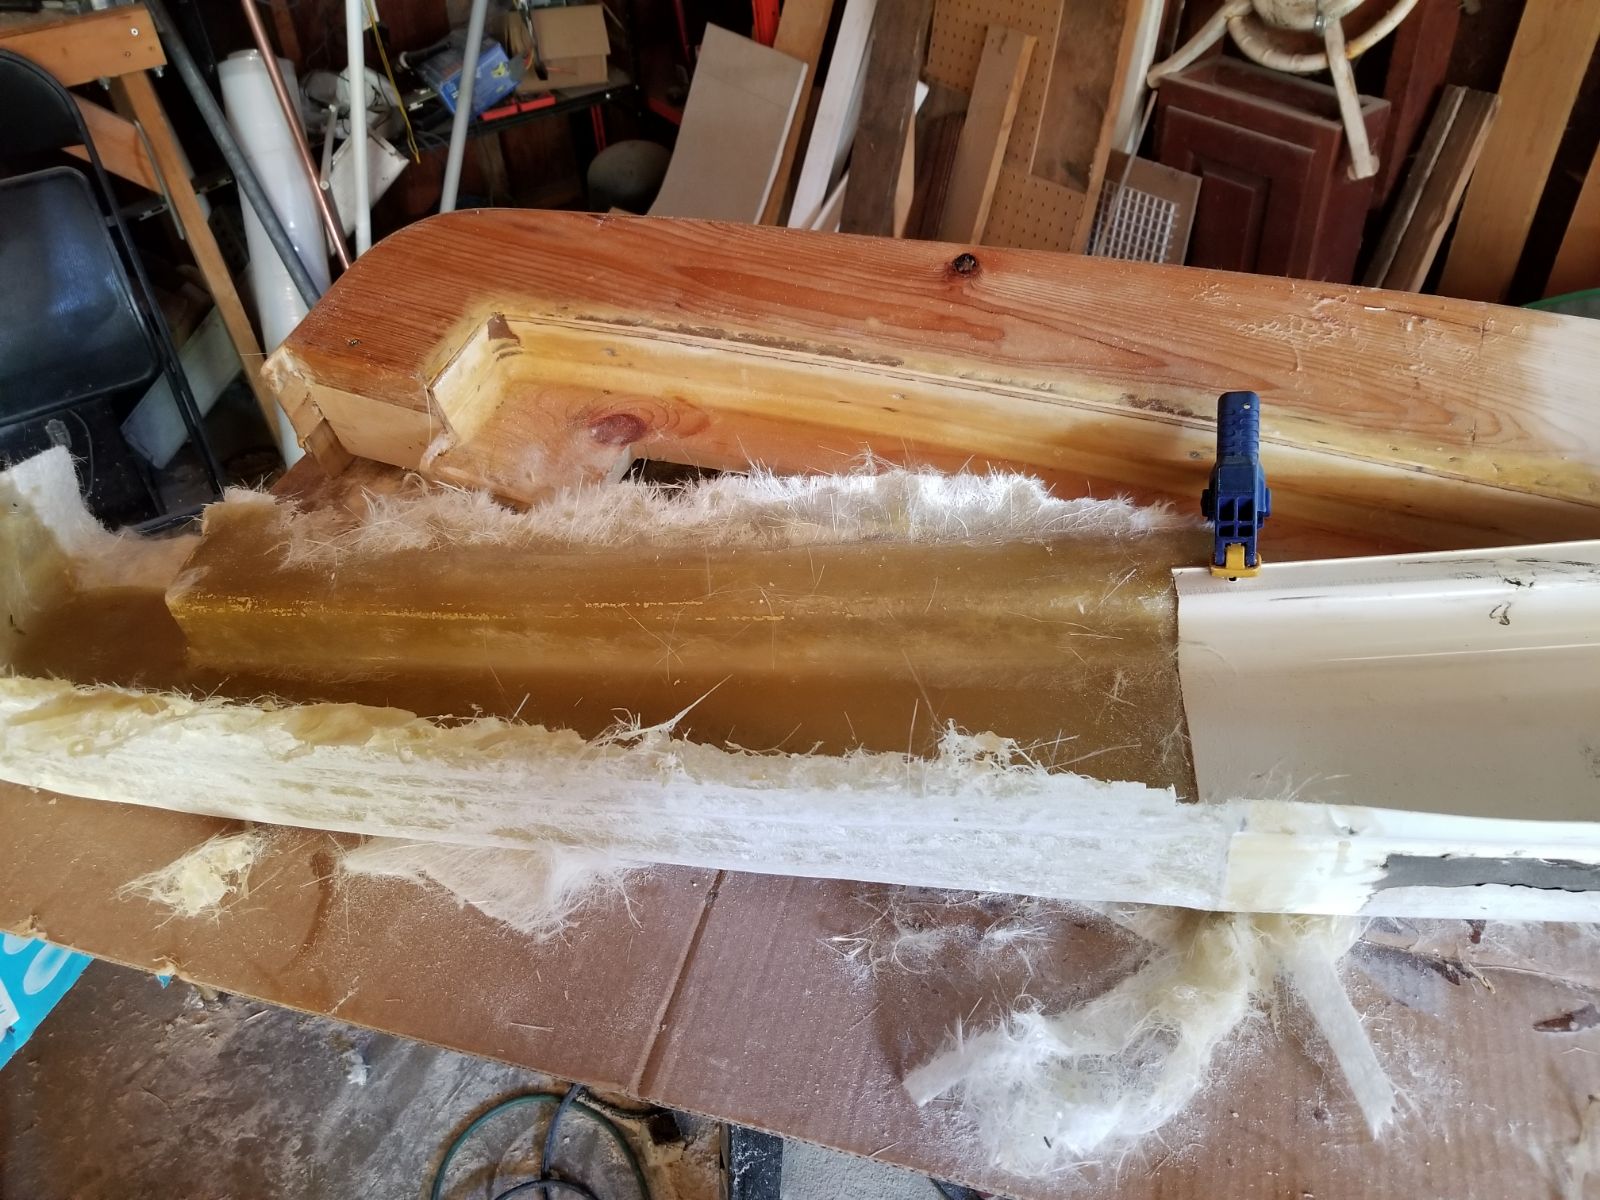
This was the repair job I did on the earlier pic of the upper back corner.

Had to make my own form for the fiberglass.
|
|
|
|
|
09-04-2019, 05:39 AM
|
#207
|
|
Senior Member
Fleetwood Owners Club Workhorse Chassis Owner
Join Date: Jan 2011
Location: Prospect, KY
Posts: 1,801
|
great work, looks great. had to compare pictures to even know where the damage was.
__________________
Kevan & Rebecca(BTW) 2009 Fleetwood PaceArrow 38P 8.1 on W24 chassis w/air bags, 1990 Goldwing 1500, 2010 Jeep Liberty, RVM#197, FMCA#F413587, FMA#7985, WCMC, 2 dogs Cody and Sadie
|
|
|
|
|
09-04-2019, 06:45 PM
|
#208
|
|
Member
Join Date: Aug 2018
Posts: 67
|
Quote:
Originally Posted by PappaBull
great work, looks great. had to compare pictures to even know where the damage was.
|
Thanks. For my first ever fiberglass repair, I think it turned out great.
|
|
|
|
|
09-08-2019, 07:22 PM
|
#209
|
|
Senior Member
Fleetwood Owners Club
Join Date: May 2013
Posts: 1,485
|
Here, finally, photos of my torn rear cap. What doesn't show is the edge of the cap is pulled loose all the way to the top of the coach. To fix that, the vertical trim will have to come off. reattach the cap (with screws since the holes are torn out) and reinstall the trim strip (after straightening the end of it). The fiberglass repair I think I can handle myself.
__________________
Dave RVM#66 and Carol
1998 Pace Arrow Vision
Seeing the USA - 200 miles at a time
|
|
|
|
|
09-08-2019, 08:16 PM
|
#210
|
|
Member
Join Date: Aug 2018
Posts: 67
|
Quote:
Originally Posted by daveandcarol
Here, finally, photos of my torn rear cap. What doesn't show is the edge of the cap is pulled loose all the way to the top of the coach. To fix that, the vertical trim will have to come off. reattach the cap (with screws since the holes are torn out) and reinstall the trim strip (after straightening the end of it). The fiberglass repair I think I can handle myself.
|
That doesn't look that much tougher than the repair I did to mine. The trick would be to make a form to put the fiberglass over similar to what I did. As a release agent for the form to get the fiberglass off, I just used Vaseline and rubbed it over the whole form, and then put the fiberglass over that. You will probably have to take the whole cap off to do the repair though which might be hard. On mine, luckily I only had to take one side of the top cap off to repair it since there was a seam just past the backup camera.
As for the vertical trim, you might want to get some sheet metal screws that have a fender type head like these:

The larger screw head can then act as a clamp to hold the cap in place since your screw holes are torn out.
I assume you checked the RV salvage yards for the part. When I checked on mine, none of the salvage yards had that part, and fleetwood said that they no longer had the mold for my part.
|
|
|
|
|
|
|
Currently Active Users Viewing This Thread: 1 (0 members and 1 guests)
|
|
|
 Posting Rules
|
You may not post new threads
You may not post replies
You may not post attachments
You may not edit your posts
HTML code is Off
|
|
|
|
 » Recent Discussions
 |
|
|
|
|
|
|
|
|
|
|
|
|
|
|
|
|
|
|
|
|
|
|
|
|
|


 Linear Mode

