 |
|
 02-11-2015, 03:28 PM
|
#1051
|
|
Senior Member
Join Date: Jul 2014
Location: Sedona, AZ
Posts: 713
|
Quote:
Originally Posted by f15epilot

I first bought a set of the CAMCO 42134 Gutter Spouts w/Extensions thinking they were the ones that attached to the existing spouts, as described here. When I went to install, it became readily apparent that 'slip on extensions' would not work since A) my existing spouts were broken off (by the previous owner), and B) even if they were there, these Spouts w/Extensions would not have worked. These Gutter Spouts "With" Extensions attach by removing the end screw in the drip rail, pulling the rail slightly away from the side, sliding out the old gutter, and sliding this one in it's place. Well...since I had an old set of the B&B 655 versions (bought on clearance a while back; American RV has them on sale now for 99cents), and those require the same installation procedure, I installed them. I keep my rig inside a hangar, so there are no cover install issues. The B&B versions stick out about 3 inches, getting the water further off the side, yet still well inside the width of your mirrors.
So, as long as you don't have cover install issues and want a permanent install, try the B&B versions...after all, "longer" is usually better 
(couldn't help it...) |
Thanks, I'll take a look at those too. Sounds like there is no 'best' solution to this.
You're lucky you can keep your rig in your hangar! My hangar has plenty of room, but all non-aviation vehicles are banned.
__________________
Tim, Tara and Canyon - 'TnT' (& C now...)
2015 Thor Outlaw 37LS w/FJ Cruiser Toad
Columbia 400, 1967 Corvette, KTM 350 EXC-f, TTR 125 LE, XR50 for toys
|

|

|
 |
Join the #1 RV Forum Today - It's Totally Free!
iRV2.com RV Community - Are you about to start a new improvement on your RV or need some help with some maintenance? Do you need advice on what products to buy? Or maybe you can give others some advice? No matter where you fit in you'll find that iRV2 is a great community to join. Best of all it's totally FREE!
You are currently viewing our boards as a guest so you have limited access to our community. Please take the time to register and you will gain a lot of great new features including; the ability to participate in discussions, network with other RV owners, see fewer ads, upload photographs, create an RV blog, send private messages and so much, much more!
|
|
02-14-2015, 09:46 PM
|
#1052
|
|
Senior Member
Join Date: Jun 2013
Posts: 1,785
|
I know a couple of you guys have had to have your front quarter panel walls re-attached to the floor. I too have suffered from front quarterpanelitis (FQP). I first noticed it on my December trip to Glamis on bumpy I-8 in southern AZ. I only noticed it on the driver side, the passengers side seems fine. This week I took my OTL to a local rv shop here and explained the problem and cure (from the forum here). They opened up the moulding and found of the 4 screws, 2 were broken and two were stripped. They put in 4 new bolts thru the rail and put in another screw. The moulding went back on like new. Thanks to Focker and riplingj and F15epilot for the helpful info you posted on this.  The drive of my rig is much more solid again. For people who have treated FQP, did you have to fix both sides? Is my psger side inevitably going to fail?
__________________
Jeff, Catherine and Turner|2008 Damon Outlaw 3611|W24 w/ 8.1L Chevy hauling in the garage 3 quads,2 dirtbikes,2 CanAm Rykers,1 Rzr900xp, 1 smart42 & 1 sewing machine based in central AZ
|
|
|
|
|
02-15-2015, 09:56 AM
|
#1053
|
|
Moderator Emeritus


Damon Owners Club Workhorse Chassis Owner
Join Date: Mar 2012
Location: Lone Star State
Posts: 19,203
|
|
|
|
|
|
02-15-2015, 10:05 AM
|
#1054
|
|
Senior Member
Damon Owners Club Workhorse Chassis Owner
Join Date: Sep 2012
Location: Sacramento, CA
Posts: 1,358
|
Quote:
Originally Posted by JeffAZ
For people who have treated FQP, did you have to fix both sides? Is my psger side inevitably going to fail?
|
I wish the shop that did ours attempted to save the moulding, they didn't even give it a chance, just said I needed to replace and repaint. :(
We had problems with both sides but I can't say that both sides would fail for sure. As you have seen it isn't attached with much so the odds are good. In our case, it was much worse on the passenger side then the drivers side going down the road but when they opened it up all screws were broken.
|
|
|
|
|
02-15-2015, 11:28 AM
|
#1055
|
|
Senior Member
Join Date: Jun 2013
Posts: 1,785
|
Thanks for the reply Scott. On my 2008 OTL there is no paint or decals in that area so it is just a plain white moulding, so that part was good. I guess that's a little obscure advantage of no paint on a rig is no expensive paint repairs. I did replace that 10 foot vertically tall rear plastic corner piece last year. The piece was black and I got bids of $800 to paint it white before installation. I got a company in WI to match the paint and sell me 3 spray paint cans and paint adhesive for $80, so that turned out nice.
__________________
Jeff, Catherine and Turner|2008 Damon Outlaw 3611|W24 w/ 8.1L Chevy hauling in the garage 3 quads,2 dirtbikes,2 CanAm Rykers,1 Rzr900xp, 1 smart42 & 1 sewing machine based in central AZ
|
|
|
|
|
02-17-2015, 11:15 AM
|
#1056
|
|
Senior Member
Damon Owners Club Spartan Chassis
Join Date: Jan 2011
Location: Niceville, FL
Posts: 265
|
Sidewall Reattachment and Flooring Refurbishment
Regarding the sidewalls coming apart...mine did on BOTH sides. First, my rig was originally a mobile health fair venue for an HMO in Miami where it logged almost 60K miles. When I got it, the side roof/wall caps were all dented (from low limbs, no doubt), there were too many nicks and holes in the roof membrane from hitting things to count, and the front bumper mounts were loose (passenger side) and broken (driver side). This is the 2" square beam that is welded to the frame with an attachment to the fiberglass bumper. It wasn't long before I noticed I could see daylight looking down by my left foot between the wall and the floor/carpet. The dash also came loose on each side, especially the passenger side since the walls 'were' attached to the ends of the dash, but the middle lays across the floor frame. So, when the side walls come loose, the floor and walls move up/down as the frame sways/moves. That does the following things, all of which are bad:
1) It breaks the bumper attachment at either the weld to the frame (driver side) or at the bolt attachment to the fiberglass mount (passenger side). That is because the bumper is attached to the side walls; the frame to the floor.
2) The coach will sway side-to-side more in either gusty winds or undulating roads since the mass of the 'body' is no longer rigid to the frame to which the shocks are attached (the shocks cannot do their job).
3) It lets in moisture from road spray which will leach into the 1/2-in wood flooring along that seam...but the carpet on top will mask that dampness a bit and likely, since you don't step there, this will go unnoticed.
4) The dash comes free from the side walls and bounces up/down
5) 'Stuff' (like my wife's magazines) get lodged/stuck in the gap
OK...first I tried oversized self-tapping screws in place of the original ones, even using red-thread locker. That does not help as they will back out. Worse, the original outer side 'hole' is likely reamed and/or enlarged so the screw has nothing against which to pull the panel to the frame. Since my co-pilot never liked the carpet, and found it a pain to clean, I replaced ours with a vinyl flooring laminate that is put down in 6" x 3-ft strips that 'stick' to one another, but not the floor. Great stuff and easy to work with. The only carpet remaining is under the table and around the slide. Since they had to come out, we had the 'pleather' chairs reupholstered in a more durable material.
Step one was to pull up the carpet. That is actually fairly easy as it is stapled with small staples; the 1/4" foam underlayment uses much larger 1-1/2" heavy staples, which ARE a pain to get up.
The first photo shows the driver side, along with the damage from water intrusion along that wall/floor seam. The second the passenger side. I also found a thumb-sized gap at the driver/rear side of the engine cover, though that other stain is not related. I had to cut out a 9" wide section on each side along the wall to replace that flooring.
Since I had 'room' to work, I pulled ALL of the screws back out of the sidewall and spread the gap between the wall and frame to allow me to squirt sealant/adhesive into that gap. Damon originally placed a thin rubber vibration strip (about 1/16" thick) between the wall and frame. They also sprayed that gray/rigid foam insulation along that seam, all of which fell off/away as I spread the gap. I cleaned the surfaces as best I could, and scraped away any debris, then squirted a heavy bead of Locktite heavy-duty construction adhesive between the two surfaces; it grabs, but remains flexible.
The bottom of the wall panel (dark/outer part in underside pic) is an aluminum box or "U" frame through which those metal screws had been driven. Since the outer hole had spread and enlarged, I needed some sort of washer to distribute the pull of the bolts. Since a 'washer' and bolt would make reattachment of the trim piece problematic, I decided to reinsert and tighten (with red thread locker) the oversized, self-tapping screws that I'd placed 'under' the trim previously. Then I used the actual molding cover as a 'long washer' or tension plate and ran 6" x 5/16" bolts through that aluminum plate all the way through the outer wall U-frame and two 2" steel frame members. I used nylon washer locking nuts with washers on the inside, centering the bolt in the middle of the trim so the head did not interfere with the snap-on piece. The bolt head required some trimming of that cover expansion legs so they would slide around the 5/16" hex bolt, but that only requires a good pair of wire dikes and pliers to nick/bend/break. With the walls now glued, screwed and bolted, I returned to the flooring.
I replaced the water damaged sections with pressure treated and water-sealed plywood. You'll find a thin (.020, I think) sheet of aluminum under the plywood as a water barrier. Since cutting the plywood nicked that sheeting, I sealed the cut line in the aluminum with Lexel, and sealed/glued the seam in the wood and glued the flooring in place with flooring adhesive. I used new, stainless self-tapping screws to affix the replacement flooring insert back to the frame. Then, for noise and heat abatement, I laid down foil-backed underlayment flooring foam, taking some time to fill that hole by the engine cover with hi-temp RTB sealant before laying the foam over it. Since there is still slight 'flex' at the wall, I used a vinyl wall base to seal that joint (probably should have used almond). I seamed the 'front' area from the rear flooring (which lacks the underlayment) with a carpet/tile transition; the carpet around the engine cover provides enough seam/cover for a nice look without having to add a trim (though cutting the flooring is key to that). Finally, I reattached the dash to the sidewalls using a spacer piece of plywood (1/2").
The seats then went back in and the end result meets the Co-Pilot's requirements (which was the objective, after all). The benefit, too, is both less noise and MUCH less sway now that the walls are reattached to the frame. When it warms up a bit more in LA (lower Alabama, as in NW Florida), I'll clean and coat the wheel-wells and those seams with a good truck-bed liner for an undercoat. The whole process, aside from the re-upholstery, took two days of steady work but was WELL worth the efforts.


|
|
|
|
|
02-18-2015, 01:45 PM
|
#1057
|
|
Senior Member
Join Date: Jun 2013
Posts: 1,785
|
Wow f15e, thanks for that great write up and photos of your fix for the FQP. Looks like you did a great job. I'm tired after just reading the post! I will check my bumper attachment. I had read the posts about this problem last year, so I was always paying attention to my rig. I just noticed the symptoms last December, so it didn't have a chance to do much damage (I hope). And of course living here in PHX, it didn't get driven in any rain while the gap was present, so no water intrusion occurred. BTW, that floor and the seats look fantastic
__________________
Jeff, Catherine and Turner|2008 Damon Outlaw 3611|W24 w/ 8.1L Chevy hauling in the garage 3 quads,2 dirtbikes,2 CanAm Rykers,1 Rzr900xp, 1 smart42 & 1 sewing machine based in central AZ
|
|
|
|
|
02-23-2015, 12:13 AM
|
#1058
|
|
Senior Member
Join Date: Jan 2015
Location: Brampton, ON
Posts: 451
|
F15ePilot... Wow! I need to hide your post from Lisa or she'll want your beautiful floors. :-)
|
|
|
|
|
02-24-2015, 12:41 PM
|
#1059
|
|
Junior Member
Freightliner Owners Club
Join Date: Jul 2014
Posts: 20
|
Getting ready to do the sidewall reattachment on my OTL 2010 3808. 1st quest. How did you remove the outside molding? 2nd quest. How long are the screws that held the side panel in place? 3rd quest. what sealant did Thor use to seal the upper part of the molding that is paintable? The Passenger side has a long piece of molding that goes under the slide opening framework & all the way to the entrance door. I assume this whole piece would have to come off. Is that correct? Any information would be greatly appreciated. Thanks, Ken
|
|
|
|
|
02-25-2015, 06:47 PM
|
#1060
|
|
Member
Join Date: Sep 2014
Posts: 93
|
Dog / pet door
Hey all. Getting MUCH closer to pulling the trigger and going down to texas to pickup a new ls.
Did any of you fellow dog lovers install a pet door in the door between the garage and the main hall?
I have one on my back door at home, and thought it would be great to allow my little monster to go in and out whe we are are the race track so i don't have to worry about her overheating or needing water. I imagine she would love to spend most of her day on the party deck watching everyone.
Also can anyone with a 14.5 or newer (meaning the 26k chassis) tell me if they did any track bar or steering damper mods?
Thanks to all of you evil people who gave me all these mod ideas.
|
|
|
|
|
02-26-2015, 12:05 AM
|
#1061
|
|
Senior Member
Join Date: Jan 2015
Location: Brampton, ON
Posts: 451
|
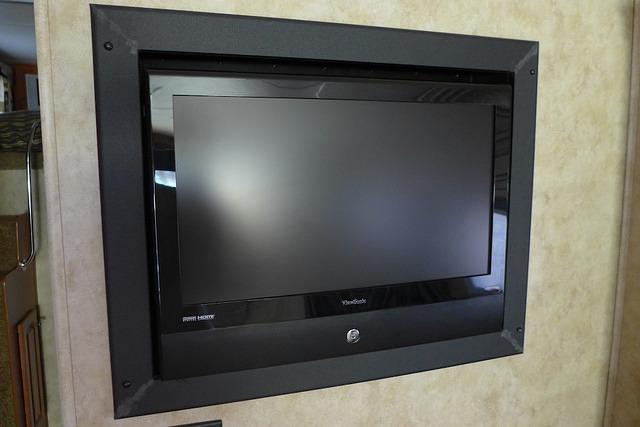
Quote:
Originally Posted by focker
Here is where I am so far in the TV/HDMI upgrade project.
First this is what the stock TV setup looks like for those that don't have the same setup as us. The Viewsonic is a 26" TV.
and
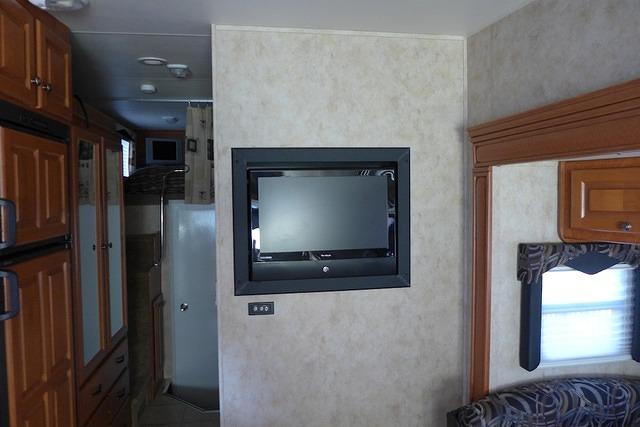 Now the stock TV is removed...
 |
I'm gonna stop you right there! Typical of my many failed journeys into the world of the handyman, I tend to get stuck at step one. 
The bracket on the top of the TV has a row of screws that can be easily removed. But how do you get to the screws on the bottom of the bracket ( http://www.irv2.com/forums/attachmen...6&d=1391224551) to actually get the TV out?
|
|
|
|
|
02-26-2015, 12:20 AM
|
#1062
|
|
Moderator Emeritus
Damon Owners Club Workhorse Chassis Owner
Join Date: Mar 2012
Location: Lone Star State
Posts: 19,203
|
Anthony,
Did you pick-up your Outlaw? What was the story with the floor?
About the TV, did you take the frame off the wall? That improves access.
You can see your targets (the screws) here:

More here:
http://www.irv2.com/forums/f121/outl...ml#post1885483
Best luck
|
|
|
|
|
02-26-2015, 06:27 AM
|
#1063
|
|
Senior Member
Join Date: Jan 2015
Location: Brampton, ON
Posts: 451
|
Quote:
Originally Posted by Scarab0088
Anthony,
Did you pick-up your Outlaw? What was the story with the floor?
About the TV, did you take the frame off the wall? That improves access.
|
Went to see it again yesterday to pick out replacement flooring. Looks like the Outlaw going in and out from the extreme cold caused it. We're taking advantage of the opportunity though and Lisa's going to get the flooring she wanted in the first place.
We're going to remove the carpet from the living area and go with vinyl, ceramic-look tiles installed in a diamond pattern. It'll end up looking a little closer to what's in newer Outlaws.
http://www.armstrong.com/flooring/lu...oor-111629.asp
So we didn't pick it up, but while I was there I checked out the TV more closely and just can see how to get at that bottom row of screws. So removing the frame will expose them?
A
|
|
|
|
|
02-26-2015, 06:32 AM
|
#1064
|
|
Senior Member
Join Date: Jan 2015
Location: Brampton, ON
Posts: 451
|
Quote:
Originally Posted by Terminex
Hey all. Getting MUCH closer to pulling the trigger and going down to texas to pickup a new ls.
Did any of you fellow dog lovers install a pet door in the door between the garage and the main hall?
|
Our dogs enjoy the freedom of coming and going at home so a doggie door is a must for us. Problem is our Outlaw's garage door has a window that would get in the way of its installation.

So unless we replace the door, we're thinking of just keeping the door open for them. We're going to put in a fake grass pee pad for them for on-demand relief when on the road or when we have to leave them in there on their own for an afternoon or evening.
Anthony
|
|
|
|
|
|
|
Currently Active Users Viewing This Thread: 1 (0 members and 1 guests)
|
|
|
| Thread Tools |
Search this Thread |
|
|
|
| Display Modes |
 Linear Mode Linear Mode
|
 Posting Rules
|
You may not post new threads
You may not post replies
You may not post attachments
You may not edit your posts
HTML code is Off
|
|
|
|
 » Recent Discussions
 |
|
|
|
|
|
|
|
|
|
|
|
|
|
|
|
|
|
|
|
|
|
|
|
|
|


