 |
|
 11-15-2022, 11:00 AM
|
#309
|
|
Senior Member


Join Date: Dec 2009
Location: Out there, somewhere
Posts: 9,941
|
SteveD.
I have an experiment for you (and others if they feel like it). If you haven't thrown away your old coolant reservoir, here's a little test/experiment. Long, long ago, way before Star Wars, we had an older class C Dodge 23' motorhome. The roof vents, you know, the 14" x 14" ones that tip up, were getting very old, chalky and brittle. I was up on the roof to do some Dicor re-caulking on various seams etc. I brought up with me, an industrial heat gun made by Milwalkee.
When I'm gonna do seam re-seal, I use that heat gun to really soften the original Dicor and that makes it really pliable and easy to remove. But, I got a bit close to one of my 14"x14" roof vents with the heat from that gun and noticed something. That part of the vent cover actually melted ever so slightly.
I backed the heat gun away from it rapidly cause I was not ready to go run to the RV store and buy one just yet. But, when that small section of that roof vent heated up and cooled, something great happened. It basically re-chemicaled back to it's almost new form. That is, it was rejuvenated to a pliable and durable state. Hmmmmm.
Sooooo, I thought what the heck, lets heat up the whole vent cover and see what happens. To my surprise, that entire chalky, brittle vent cover, changed back to an almost new condition. It was soft and shiny and nowhere near the chalky condition it was in only a few moments prior. YAHOOOOO! I found a way to save a buck!!!! I did that process to the rest of the roof vents, including the plumbing vents. All of which rejuvenated to almost new condition.
Now, would or could you use this same procedure on your old coolant tank and have it turn out the same, NOT A CLUE. But what have you to lose? NOTHING! I mean most likely you're gonna throw it out anyways so, what the heck, give it a try if you have a good heat gun. I don't think the CEO's hair dryer will work as it doesn't have enough umph to do the job. And she's probably not gonna respond too well was she sees you sneaking out with it.
Scott
__________________
2004 ITASCA HORIZON 36GD, 2011 GMC Sierra 1500 4x4 Toad '20 Honda NC750X DCT
 2018 Goldwing Tour DCT Airbag
Retired-29.5 yrs, SDFD, Ham - KI6OND
Me, Karla and the Heidi character, (mini Schnauzer)!
|

|

|
 |
Join the #1 RV Forum Today - It's Totally Free!
iRV2.com RV Community - Are you about to start a new improvement on your RV or need some help with some maintenance? Do you need advice on what products to buy? Or maybe you can give others some advice? No matter where you fit in you'll find that iRV2 is a great community to join. Best of all it's totally FREE!
You are currently viewing our boards as a guest so you have limited access to our community. Please take the time to register and you will gain a lot of great new features including; the ability to participate in discussions, network with other RV owners, see fewer ads, upload photographs, create an RV blog, send private messages and so much, much more!
|
|
11-15-2022, 05:28 PM
|
#310
|
|
Senior Member
Tiffin Owners Club
Join Date: Nov 2006
Location: Near Atlanta
Posts: 121
|
Scott,
Sounds like an interesting thought.. and I DO still have the old reservoir .. and a HEAT GUN  . Still busy finishing up (or trying to) the radiator repair (along with all that other stuff) at the moment, but I'll check it out later .. maybe next week.
Today, my task was to reinstall the crossover tube and then come up with a new mount 'mechanism' for the Power Steering reservoir .. and I did. This was my FIRST thought a while back, but I put it aside trying to come up with an easier solution.. but no. I ended up CUTTING the 'reservoir plate' that held BOTH the coolant and PS reservoirs.
I cut the PS part off after 'splicing' (bracing) the gap created by removing it. Then I had to add steel tabs on each end to find a place to bolt it to the rad top (in the same place where it was originally). I left enough of the original 'top' to support the weight so that I only needed to keep it from falling off ... or moving around. I still have to drill a hole into the tabs that I welded onto each end, but I'm confident at this point that it will work.
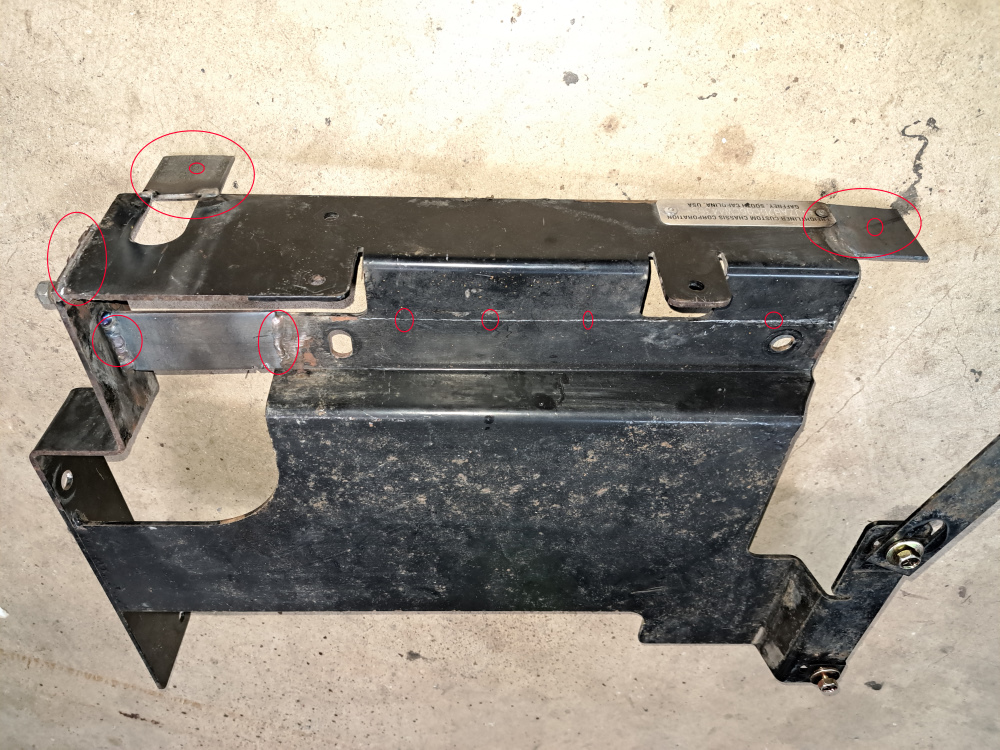
You can see the red circles where I 'did my magic' ") . At the most left, I had to CUT that end loose from the main coolant support .. but first I had to tie that 'wing' back to the main plate with a tab welded in below that left end. Then I CUT the PS part from the coolant part along that line marked with 4 small circles. THEN, I added 2 tabs - one on the right side (left facing the rad from the back) and a second one on the opposite end. The tabs had to be outside of the space/volume of the PS reservoir and be able to ATTACH to something.
NOW.. to remove the coolant reservoir, I just remove the 2 nuts that hold it to the rad..
To remove the PS reservoir, I just remove the left nut/bolt (right end in pic - drilled a corresponding HOLD in the rad frame) and the other end needs a hole to match the 'black side curtain mount' that also attaches to the radiator next to the dip sticks.
I have HIGH HOPES that I'll NEVER have to remove either of these again, but if my rad repair LEAKS.... at least I'm ahead of the game. I also added a petcock to that coolant crossover tube but forgot to take a picture of it installed .. looks a LOT like the one that Scott posted a couple HUNDRED posts ago .
Pretty sure I'll be pouring liquid into it tomorrow .. and maybe even firing up the engine
Steve
__________________
2006 Tiffin Phaeton 35DH ~75k mi. Cat C7/350 on FL XC. Lots of FIXES - Worst thing is the FUEL mileage.. only ~7. My 1994 8.3 Cummins got almost 9  - NEW 'worst thing' - failed radiator overflow and radiator itself. WOW .. what a job!
|
|
|
|
|
11-16-2022, 05:50 AM
|
#311
|
|
Senior Member
Tiffin Owners Club
Join Date: Nov 2006
Location: Near Atlanta
Posts: 121
|
New question ... does anyone know the purpose of all that black 'curtain' heavy tar paper like stuff that surrounds EVERYTHING in the back of these rigs? It blocks view and access to anything useful. I plan to leave mine out at least for the first start, but have myself wondering if I really NEED to put it back in. The most likely purpose I can think of is (maybe) to reduce the dust and grime that might otherwise be sucked into the engine area.. but the fan is blowing OUT and all the air is being pulled from underneath ...so.. I'm not sure.
Anyone tried leaving it out before?
Steve
__________________
2006 Tiffin Phaeton 35DH ~75k mi. Cat C7/350 on FL XC. Lots of FIXES - Worst thing is the FUEL mileage.. only ~7. My 1994 8.3 Cummins got almost 9 - NEW 'worst thing' - failed radiator overflow and radiator itself. WOW .. what a job!
|
|
|
|
|
11-16-2022, 09:21 AM
|
#312
|
|
Senior Member
Join Date: Jul 2005
Location: Carmel, Indiana
Posts: 363
|
I think the material also serves the purpose of not letting air from behind the coach which can contain exhaust gases from getting sucked into the area under the engine cover due to the pull of air from the fan blade. That air would then be directly under the rear floor of the coach which can sometimes find its way into the coach through openings back there. Additionally the material seems to be helping force the air in the front of the radiator to go through the radiator and not over the top or around it (other than underneath the coach). On my Winnebago Journey 36G some parts of that trim back there were metal, but those nearest the radiator were a heavy felt like material that appeared to me to be trying to seal the air flow around the radiator to force more air through the cooling fins of the radiator to help with cooling. I think even one piece in the back trim was just a length of simple D shaped rubber moulding strip as well.
__________________
Clayton
2022 Dutch Star 3709
Previously: 2006 Winnebago Journey 36G CAT 350
|
|
|
|
|
11-16-2022, 10:20 AM
|
#313
|
|
Senior Member
Join Date: Dec 2009
Location: Out there, somewhere
Posts: 9,941
|
Quote:
Originally Posted by CWHTRAINS

I think the material also serves the purpose of not letting air from behind the coach which can contain exhaust gases from getting sucked into the area under the engine cover due to the pull of air from the fan blade. That air would then be directly under the rear floor of the coach which can sometimes find its way into the coach through openings back there. Additionally the material seems to be helping force the air in the front of the radiator to go through the radiator and not over the top or around it (other than underneath the coach). On my Winnebago Journey 36G some parts of that trim back there were metal, but those nearest the radiator were a heavy felt like material that appeared to me to be trying to seal the air flow around the radiator to force more air through the cooling fins of the radiator to help with cooling. I think even one piece in the back trim was just a length of simple D shaped rubber moulding strip as well.
|
Clayton,
I think you pretty much hit the nail on the head with that total explanation. Iwas gonna try and say about the same thing but, you covered it all. I think that Winne/Itasca installed that *shield* pretty much for all your explained reasons, just like many, many of todays (and quite a few years back) cars, trucks and more, all have the same type of plastic/organic material of some sort that does pretty much seals the engine compartments from the the front, and both fenderwells. Nice job of reasoning.
Scott
P.S. Steve, that Petcock you installed WILL be a life saver, there's no doubt you'll be using it again, as much as both you and I (and any other wrench turner here) HOPEFULLY would NEVER like to put a single wrench on that area ever again.
Scott
__________________
2004 ITASCA HORIZON 36GD, 2011 GMC Sierra 1500 4x4 Toad '20 Honda NC750X DCT
2018 Goldwing Tour DCT Airbag
Retired-29.5 yrs, SDFD, Ham - KI6OND
Me, Karla and the Heidi character, (mini Schnauzer)!
|
|
|
|
|
12-18-2022, 07:32 AM
|
#314
|
|
Senior Member
Tiffin Owners Club
Join Date: Nov 2006
Location: Near Atlanta
Posts: 121
|
Quote:
Originally Posted by FIRE UP
...
P.S. Steve, that Petcock you installed WILL be a life saver, there's no doubt you'll be using it again, as much as both you and I (and any other wrench turner here) HOPEFULLY would NEVER like to put a single wrench on that area ever again.
Scott
|
Scott.... you are correct. I have already had to use it TWICE more - what a bit*h. I got my repaired rad installed and filled .. THEN found it still had a leak.. this time in the PLASTIC side at the bottom - so it had to come back out again - unfixable. I was finally able to source a new replacement - amazingly enough, I got it from AMAZON! I got the MFR ID# from FL Gaffney and searched the internet and found it (for ONLY $1700 - a LOT cheaper than some prices I saw on this forum). I was actually shipped from Northern Radiator in Texas. Got that in, installed it and after testing it OK.. I found a very small LEAK at the hose fitting at the bottom of the water pump the next day. It was tempting to leave it since it was only a couple of drops a day.. but decided that would be a stupid move. I had to drain down my system to get it below that point so I could remove and reposition that hose (it was NEW) again. I apparently did not have it quite seated deeply enough on the WP bottom snout. FINALLY... !*FINALLY*!... I think I have completed this task successfully. I also made several mods to make the job "easier", but it was still WAY WAY more difficult than it should ever be. An INCH here and there would have made life SO MUCH better  .
Also during this task, I noticed that the top of the tailpipe extension (that sticks out the side through the rear cap) was totally BLOWN OUT in the top - which was hidden way back inside the cap. I just happened to notice something 'odd' while looking up from the bottom while re-installing the bottom radiator/shroud screws... I could SEE the sky.. where there should NOT have been any sky. Looking carefully past the 'big bellows air intake hose' with a flashlight, I could see a hole that was about 4-5 inches long in the top. It was almost impossible to get that piece removed and most of the rest of the exhaust had to be disconnected to do it , so I decided to change the muffler from stock to a 'glass pack' type (covered in another thread) - which required modification of several other parts to make it all fit. Still, I was never able to find another exhaust tip that would fit through that hole in the cap - so I had to 'exhaust it' below the back of the cap instead. Just barely enough room to do it. It remains to be seen if that will result in any MPG improvement.
Steve
PS... I also tried your technique of heating the old coolant reservoir.. it did HELP, but it really didn't make the coolant much more visible through the cloudiness of the material. Maybe I could have heated it more and gotten it better, but I already had a new one, so didn't bother to work harder at it.
__________________
2006 Tiffin Phaeton 35DH ~75k mi. Cat C7/350 on FL XC. Lots of FIXES - Worst thing is the FUEL mileage.. only ~7. My 1994 8.3 Cummins got almost 9 - NEW 'worst thing' - failed radiator overflow and radiator itself. WOW .. what a job!
|
|
|
|
|
12-18-2022, 08:49 AM
|
#315
|
|
Senior Member
Join Date: Jun 2012
Location: The Bluegrass State
Posts: 8,889
|
Quote:
|
"I noticed that the top of the tailpipe extension (that sticks out the side through the rear cap) was totally BLOWN OUT in the top "
|
Along these lines, have you replaced the "U" turn exhaust pipe that is in-between the exhaust brake and the muffler yet? If this pipe burns a hole in it, it can cause a LOT of damage! There is a lot of wiring in that area and a well placed hole can totally melt the wiring. I was lucky. No real damage except the sliding room controllers melted right off the wall they were screwed to, and I found a melted shore power adapter.
__________________
Good Luck, Be Safe and Above All, Don't Forget To Have Fun  Pete
Pete
Central Kentucky
2006 Fleetwood Discovery 35H, 2014 Honda CR-V, M&G Engineering Braking System
|
|
|
|
|
12-19-2022, 07:19 AM
|
#316
|
|
Senior Member
Tiffin Owners Club
Join Date: Nov 2006
Location: Near Atlanta
Posts: 121
|
Thanks for the heads-up, Pete. I was in that area and hadn't noticed anything, but went back and double checked to be sure. I don't have a 'u-turn', but I do have a '90' in the path at that point. Thankfully, everything looks peachy keen there. I reinstalled the 'black blanket stuff' yesterday and also the rear 'swinging doors' - that pretty much wraps the job... except for reinstalling a bunch of zip ties that I cut out for access underneath. I'll wait for a warmer day to tackle that. I still have almost a month before we head out on our first trip of 2023.
Steve
__________________
2006 Tiffin Phaeton 35DH ~75k mi. Cat C7/350 on FL XC. Lots of FIXES - Worst thing is the FUEL mileage.. only ~7. My 1994 8.3 Cummins got almost 9 - NEW 'worst thing' - failed radiator overflow and radiator itself. WOW .. what a job!
|
|
|
|
|
12-19-2022, 10:14 AM
|
#317
|
|
Senior Member
Join Date: Jun 2012
Location: The Bluegrass State
Posts: 8,889
|
Quote:
Originally Posted by SteveD
Thanks for the heads-up, Pete. I was in that area and hadn't noticed anything, but went back and double checked to be sure. I don't have a 'u-turn', but I do have a '90' in the path at that point. Thankfully, everything looks peachy keen there. I reinstalled the 'black blanket stuff' yesterday and also the rear 'swinging doors' - that pretty much wraps the job... except for reinstalling a bunch of zip ties that I cut out for access underneath. I'll wait for a warmer day to tackle that. I still have almost a month before we head out on our first trip of 2023.
Steve
|
I kind of miss spoke when I said it was a 180 degree bend. Please let me restate the shape. Its a twisty turney pipe!
I lightly tapped on mine with a small tack hammer before we left KY heading West. It all sounded the same. I made it as far as Pahrump Nevada before it blew a hole and did some damage. I was real lucky I caught is as soon as I did.
Here is a picture of my newly named twisty turney pipe also showing the part numbers. BTW, the heat also disintegrated the heat sock that is on that pipe. I bought several large cans of fruit, and cut open the cans clamping them around the exhaust pipe in order to get home. They worked and we had fruit salad for supper!
__________________
Good Luck, Be Safe and Above All, Don't Forget To Have Fun
Pete
Central Kentucky
2006 Fleetwood Discovery 35H, 2014 Honda CR-V, M&G Engineering Braking System
|
|
|
|
|
03-20-2023, 01:09 AM
|
#318
|
|
Senior Member
Join Date: Apr 2022
Location: Renton-Highlands,Wa./HB,Ca./Fujieda-Japan
Posts: 832
|
Concerning the OP's original pic of the radiator...No leak. Look at the other pics. See the yellow pollen/debris? It does this with the radiator due to air being drawn from the sides of the radiator & shroud. The pollen/debris will catch all along the edge at that location on the radiator. Seen this often.
In the OPs case it was over spray.
The clue it wasn't a leak...
Never had to add any coolant.
__________________
1994 Southwind Storm 28ft - 454TBI w/4L80E
VIN#1GBJP37N4R3314754
Flight System G-Man 360 generator man (PM me)
|
|
|
|
|
06-14-2023, 12:03 PM
|
#319
|
|
Member
Fleetwood Owners Club
Join Date: Aug 2022
Location: Fenton, MI
Posts: 57
|
Water Pump & Torque Specs
I skimmed through this 20+ page posting. I'm planning to replace my radiator and most of the belts, hoses, etc.
I talked to the guy at the Cat dealer, he said that they really haven't seen issues with the water pump on the C7 and didn't recommend replacing it unless I could tell there was a problem. My motorhome is a 2005 with about 95,000 miles on it.
Also, I may have missed it, but does anyone have the torque specs for putting everything back together?
__________________
2005 Fleetwood Bounder 38N
Freightliner XC - Cat C7
Toad - 2015 Cadillac SRX
|
|
|
|
|
06-14-2023, 12:44 PM
|
#320
|
|
Senior Member
Fleetwood Owners Club Spartan Chassis
Join Date: Oct 2011
Location: Henderson, NV
Posts: 277
|
Regarding bolt torques, I have a Caterpillar guide/manual that has the torque values listed per bolt size which was a good reference.
I dont have access to that now, as the coach is in storage.
__________________
2005 Providence 39L, Spartan, CAT 350
2021 Jeep GC 80th
|
|
|
|
|
06-14-2023, 06:21 PM
|
#321
|
|
Senior Member
Join Date: Sep 2004
Location: Olympic Peninsula
Posts: 546
|
Quote:
Originally Posted by Hyslopthom
I skimmed through this 20+ page posting. I'm planning to replace my radiator and most of the belts, hoses, etc.
I talked to the guy at the Cat dealer, he said that they really haven't seen issues with the water pump on the C7 and didn't recommend replacing it unless I could tell there was a problem. My motorhome is a 2005 with about 95,000 miles on it.
Also, I may have missed it, but does anyone have the torque specs for putting everything back together?
|
Here are the torque spec pages out of the Caterpillar Operation and Maintenance Manual that came with my 3126E.
|
|
|
|
|
06-15-2023, 04:42 AM
|
#322
|
|
Senior Member
Join Date: Feb 2015
Posts: 720
|
Quote:
Originally Posted by Hyslopthom
I skimmed through this 20+ page posting. I'm planning to replace my radiator and most of the belts, hoses, etc.
I talked to the guy at the Cat dealer, he said that they really haven't seen issues with the water pump on the C7 and didn't recommend replacing it unless I could tell there was a problem. My motorhome is a 2005 with about 95,000 miles on it.
Also, I may have missed it, but does anyone have the torque specs for putting everything back together?
|
I will just add my experience I pulled my radiator to replace it, did the belt tensioner and a few other things and not the water pump. 200 miles later it failed. The cost is not that significant, but the confidence in your water system will be.
__________________
Frank, Columbus, Ohio
2001 Itasca Horizon Cat 3126B 330hp, 2018 Jeep GC Limited, EPS harness or 24' Enclosed Car Hauler
|
|
|
|
|
|
|
Currently Active Users Viewing This Thread: 1 (0 members and 1 guests)
|
|
|
 Posting Rules
|
You may not post new threads
You may not post replies
You may not post attachments
You may not edit your posts
HTML code is Off
|
|
|
|
 » Recent Discussions
 |
|
|
|
|
|
|
|
|
|
|
|
|
|
|
|
|
|
|
|
|
|
|
|
|
|


 Linear Mode

