Instead of offering specific product endorsements, I would like to offer to you some concepts when it comes to care of the finished surface to help you understand your options and separate good advice from the chaff.
The steps needed for any particular vehicle, and thus the products/methods chosen, will depend in large part upon the starting condition of the finish (paint/gelcoat/thermoplastic/whatever).
The better the surface is to start with, the fewer number of actions needed. The worse the surface, the more work and the more actions/products needed.
If your surface is already shiny and in good condition, then the only thing needed is a good cleaning and application of surface protectant (pure carnuba wax, etc.).
If your surface is dulled (either a little or a lot), then restoring the shine will involve the use of products with abrasive qualities. Keep in mind that "abrasive" is the adjective form of "abrasion", which translates to "make your paint thinner by grinding off the top surface of it". The trick is to match up the products and methods with the starting surface condition so that the desired result is pleasing and still only minimally impacts the mils (a unit of measurement commonly used to describe paint thickness - each mil corresponds to 0.001"). In plain English - you want to keep that paint as thick as possible by only removing the absolute minimum you have to in order to restore the shiny surface finish. Abrasion is applied starting with the most aggressive or coarse and progressing through to very fine, bringing up the shine along the way.
Making dull paint shiny involves grinding it with ever-finer abrasives until it's glossy. Even vehicles that have been buffed to a very high gloss will show under magnification extremely fine scratches in the surface. The fineness of those scratches (at a microscopic level) will match the gloss obtained. Simple concept, no?

If your surface is only very slightly dulled, then you might be able to get away with a combination cleaner/wax. The pro of this is that it's completed in a single application, thus saving your elbow grease. The con is that it's a compromise - the product is neither a true wax nor a true compounding agent, yielding kind of a middling result.
For surfaces of moderate or significant dullness a multi-step process is called for. Note that between each step a VERY thorough cleaning is called for to remove traces of the previous product. You don't want your polishing, for instance, to pick up the coarse abrasive left over from compounding. Failure to do this could negatively impact your end result, and who wants to have a crappy end result from hours of work?
You would start with a compounding (or "cutting") agent on an appropriate medium, such as a cutting pad on a rotary or dual-action polisher (by hand is possible, too, but on a motor home you'd be insane or very fit to pursue this method due to time and exhaustion). This is the most aggressive thing you can start with short of sandpaper (I'll come back to this tantalizing statement in a bit). Care should be taken when using powered polishers not to "burn" the paint, especially around edges and definition lines (some people call these "creases", such as the line along the top of your fenders or the hood creases). It's very, very easy to grind right through your paint on the high points of your surface. The only remedy for that is new paint.
After compounding (and cleaning!), you would progress to a polishing agent. This is, in effect, simply a finer abrasive. You will also USE A DIFFERENT POLISHING PAD. This pad will be of a different material and crucially will not have remnants of another/coarser compounding agent on it.
After you have completed these two steps (and washing the beans out of it again) you would finally apply a surface protectant such as carnuba wax or your product of choice.
I'm only going to mention this last bit in the interest of being thorough. On occasion I've gotten to address severely degraded paint. In those cases I started not with compound but with extremely fine wet sandpaper (like 2000 grit or 10-micron). If you do not have experience using these products I strongly recommend that you do not get your initial start on something you care about, such as the surface of your expensive motor home. After using this sandpaper for the initial "cut" I then proceeded to use the compound, polish, wax method described above.
Also, I would be remiss not to mention what will happen to your buffing and polishing pads as you use them. They do something called "loading up". This means they get all gunked up with the abrasive and fine particles of the painted surface. You will periodically (usually every few minutes) need to "spur" the surface to dislodge this material from the pad and restore the desired cutting/polishing properties. Sort of scraping the gunk off, if you will. There are specific products made that literally look like handheld horse spurs you can use to dislodge this gunked-up material.
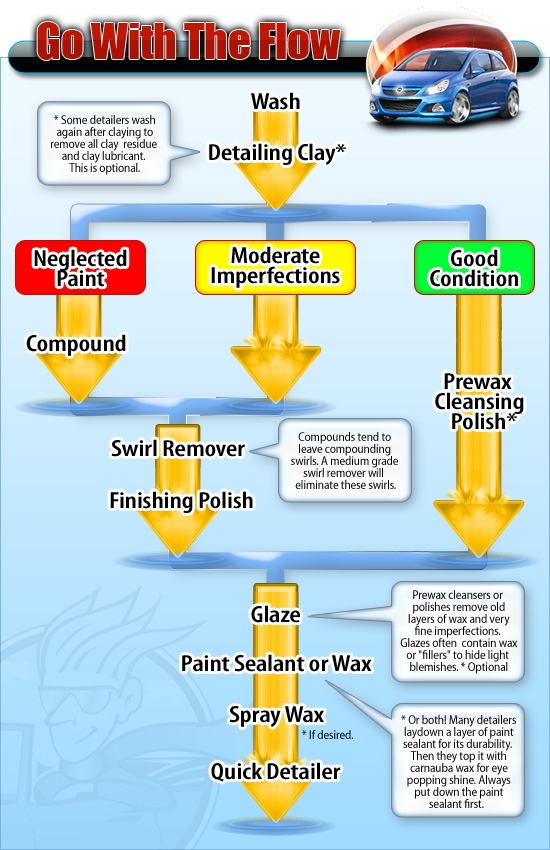
Some previous posts in this thread have referenced the website for AutoGeek. That site contains a great diagram generally describing what I have written above to aid you in visualizing the steps. That diagram is here:
Best of luck, and share before/after photos!


 Linear Mode


