 |
|
 05-25-2021, 04:02 PM
|
#1
|
|
Senior Member
Join Date: Mar 2012
Posts: 472
|
Water damaged cargo pass through doors
This is ON a 5th wheel, but it's not a 5th-wheel-specific problem, so I'm not sure where to put it... If there's a more appropriate section, please move it as needed.
10-year-old Keystone Cougar 246TL. It has 2 large doors on a passthrough - the doors are around 20" x 60" (I'm not at home so I haven't measured exactly). The wooden inserts on both doors have significant damage from water.
The doors are round corner, top hinge doors in a metal frame. It appears that when Forest River BUILT this trailer they didn't do any weather sealing around the wooden door inserts, apparently NO caulking of any kind to keep water out. Over time water got into the frame around the door insert and rotted the bottoms of both doors.
Happy post-Covid surprise!
In theory, I can BUY replacements, but they're hellishly expensive and there's no guarantee they'll fit perfectly. And, of course, they'll be white, not matching the gray/tan/off-white the trailer is.
If I'm going to get white doors/inserts, I can't see any good reason not to try replacing them myself. I can see how they come apart.
I recently built a generator box from white composite and that seems like a great material for this. It can't be any heavier than the wood, and it's not going to be bothered by water.
Is there any reason I CANNOT replace this inserts?
If I CAN, can someone tell me how you make the oval shaped holes for the knobs and lock? I presume I can just drill a circular hole and find some rotary "something" to enable me to extend the circle up and down... But is there some specific "right" way to do it?
__________________
2011 Cougar High Country 246RL towed by a 2016 Ford F-350 Crew Cab.
|

|

|
 |
Join the #1 RV Forum Today - It's Totally Free!
iRV2.com RV Community - Are you about to start a new improvement on your RV or need some help with some maintenance? Do you need advice on what products to buy? Or maybe you can give others some advice? No matter where you fit in you'll find that iRV2 is a great community to join. Best of all it's totally FREE!
You are currently viewing our boards as a guest so you have limited access to our community. Please take the time to register and you will gain a lot of great new features including; the ability to participate in discussions, network with other RV owners, see fewer ads, upload photographs, create an RV blog, send private messages and so much, much more!
|
|
05-25-2021, 05:44 PM
|
#2
|
|
Senior Member
Join Date: Oct 2017
Location: Boston,ma
Posts: 908
|
Just a suggestion. Check with the local tech high school carpentry shop & see if they can help you. Only problem is that it is getting late in the school year.
|
|
|
|
|
05-26-2021, 05:42 AM
|
#3
|
|
Senior Member
Join Date: May 2005
Location: Carlos, Texas
Posts: 1,746
|
Check with the local tech high school carpentry shop
I work at a school district. They won't do this anymore. Our automotive shop has people all the time wanting them to fix their cars for free. Most school districts are going away from having these kinds of shops anyway.
There is no reason you can't try. Main thing I would be concerned about is, is the cover panel glued to the existing plywood. If it is, use some kind of solvent to remove it and take your time. Also be careful not to distort the frame around it. Otherwise, go for it.
|
|
|
|
|
05-26-2021, 06:09 AM
|
#4
|
|
Senior Member
Join Date: Mar 2017
Location: Waretown
Posts: 453
|
. It appears that when Forest River BUILT this trailer
Just a clarification: Keystone is owned by Thor.
__________________
Bill 3rd
2016 Sunseeker 3010DS
2017 Ford Fiesta toad
|
|
|
|
|
05-26-2021, 08:50 AM
|
#5
|
|
Senior Member
Join Date: Mar 2012
Posts: 472
|
I'm not sure what I'd need a high school (or any other) carpentry shop for... They're just a couple panels. Getting them apart is pretty simple looking (again, I'm currently traveling so I haven't pulled either door off). Making new panels also looks pretty reasonable.
I'll have to see if I can separate the cover from what's underneath. I hadn't considered that - I figured I'd have to go with white. But, if I can use MEK or acetone to get the cover off, that'd be fine.
My only real question is how to make the oblong holes for the knobs and lock, but again, it can't be that hard... If I HAVE to, I can make a template, clamp it on and use a plunge router to do the holes.
As for who owns Keystone, Thor may own them today, but my trailer documentation from when it was bought says Forest River.
__________________
2011 Cougar High Country 246RL towed by a 2016 Ford F-350 Crew Cab.
|
|
|
|
|
05-26-2021, 08:55 AM
|
#6
|
|
Senior Member
Join Date: May 2005
Location: Carlos, Texas
Posts: 1,746
|
Once you drill a hole, you can easily enlarge it with a sabre saw. Maybe consider..if..water gets into the rebuilt doors, adding a way for it to get out. Maybe a small hole drilled in the bottom of the frame somewhere...if possible.
|
|
|
|
|
05-26-2021, 12:05 PM
|
#7
|
|
Senior Member
Join Date: May 2004
Location: MI
Posts: 2,198
|
To make a slot drill 2 holes and cut between them with a saber saw.
|
|
|
|
|
05-27-2021, 07:16 AM
|
#8
|
|
Senior Member
Join Date: Mar 2012
Posts: 472
|
I'll have to look when I pull the doors off, but I suspect the holes where the knobs go aren't long enough to make two overlapping holes - Not sure. I'll know when I start messing with it.
As for drainage - there are a series of holes in the bottom of the door frame, so the water SHOULD be able to drain out. I suspect it doesn't all drain out, and some gets absorbed into the wood and eventually it delaminates and rots.
I"ll know more when I get home next week and pull the worst door off.
__________________
2011 Cougar High Country 246RL towed by a 2016 Ford F-350 Crew Cab.
|
|
|
|
|
05-28-2021, 08:15 AM
|
#9
|
|
Senior Member
Join Date: May 2017
Location: Metamora, MI
Posts: 5,525
|
Would be good to post a pic of the situation. Hard to provide assistance without understanding what you have to tackle.
__________________
2002 Newmar Mountain Aire Limited 4370 w/ Spartan K2 and Cummins 500hp
ASE Master Certified (a long.....time ago...)
|
|
|
|
|
05-29-2021, 07:05 AM
|
#10
|
|
Senior Member
Join Date: Mar 2012
Posts: 472
|
Once I get the first door off next week I'll post a shot. I can already tell the whole bottom of the door insert is rotted away. The knobs and lock are sort-of, barely hanging on - there's not much left for them to go into.
I took a quick look yesterday, and the doors have a metal frame that pivots from the top, and sit in an outer frame on the trail. If I remove one screw I THINK I can slide the door assembly off the frame in the trailer.....
I'll know more when I get home, but if I'm right, it SHOULD be reasonably straightforward if I can get the plastic or gel or whatever piece off the rotted backing. Being a person of little patience, I'd pull the thing apart down here, but if I screw something up I've got a 2+ hour drive home with the trailer and a HUGE hole in the side!
So, for once I'm trying to be smart and NOT do anything stupid!
__________________
2011 Cougar High Country 246RL towed by a 2016 Ford F-350 Crew Cab.
|
|
|
|
|
05-29-2021, 10:58 AM
|
#11
|
|
Member
Join Date: Mar 2021
Location: Idaho
Posts: 70
|
I generally cut non-round holes in laminate, plywood, MDF, etc. with a roto-zip type tool. You can either freehand following a drawn-on line (steady hands and good grip required), or make a template first that you can clamp on and follow with the non-cutting shank of the bit.
Sounds like a fun project. Looking forward to pics.
__________________
____________________________
2020 Ram 3500 SRW w/HO Cummins 6.7 and Aisan Trans
2021 KZ Durango D301RLT 5th Wheel
|
|
|
|
|
06-01-2021, 09:14 PM
|
#12
|
|
Senior Member
Join Date: Mar 2012
Posts: 472
|
I hadn't thought about the Roto-zip... That seems like a pretty easy way.
FIRST question: Can SOMEBODY tell me how to shove images into these things WITHOUT having go through the PITA of shoving them onto the website then having to put in a URL? Most everywhere else I can push images directly up from a folder on the computer.
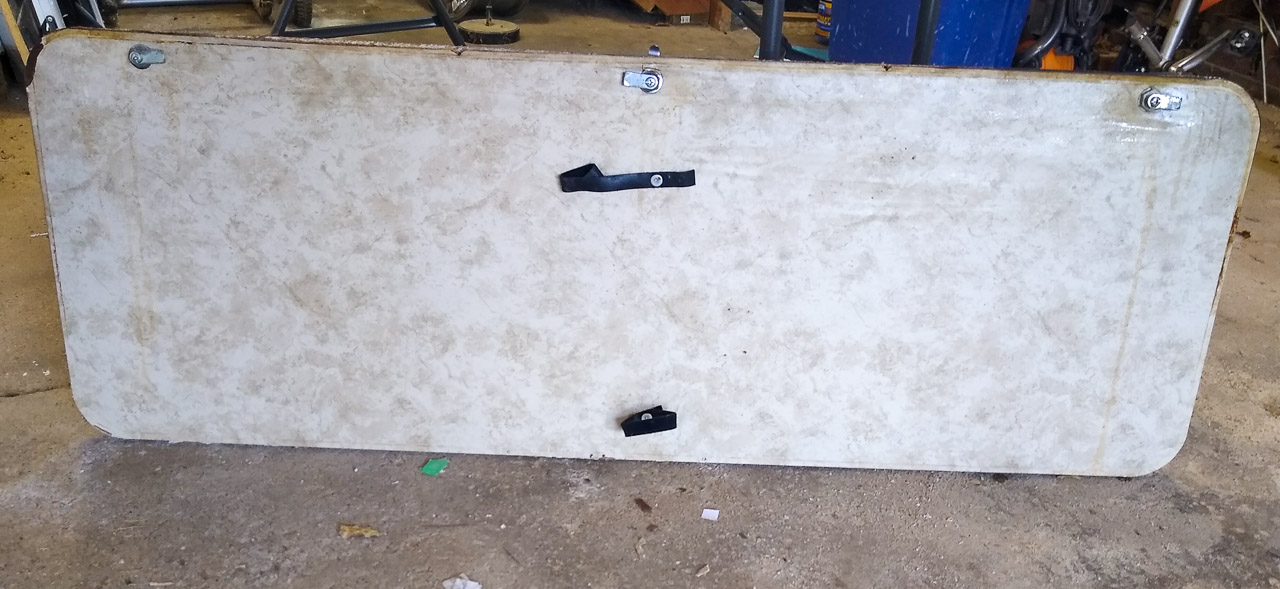
Back home today. Pulled the door off. The way these are on, there's a metal frame screwed into the trailer. At the top there's a channel that matches up with a channel on top of the moving part of the door. Take one screw out of the end of the channel, open the door, slide it out.
I forgot to measure exactly, but the door is about 20" x 60". There's one on each side, and they're both bad.
I took pictures of what it looks like - I do NOT use a cell phone to photograph things, and it shows! But hopefully they're good enough to see what I've got...
The door panel has a metal frame around it that's split at the top. It's in with a couple pop rivets (4 total). Drill 'em out, pull the frame loose and separate things enough to get the insert out. Also easy.
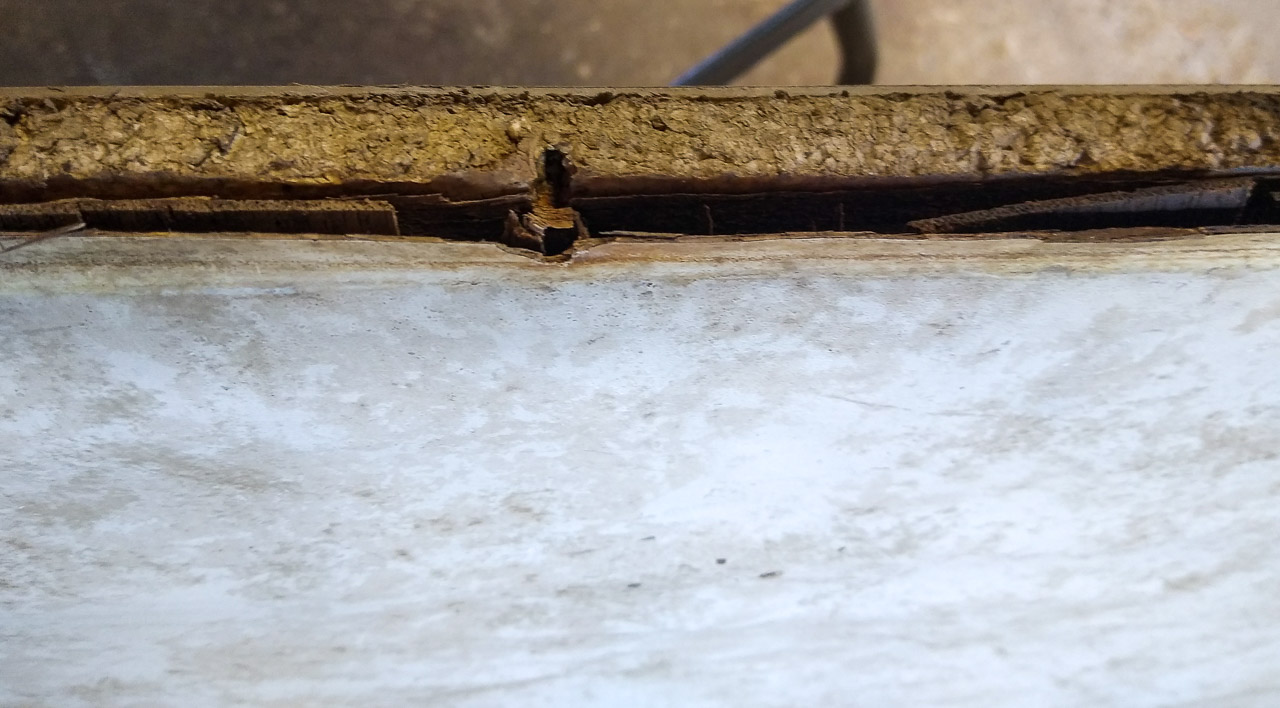
Here's the insert from the bottom, inside. There is basically nothing left holding the knobs and lock solidly.
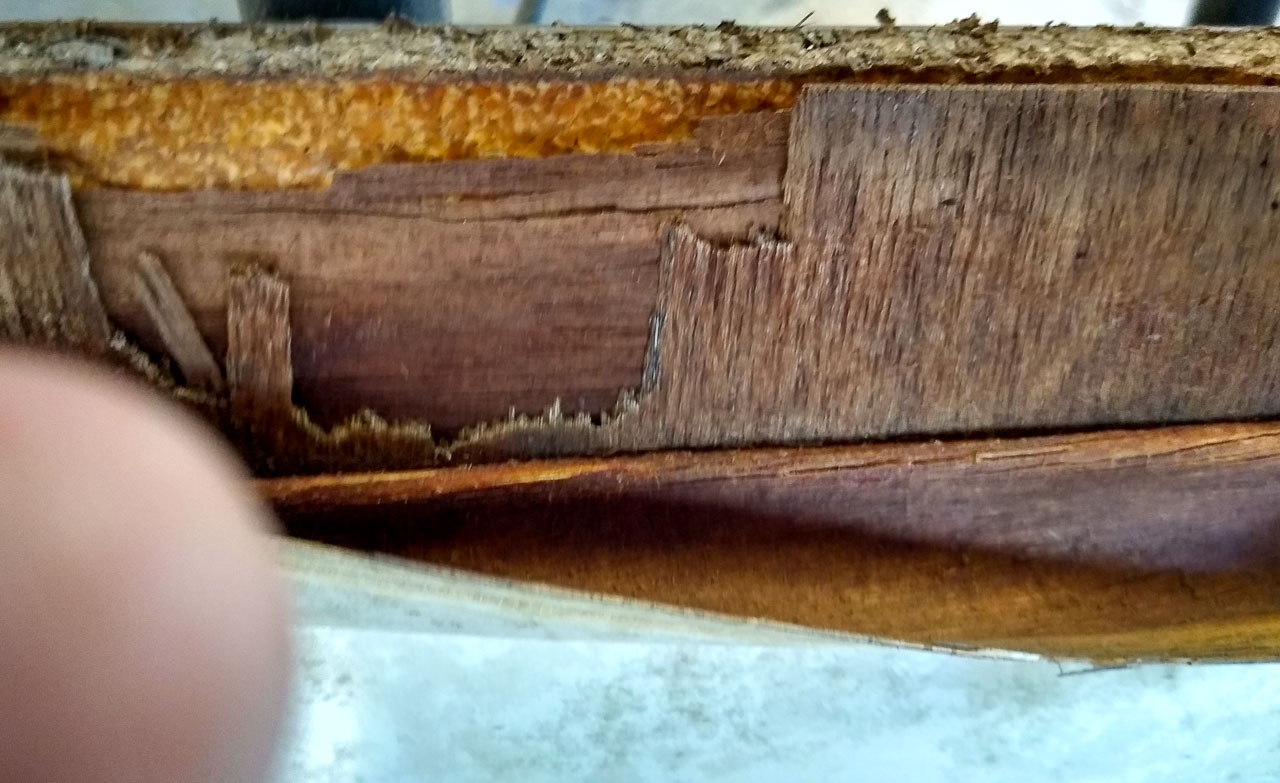
Here's the bottom edge and you can see the extremely THIN piece of plywood is completely rotted. The dingy brown crud in the middle is some kind of styrofoam panel - made of tiny beads of styrofoam. The plywood disintegrates if you mess with it.
Another shot of the bottom of the panel from the back side. Whatever this covering is, is loose about halfway up the panel. I'll need to know what solvent will work to get this stuff that LOOKS like vinyl wallpaper loose from what's left of the plywood.
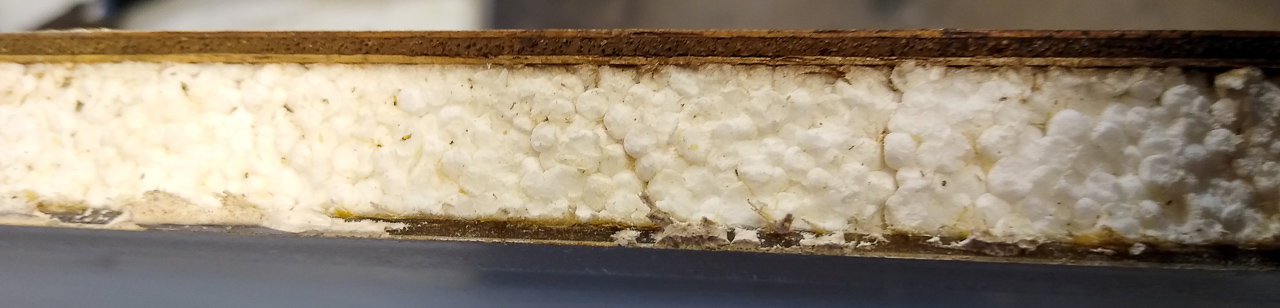
On this last image you can see the TOP of the insert. The outer is something plastic-y - I"m not sure what. Maybe very thin laminate? Gel-coat of some sort? Whatever it is, it's very thin but it still appears to be intact if I can get it loose from what's behind it. Behind that is a bunch of styrofoam - or some kind of panel made with tiny styrofoam beads. So, WHAT solvent will get this laminate or gel-coat or whatever loose from the styrofoam garbage without messing up the outer coating or mess up the decal that extends down onto the door?
__________________
2011 Cougar High Country 246RL towed by a 2016 Ford F-350 Crew Cab.
|
|
|
|
|
06-01-2021, 09:39 PM
|
#13
|
|
Senior Member
Join Date: Mar 2021
Posts: 461
|
Just thinking out loud.
Had wall repair/damage with a structure like what you have got. DH used a multitool/blade to seperate the layers until back to fiberglass. You could fine tune any holes with a dremel tool with a sanding disk. The multi tool was purchased at Harbor Freight. Best of luck with your repairs. You can do this!!
|
|
|
|
|
06-02-2021, 05:45 AM
|
#14
|
|
Community Administrator


Tiffin Owners Club
Join Date: Sep 2013
Location: DFW, Texas
Posts: 21,570
|
Quote:
Originally Posted by dkperez

FIRST question: Can SOMEBODY tell me how to shove images into these things WITHOUT having go through the PITA of shoving them onto the website then having to put in a URL? Most everywhere else I can push images directly up from a folder on the computer.
|
Here are some instructions on how to add photos to a post. Hope this helps.
https://www.irv2.com/forums/f62/foru...tml#post477709
__________________
 2017 Phaeton 40IH XSH Maroon Coral - Power Glide Chassis with IFS 2017 Phaeton 40IH XSH Maroon Coral - Power Glide Chassis with IFS
Previous '15 Tiffin Allegro RED 38QRA and '06 Itasca Sunrise 35A
'16 Jeep JKU Wrangler Sahara or '08 Honda Goldwing
|
|
|
|
|
|
|
Currently Active Users Viewing This Thread: 1 (0 members and 1 guests)
|
|
|
 Posting Rules
|
You may not post new threads
You may not post replies
You may not post attachments
You may not edit your posts
HTML code is Off
|
|
|
|
 » Recent Discussions
 |
|
|
|
|
|
|
|
|
|
|
|
|
|
|
|
|
|
|
|
|
|
|
|
|
|


 Linear Mode

