 |
|
 03-29-2015, 12:30 PM
|
#1
|
|
Member
Join Date: Jan 2015
Posts: 78
|
Relocate Opening Blackwater Tank
Hey all!
I want to relocate my toilet. Has anyone have experience with opening a new hole in a blackwater tank. I figure I can just plug the old port with a screw in plug, but have no idea after cutting the hole for the new location how to connect the plumbing. I assume these tanks do not come precut, so that each factory would cut there own openings. So, there must be hardware out there to facilitate this.
|

|

|
 |
Join the #1 RV Forum Today - It's Totally Free!
iRV2.com RV Community - Are you about to start a new improvement on your RV or need some help with some maintenance? Do you need advice on what products to buy? Or maybe you can give others some advice? No matter where you fit in you'll find that iRV2 is a great community to join. Best of all it's totally FREE!
You are currently viewing our boards as a guest so you have limited access to our community. Please take the time to register and you will gain a lot of great new features including; the ability to participate in discussions, network with other RV owners, see fewer ads, upload photographs, create an RV blog, send private messages and so much, much more!
|
|
03-29-2015, 03:00 PM
|
#2
|
|
Registered User
Join Date: Mar 2010
Posts: 8,777
|
Quote:
Originally Posted by searchinferu

Hey all!
I want to relocate my toilet. Has anyone have experience with opening a new hole in a blackwater tank. I figure I can just plug the old port with a screw in plug, but have no idea after cutting the hole for the new location how to connect the plumbing. I assume these tanks do not come precut, so that each factory would cut there own openings. So, there must be hardware out there to facilitate this.
|
searchinferu
Use one of these: Ameri-Kart 3" FPT Holding Tank Inlet Fitting - Holding Tank Fittings - Black Water Tanks - Plumbing
Mel
'96 Safari
|
|
|
|
|
03-29-2015, 06:50 PM
|
#3
|
|
Senior Member
Gulf Streamers Club
Join Date: Oct 2012
Location: Pacific Coast, Washington State
Posts: 469
|
As long as you plan for a straight drop from the new toilet into the tank, it shouldn't be complicated. Plan to extend the down pipe in an inch or so, and leaks become less problematic.
|
|
|
|
|
03-31-2015, 05:14 PM
|
#4
|
|
Member
Join Date: Jan 2015
Posts: 78
|
Thanks Mel & Badger,
I suppose I should say I am only familiar with household plumbing. Cruising through the supplier's pages thanks to the link you sent was a bit of an education. Certainly, most of the parts were for repairing actual toilets, but it leaves me wondering if I have a clear idea of what's between the holding tank and the toilet.
So, as I assume it to be: the toilet is fastened to a flange by two or three bolts similar to a household toilet. This flange screws into a threaded adapter, nominally three inch. From there it gets fuzzy, but it would appear that the threaded adapter is followed by a reducer to get the pipe down to 11/2 inch pipe. Then things grow really dim, as it appears that this pipe may join the tank via only a rubber grommet. "Hence the caution to make sure the pipe sticks a bit below the level of the tank, I reckon. Or, the tank may have some type of device bolted or bonded over its intake hole. How this device secures with the 11/2 inch pipe I haven't a clue!
So, how am I doing sofar? Haven't found any youtube videos, which I find odd. Perhaps it's considered a 'black art'. Ha Ha!
So keep those cards and letters coming in, as this boy needs an edumacation. Also need to know if the offset 'distance between the whole in the floor and the wall is the same for all RV toilets. If not, I then need to consider that when I shop for a new toilet. Speaking of which, by the number of spare 'widgets' and 'gadgets' for toilets, I assume I have a lot to learn there too
|
|
|
|
|
04-01-2015, 06:49 AM
|
#5
|
|
Registered User
Join Date: Mar 2010
Posts: 8,777
|
Quote:
Originally Posted by searchinferu
Thanks Mel & Badger,
I suppose I should say I am only familiar with household plumbing. Cruising through the supplier's pages thanks to the link you sent was a bit of an education. Certainly, most of the parts were for repairing actual toilets, but it leaves me wondering if I have a clear idea of what's between the holding tank and the toilet.
So, as I assume it to be: the toilet is fastened to a flange by two or three bolts similar to a household toilet. This flange screws into a threaded adapter, nominally three inch. From there it gets fuzzy, but it would appear that the threaded adapter is followed by a reducer to get the pipe down to 11/2 inch pipe. Then things grow really dim, as it appears that this pipe may join the tank via only a rubber grommet. "Hence the caution to make sure the pipe sticks a bit below the level of the tank, I reckon. Or, the tank may have some type of device bolted or bonded over its intake hole. How this device secures with the 1 1/2 inch pipe I haven't a clue!
So, how am I doing sofar? Haven't found any youtube videos, which I find odd. Perhaps it's considered a 'black art'. Ha Ha!
So keep those cards and letters coming in, as this boy needs an edumacation. Also need to know if the offset 'distance between the whole in the floor and the wall is the same for all RV toilets. If not, I then need to consider that when I shop for a new toilet. Speaking of which, by the number of spare 'widgets' and 'gadgets' for toilets, I assume I have a lot to learn there too
|
searchinferu
To relocate a RV toilet you need to:
1.) Cut a hole in the top of the black tank....
2.) Glue a 3" FPT Flush Holding Tank Fitting to the tank....
 3.) Install a toilet flange to and above that new fitting.
4.) Mount the toilet to the flange.

BTW, NO 1 1/2 inch pipe is used when plumbing most RV toilets.
Mel
'96 Safari
|
|
|
|
|
04-01-2015, 06:55 AM
|
#6
|
|
Senior Member
Gulf Streamers Club
Join Date: Oct 2012
Location: Pacific Coast, Washington State
Posts: 469
|
No reducer! No 1 1/2" pipe! You are asking for immediate problems expecting solid waste to exit your universe via such a small opening. 1 1/2" is for gray water.
Have you inspected your current toilet? Chances are its a straight shot right down into the tank. Remember, you are using a very limited amount of water to flush. Even your home sewage set-up uses 3 or 4 inch pipe to get the stuff out to the sewer or septic tank.
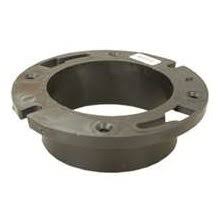
Something like this is what is glued/solvent-welded to the top of the tank, and the ABS down Pipe from the toilet goes in it. Some are threaded. A new flange on the floor where the toilet goes and a 3" piece of pipe between the 2 is all that's required.
If you want to put your new toilet somewhere way from the black tank, realize that you have only 1 or 2 inches of slope at best to play with as you plan your pipe runs. You might be better off going to a new side-opening in the black tank, unless that's already what you have. In which case, just cut the old pipe going in the side and use a connector to attach the new run.
As far as I know, all RV toilets have the same footprint; some are shorter (they go on an elevated "step" in the bathroom) or taller, but I believe set-back is the same on all.
|
|
|
|
|
04-02-2015, 08:56 PM
|
#7
|
|
Member
Join Date: Jan 2015
Posts: 78
|
I hate this forum format. I signed on before I wrote the following post, but when I hit send, it goes back to the signin page. I sign back in, but of course, the original post is gone!
|
|
|
|
|
04-02-2015, 09:06 PM
|
#8
|
|
Member
Join Date: Jan 2015
Posts: 78
|
Thanks for all the help here folks, I feel like we're really getting somewhere.
Writing the supplier, he told me that most manufacturers just use a tailpipe run through a rubber grommet installed in a whole on top of the holding tank. This would allow for some movement of the tank during transit. However, I otherwise would see how the threaded approach would be superior.
Can I bond an ABS fitting to a poly tank? I'm told that the holding tank may be constructed of either ABS or poly and won't know until I get further into this project what I have. Would you recommend thickening the glue with ABS shavings? I think this might work better if the joint between the tank and fitting are uneven.
If I can remove the original toilet flange in one piece, can I reuse it? I plan on using a new, higher profile toilet, so perhaps it might take a different flange?
Lastly, if I keep asking a bunch of stupid questions, will you folks keep giving me intelligent answers? Hello? Hello? Is anybody out there? Hello?......
|
|
|
|
|
04-03-2015, 07:07 AM
|
#9
|
|
Senior Member
Gulf Streamers Club
Join Date: Oct 2012
Location: Pacific Coast, Washington State
Posts: 469
|
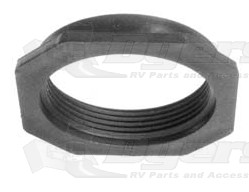
Use this if your tank is poly.
If the floor flange is ok, no reason to not reuse it, I guess. I wouldn't but that's just me.
Any RV Toilet will fit either the new or the old one; they are all interchangeble.
Going with the rubber gasket approach should be fine and might be the better idea. We managed to crack our fresh-water tank (fortunately up high and in an accessible place) after an hour spent on the world' s roughest piece of road in South Texas. (Four miles long- one hour- no room to turn around. Many things moved around and broke during that hour in spite of our creeping speed).
I'm sure you've already thought of this, but when you remove the old toilet, make sure there is enough old pipe left sticking up from the tank to glue a cap on it.
|
|
|
|
|
04-03-2015, 07:14 AM
|
#10
|
|
Senior Member
Gulf Streamers Club
Join Date: Oct 2012
Location: Pacific Coast, Washington State
Posts: 469
|
And an aside: I would make sure the black tank is extra, extra clean before starting to work on it. There exists the chance you will drop something in it while working (a socket, the circle of cut-out ABS, your glasses) and reaching down and retrieving will be much more pleasant if you're scrupulous about cleaning beforehand.
|
|
|
|
|
04-03-2015, 07:20 AM
|
#11
|
|
Member
Join Date: Jan 2015
Posts: 78
|
Thanks Badger,
I will probably remove the old toilet first along with its toilet flange. If it has a piece of pipe attached, I woulds assume I will find a grommet type seal at the top of the tank. Since it is a factory setup, the tank may very well be right up against the floor and their will be a threaded adapter attached to the tank similar to the one in the photos. If so, I'm hoping I can find a threaded cap to just screw over it to terminate that location.
|
|
|
|
|
04-03-2015, 08:37 AM
|
#12
|
|
Senior Member
Join Date: Feb 2010
Posts: 4,654
|
You are on right track.
First flush twice then use pool shock to sanitize that thing just because...
Next tear down to see how it is built and confirm how you will cap exisiting and make new.
Then make sure path in new location good.
If tile floor locate a replacement tile or 2 so you can have an oopps...
Get a bore camera from harbor freight so you can insure path is clear via side or small hole.
Use hole saw to create the hole.
Wrap the outside with many turns of masking tape to form a lip to prevent the hole saw from cutting too far if needed.
Use existing hole as guide and place lip just enough to go through the floor.
__________________
Tony & Lori
1989 Country Coach Savannah SE
|
|
|
|
|
04-07-2015, 07:06 PM
|
#13
|
|
Member
Join Date: Jan 2015
Posts: 78
|
shorten the hole saw
Great idas TQ. Thanks. Order a toilet, so now I'm committed. Oh, by the way, you left off the part about a clothespin on the nose!
Quote:
Originally Posted by TQ60
You are on right track.
First flush twice then use pool shock to sanitize that thing just because...
Next tear down to see how it is built and confirm how you will cap exisiting and make new.
Then make sure path in new location good.
If tile floor locate a replacement tile or 2 so you can have an oopps...
Get a bore camera from harbor freight so you can insure path is clear via side or small hole.
Use hole saw to create the hole.
Wrap the outside with many turns of masking tape to form a lip to prevent the hole saw from cutting too far if needed.
Use existing hole as guide and place lip just enough to go through the floor.
|
|
|
|
|
|
04-07-2015, 08:16 PM
|
#14
|
|
Senior Member
Gulf Streamers Club
Join Date: Oct 2012
Location: Pacific Coast, Washington State
Posts: 469
|
Do you mind telling us where exactly you're relocating the new biffy to?
We've got a 32' Southwind and the only space I could put a new toilet would be in the clothes closet.
|
|
|
|
|
|
|
Currently Active Users Viewing This Thread: 1 (0 members and 1 guests)
|
|
|
 Posting Rules
|
You may not post new threads
You may not post replies
You may not post attachments
You may not edit your posts
HTML code is Off
|
|
|
|
 » Recent Discussions
 |
|
|
|
|
|
|
|
|
|
|
|
|
|
|
|
|
|
|
|
|
|
|
|
|
|


 Linear Mode

