Journey with Confidence RV GPS App RV Trip Planner RV LIFE Campground Reviews RV Maintenance Take a Speed Test Free 7 Day Trial ×
RV Trip Planning Discussions

Go Back   iRV2 Forums > iRV2.com COMMUNITY FORUMS > Vintage RV's
Click Here to Login
Register FilesVendors Registry Blogs FAQ Community Calendar Today's Posts Search Log in
Join iRV2 Today

Mission Statement: Supporting thoughtful exchange of knowledge, values and experience among RV enthusiasts.
Reply
  This discussion is proudly sponsored by:
Please support our sponsors and let them know you heard about their products on iRV2
 
Thread Tools Search this Thread Display Modes
 
Old 02-03-2008, 08:00 PM   #1
Senior Member
 
RedneckExpress's Avatar
 
Vintage RV Owners Club
Join Date: Jul 2006
Location: Sauvie Island, OR
Posts: 2,596
Project #3 - Fridge Cooling Fans

For a while I had asked about mounting fans to the cooling fins in an ammonia absorption fridge to help with air circulation. Thanks to a lot of people I got great advice on adding a "Draft Induction" system to my fridge in addition to my interior fans as well as a tip on relocating the thermostat wires to allow the fridge to run colder than it normally would have. The combination of all three helped my 32 year old G.E. Fridge quite a bit.

The interior fans helped to make it so that the fridge is now equally cold, stuff on the door stays cold as well as stuff in the back of the fridge.

The exterior fans helped move the hot air that would stagnate in the exhaust stack in the back of the fridge, which reduced its cooling capacity.

My fridge now stays icy cold even in direct sunlight on the camper and when the interior of the camper is 90+ degrees, the fridge stays down where it should be.

Now, onto the project, as always, click on any of the pictures for a larger view.
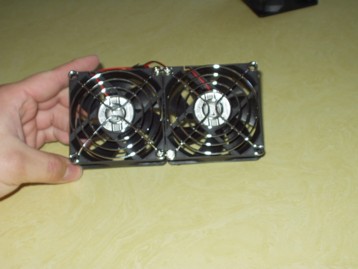


For my project, I decided I would need about 4 fans for the combination of the interior and exterior. So, I went to our local Fry's electronics here in oregon and picked up a 4 pack of 80mm x 80mm Case fans for $15.

These fans each move about 6 CFM of air, but only draw 0.16 amps of 12 volt power. The combination of all 4 running all the time consumes ~15AH's a day, if my math is remotely accurate (0.16 amps x 4 fans = 0.64 amps drawn x 24 hrs = 15.36 AH), so for my average 4 day camping trip that would burn around 60 AH's of battery, right now, I have 1 group 27 Battery that has show amazing vitality in that it ran my camper with 2 people and showering daily and cooking and doing dishes and lights for 4 days without being run down. I will be adding a second bank of batteries to the camper here in the near future to add additional capacity (2 Trojan SCS225 Batteries @ 130 AH each).

I also picked up a 2 pack of grates for the interior fans to keep food packages from getting stuck into the fan blades by accident. To simplify installation, I glued the two interior fans together and then attached the covers with the screws they came with in the center bolt holes. The outer holes will be used to secure the fans to the fridge fins.
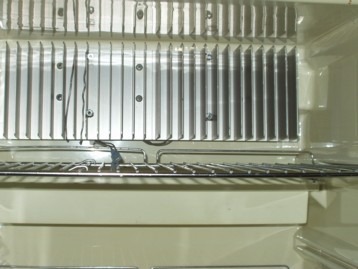


To secure the fans in place I super glued 4 nuts to the correct spots on the fins. I used a fairly small nut and screw combo so that I wasn't attaching a large chunk of metal to the thinest part of the fins. I routed the wire for the 12 volt supply through the existing access hole in the back where the thermostat wires came through. I used fully insulated blade connectors to connect the fan to the wiring, so that if I needed to remove the fans for cleaning, I could completely unattach them and take them out of the fridge.
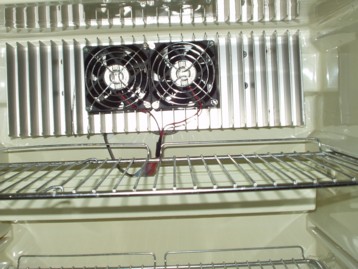


The fans are now in place, secured firmly by the four small nuts you saw in the previous picture. They're centered in the fins as the right side tends to get coldest first and also the milk spot on the shelf is just to the left of the left fan, so the positioning was perfect to prevent blockage of air flow.
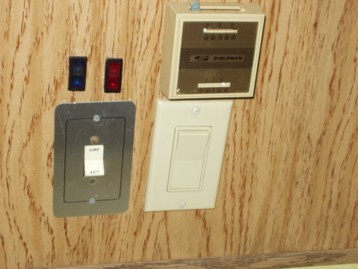


For the exterior and interior fans, I installed 2 LED illuminated toggle switches I picked up from Bi-Mart for $1.99 each, rated for 20amps. I chose two different colors for the different fan banks, blue interior (Cold Air Fans), red exterior (Hot Air Fans).
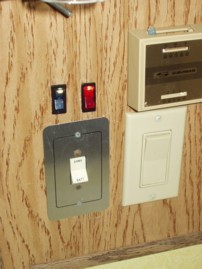


These switches are all in the right hand side of the fridge, so the wiring was short, as just below the fridge is the fuse block and I just tied into an existing 20 amp fuse.
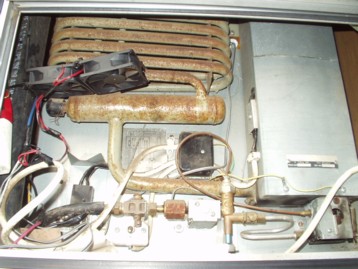


My exterior cooling fans WERE mounted between the door and the coils so they pull air in through the louvers and blow it up over the coils and through the top. Not the most perfect looking setup, but then it was a PITA to get those to balance in place while snugging the zip ties, however, after getting somewhat worried about the straps wearing on the coils, I relocated them to the door itself, so they lift up out of the way when you open the access door, and drop right back into the best spot when closed. They no longer are in direct contact with the coils, and seem to be doing a better job where they are now, than where I had them before. I just haven't gotten around to taking a newer photo.


All in All, the project probably cost about $23 to add a good system of air discharge both hot and cold. At some point, I may add a third fan to the interior block on the right, but for now the 2 in the center work great and I still have room to put taller containers around the fans without blocking any.

Come back Again for Project #4, Insulating the Cab-Over Floor
__________________
'92 Dodge W250 "Dually" Power Wagon
'74
KIT 1106 Kamper Slide-in Truck Camper
'06 Heartland Bighorn 3400RL Fifth wheel
Follow along with me in the The Journey of
RedneckExpress is offline   Reply With Quote
Join the #1 RV Forum Today - It's Totally Free!

iRV2.com RV Community - Are you about to start a new improvement on your RV or need some help with some maintenance? Do you need advice on what products to buy? Or maybe you can give others some advice? No matter where you fit in you'll find that iRV2 is a great community to join. Best of all it's totally FREE!

You are currently viewing our boards as a guest so you have limited access to our community. Please take the time to register and you will gain a lot of great new features including; the ability to participate in discussions, network with other RV owners, see fewer ads, upload photographs, create an RV blog, send private messages and so much, much more!

Old 02-03-2008, 08:00 PM   #2
Senior Member
 
RedneckExpress's Avatar
 
Vintage RV Owners Club
Join Date: Jul 2006
Location: Sauvie Island, OR
Posts: 2,596
Project #3 - Fridge Cooling Fans

For a while I had asked about mounting fans to the cooling fins in an ammonia absorption fridge to help with air circulation. Thanks to a lot of people I got great advice on adding a "Draft Induction" system to my fridge in addition to my interior fans as well as a tip on relocating the thermostat wires to allow the fridge to run colder than it normally would have. The combination of all three helped my 32 year old G.E. Fridge quite a bit.

The interior fans helped to make it so that the fridge is now equally cold, stuff on the door stays cold as well as stuff in the back of the fridge.

The exterior fans helped move the hot air that would stagnate in the exhaust stack in the back of the fridge, which reduced its cooling capacity.

My fridge now stays icy cold even in direct sunlight on the camper and when the interior of the camper is 90+ degrees, the fridge stays down where it should be.

Now, onto the project, as always, click on any of the pictures for a larger view.


For my project, I decided I would need about 4 fans for the combination of the interior and exterior. So, I went to our local Fry's electronics here in oregon and picked up a 4 pack of 80mm x 80mm Case fans for $15.

These fans each move about 6 CFM of air, but only draw 0.16 amps of 12 volt power. The combination of all 4 running all the time consumes ~15AH's a day, if my math is remotely accurate (0.16 amps x 4 fans = 0.64 amps drawn x 24 hrs = 15.36 AH), so for my average 4 day camping trip that would burn around 60 AH's of battery, right now, I have 1 group 27 Battery that has show amazing vitality in that it ran my camper with 2 people and showering daily and cooking and doing dishes and lights for 4 days without being run down. I will be adding a second bank of batteries to the camper here in the near future to add additional capacity (2 Trojan SCS225 Batteries @ 130 AH each).

I also picked up a 2 pack of grates for the interior fans to keep food packages from getting stuck into the fan blades by accident. To simplify installation, I glued the two interior fans together and then attached the covers with the screws they came with in the center bolt holes. The outer holes will be used to secure the fans to the fridge fins.


To secure the fans in place I super glued 4 nuts to the correct spots on the fins. I used a fairly small nut and screw combo so that I wasn't attaching a large chunk of metal to the thinest part of the fins. I routed the wire for the 12 volt supply through the existing access hole in the back where the thermostat wires came through. I used fully insulated blade connectors to connect the fan to the wiring, so that if I needed to remove the fans for cleaning, I could completely unattach them and take them out of the fridge.


The fans are now in place, secured firmly by the four small nuts you saw in the previous picture. They're centered in the fins as the right side tends to get coldest first and also the milk spot on the shelf is just to the left of the left fan, so the positioning was perfect to prevent blockage of air flow.


For the exterior and interior fans, I installed 2 LED illuminated toggle switches I picked up from Bi-Mart for $1.99 each, rated for 20amps. I chose two different colors for the different fan banks, blue interior (Cold Air Fans), red exterior (Hot Air Fans).


These switches are all in the right hand side of the fridge, so the wiring was short, as just below the fridge is the fuse block and I just tied into an existing 20 amp fuse.


My exterior cooling fans WERE mounted between the door and the coils so they pull air in through the louvers and blow it up over the coils and through the top. Not the most perfect looking setup, but then it was a PITA to get those to balance in place while snugging the zip ties, however, after getting somewhat worried about the straps wearing on the coils, I relocated them to the door itself, so they lift up out of the way when you open the access door, and drop right back into the best spot when closed. They no longer are in direct contact with the coils, and seem to be doing a better job where they are now, than where I had them before. I just haven't gotten around to taking a newer photo.


All in All, the project probably cost about $23 to add a good system of air discharge both hot and cold. At some point, I may add a third fan to the interior block on the right, but for now the 2 in the center work great and I still have room to put taller containers around the fans without blocking any.

Come back Again for Project #4, Insulating the Cab-Over Floor
__________________
'92 Dodge W250 "Dually" Power Wagon
'74
KIT 1106 Kamper Slide-in Truck Camper
'06 Heartland Bighorn 3400RL Fifth wheel
Follow along with me in the The Journey of
RedneckExpress is offline   Reply With Quote
Old 03-09-2008, 10:49 AM   #3
Junior Member
 
Join Date: Apr 2007
Posts: 6
What was the tip you got for relocating your thermostat wires?

I would like to know.......

KB
kevbern is offline   Reply With Quote
Old 03-09-2008, 03:19 PM   #4
Senior Member
 
RedneckExpress's Avatar
 
Vintage RV Owners Club
Join Date: Jul 2006
Location: Sauvie Island, OR
Posts: 2,596
I caught a thread on here somewhere about relocating the thermostat wires to a different position on Dometic fridges. G.E. units, like mine, are basically the grandparents of modern dometics, so the practice works for them. But basically, a really simple way to tell where they should be was to look at the fins when the unit was running, the area that ices up first, is the coldest end, and the end that ices up least is the warmest. So, I pulled the two wires, rebent them a bit and relocated them so that they were on the warmer side of the fridge.

She keeps everything good and cold now, albiet I have to turn her down in the winter as she runs the chance of freezing the milk on max otherwise.
__________________
'92 Dodge W250 "Dually" Power Wagon
'74
KIT 1106 Kamper Slide-in Truck Camper
'06 Heartland Bighorn 3400RL Fifth wheel
Follow along with me in the The Journey of
RedneckExpress is offline   Reply With Quote
Reply


Currently Active Users Viewing This Thread: 1 (0 members and 1 guests)
 

Posting Rules
You may not post new threads
You may not post replies
You may not post attachments
You may not edit your posts

BB code is On
Smilies are On
[IMG] code is On
HTML code is Off
Trackbacks are Off
Pingbacks are Off
Refbacks are Off


Similar Threads
Thread Thread Starter Forum Replies Last Post
Kit Kamper Projects - Project #9, Fridge Fans Revisited RedneckExpress Vintage RV's 1 06-04-2008 06:24 AM
Kit Camper Projects - Project #8, Yet More Storage RedneckExpress Vintage RV's 1 02-03-2008 08:21 PM
Kit Camper Projects - Project #6, Electrical Upgrades RedneckExpress Vintage RV's 1 02-03-2008 08:13 PM
Kit Camper Projects - Project #4, Insulating the Cabover RedneckExpress Vintage RV's 0 02-03-2008 08:02 PM
Kit Camper Projects - Project #1, Mo' Batteries RedneckExpress Vintage RV's 1 02-03-2008 07:57 PM

» Featured Campgrounds

Reviews provided by


All times are GMT -6. The time now is 10:47 AM.


Powered by vBulletin® Version 3.8.8 Beta 1
Copyright ©2000 - 2024, vBulletin Solutions, Inc.